Introduction
Theme Name: Ftage - Movie Production, Film studio, Creative & Entertainment WordPress Theme
Thank you very much for choosing our theme. We truly appreciate and really hope that you'll enjoy our theme!If you like this theme, Please support us by rating us 5 stars.
Movie Production, Film studio, Creative & Entertainment Wordpress Theme is mainly focused on filmmakers, film studios, film campaigns, film production companies and movie marketing. Ftage is extremely suitable for any creative agency/corporate/team/person/ video blogger/videographer to build their own Film/Movie website. Every pixel is hand-coded within HTML5 & CSS3 and therefore no coding knowledge required to build a site. Clean, elegant and modern design, you no longer have to depend on other sites to do marketing. With Ftage, promote yourself in a perfect way. 15 Homepages, Fully responsive, Awesome Custom Addons, Page Builder, Mailchimp, Contact Form 7, Powerful Theme Option, Page option.
- Elementor Club
- HelpDesk: Link
- Forums: Ftage Forums
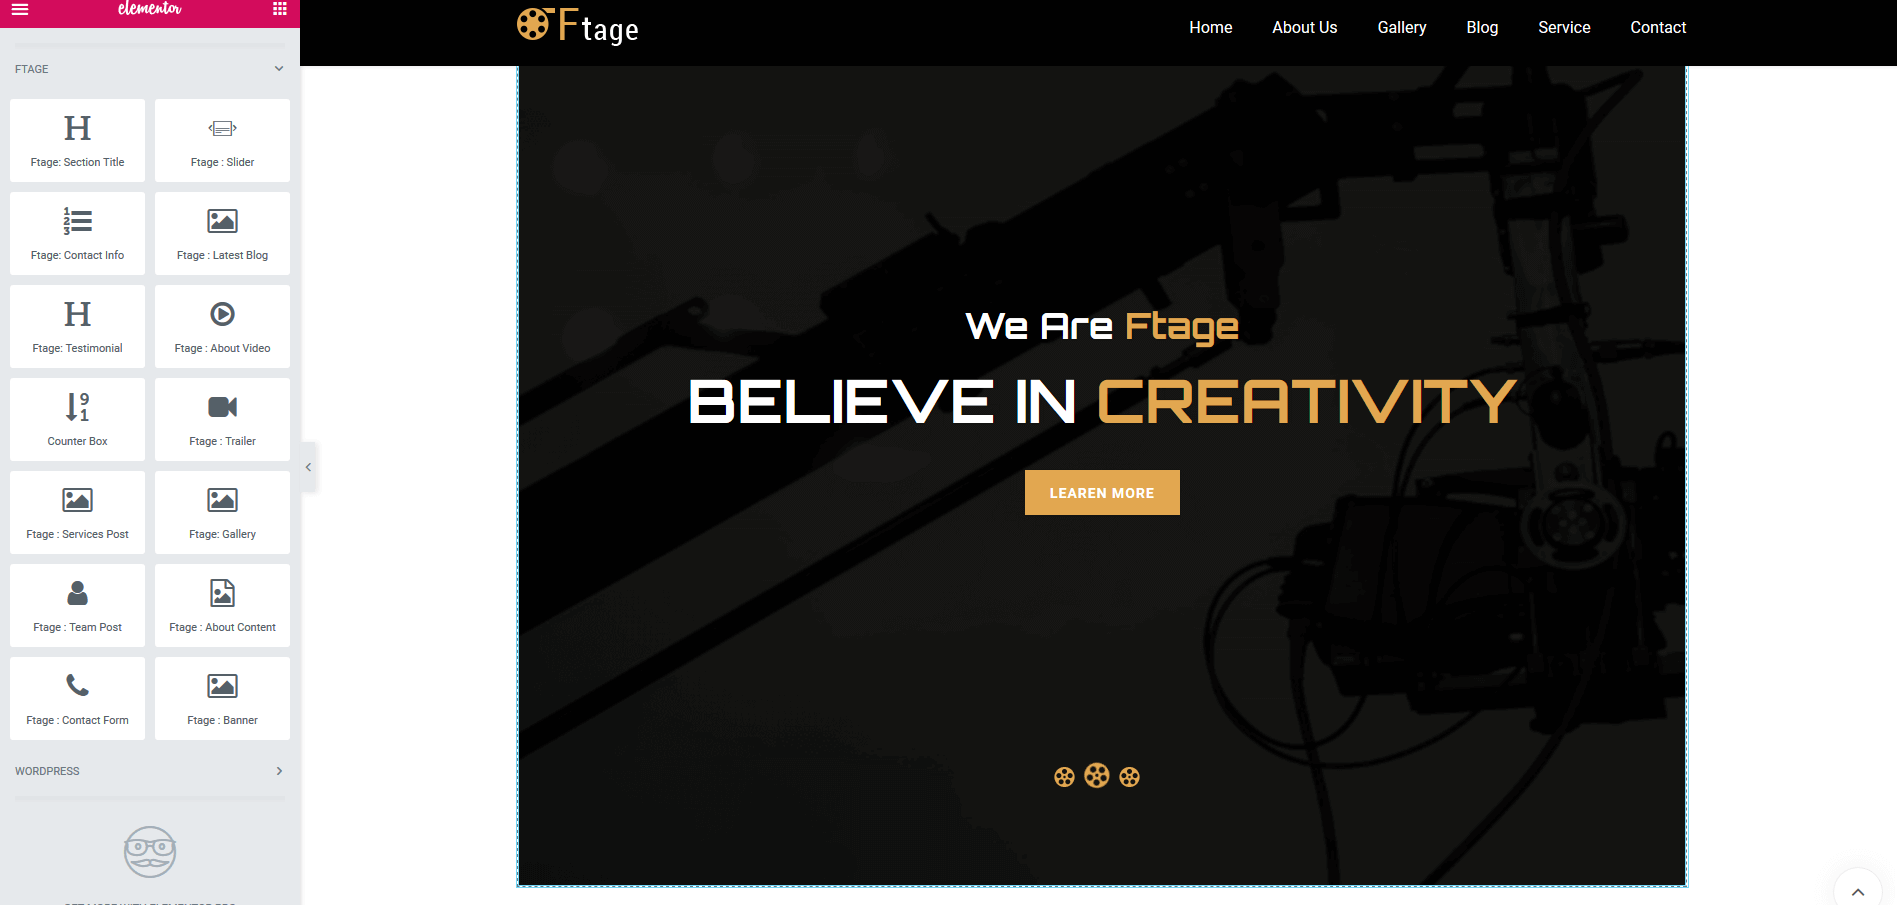
Theme features
- Neat, clean and simple design
- Valid HTML5, CSS3
- Creative and Modern Design
- Unlimited Footer Variation
- Shortcode Ready
- Built Based on Bootstrap v4.0x
- Fully Responsive
- 15 Home pages
- Cross Browser Optimization
- Color Variation
- Responsive Design
- FontAwesome Icons
- Easy To Customize
- WPML Support
- One click to import demo.
- Elementor Page Builder
- MailChimp For WordPress
- WP Film Studio
- Contact Form 7
Image Sources
- https://stocksnap.io
- https://stockphotos.io/
- http://free-photos.gatag.net/
- https://pixabay.com/
- google.com
Note: All images are just used for Preview Purpose Only. They are not part of the theme and NOT included in the final purchase files.
Need Support?
If you have any questions regarding to theme issues, please submit a ticket at LinkFiles Included
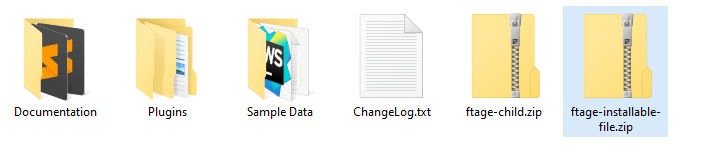
- Theme File -- (ftage-installable-file.zip)
- Child Theme -- (ftage-child.zip)
- Plugin -- (plugin)
- Demo Content -- (Sample Data)
- Documentation
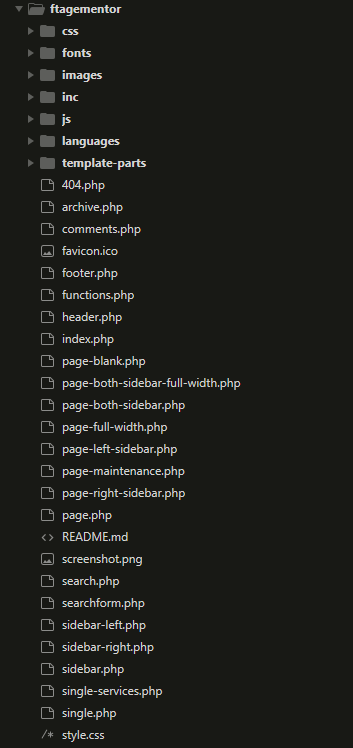
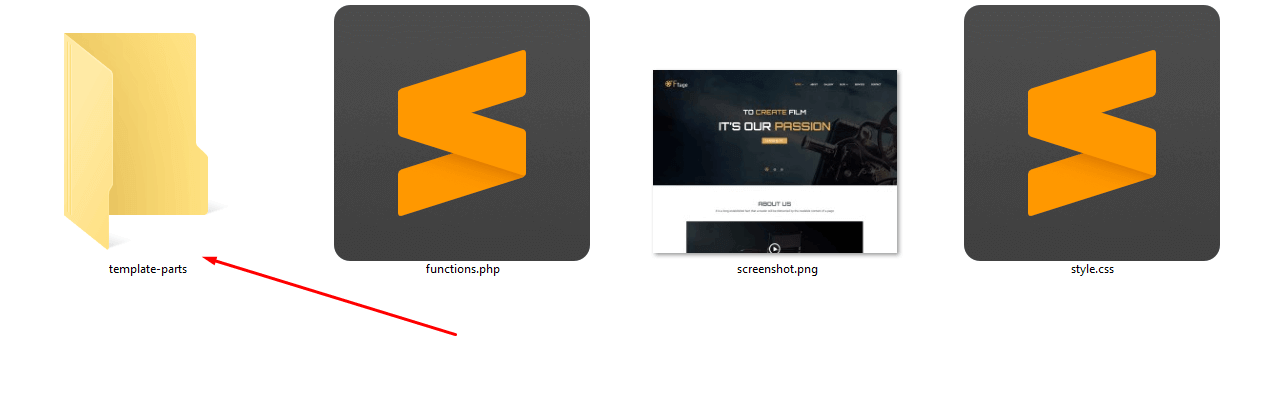
File Structure
- css,js,images,fonts -- (Assets)
- template-parts -- (blog content and layout)
- inc -- (All functionality)
- languages -- (ftagementor.pot) file
System Requirements
- WordPress 5.0 or Higher
- PHP version 7.2 or greater
- MySQL version 5.6 or greater OR MariaDB version 10.0 or greater
Recommended PHP Configuration Limits
Many issues that you may run into such as: white screen, demo content fails when importing, empty page content and other similar issues are all related to low PHP configuration limits. The solution is to increase the PHP limits. You can do this on your own, or contact your web host and ask them to increase those limits to a minimum as follows:
- max_input_vars = 3000
- memory_limit = 512M
- max_execution_time = 3000
- max_input_time = 300
- upload_max_filesize = 64M
- post_max_size = 64M
WordPress Installation
To use this theme you must have a working version of WordPress already installed. If you need help in installing wordPress follow the instruction here: https://codex.wordpress.org/Installing_WordPress
Required Plugins for this theme
In order to use this theme, please note, that following plugins SHOULD BE installed during the theme installation
- Contact Form 7
- Redux Framework
- CMB2
- Elementor
- Custom Icons for Elementor
- WP Film Studio
- MailChimp for WordPress
- One click demo import
Recommended Plugins for this theme
In addition, you can take an advantage of your theme experience with these following plugins:
- Elementor
- Redux Framework
- Custom meta box FOR CMB2
- Custom Icons for Elementor
- Theme core plugin (ftagementor-core.zip)
Theme Installation
Once you purchase the theme from themeforest, you'll be able to load 2 file type.- All Files and documentation
- Installable WordPress Theme File
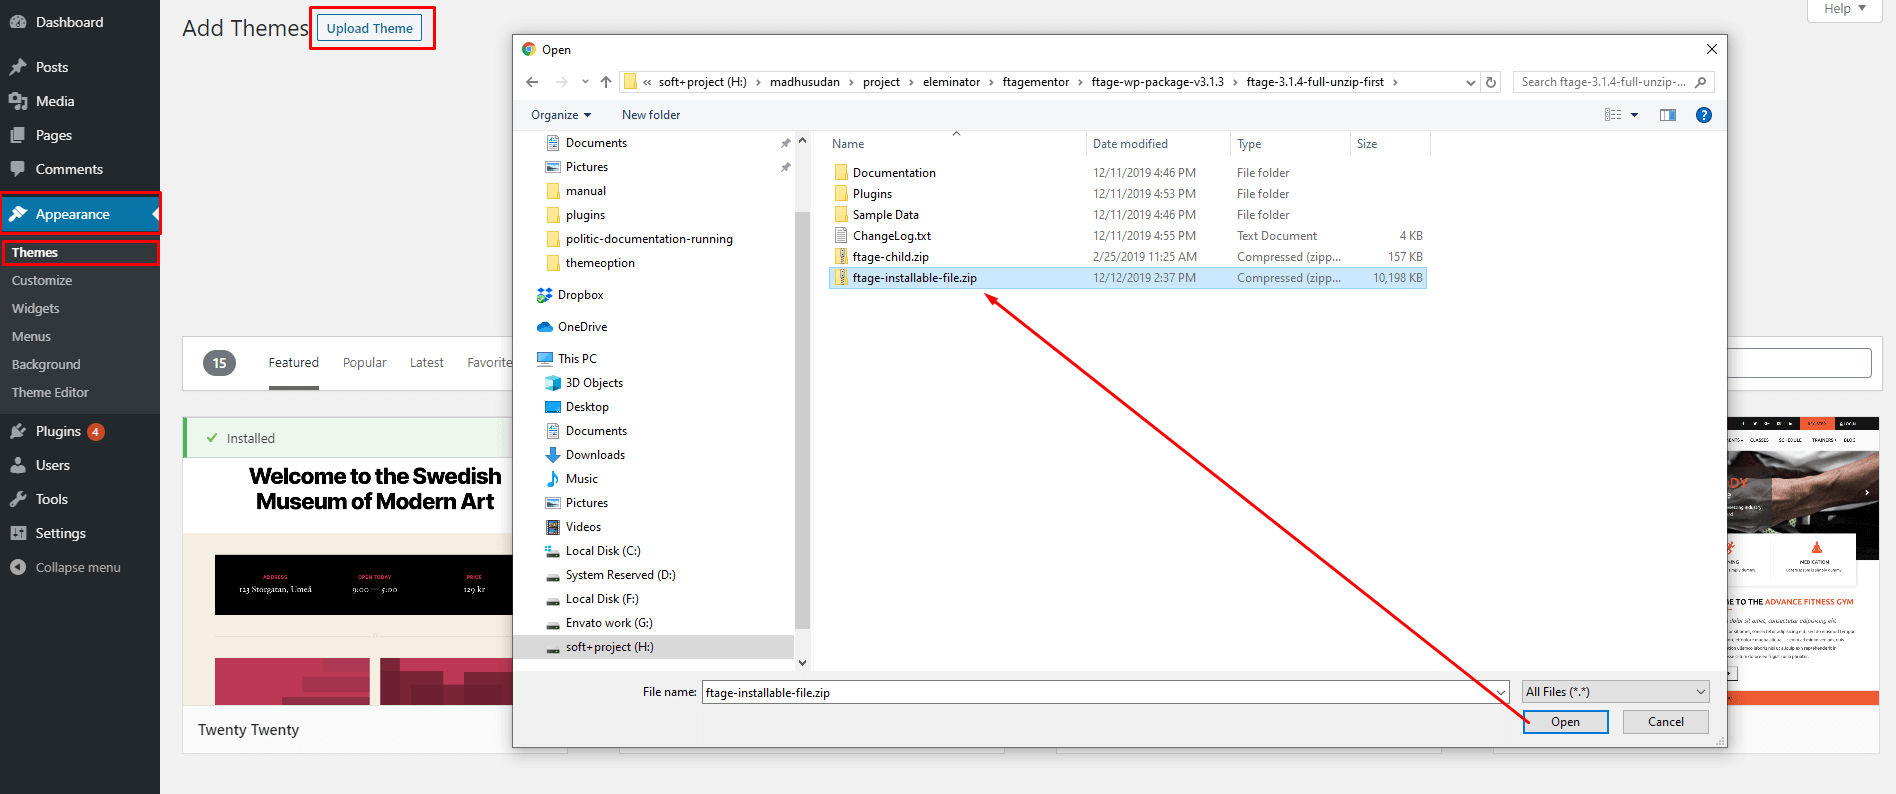
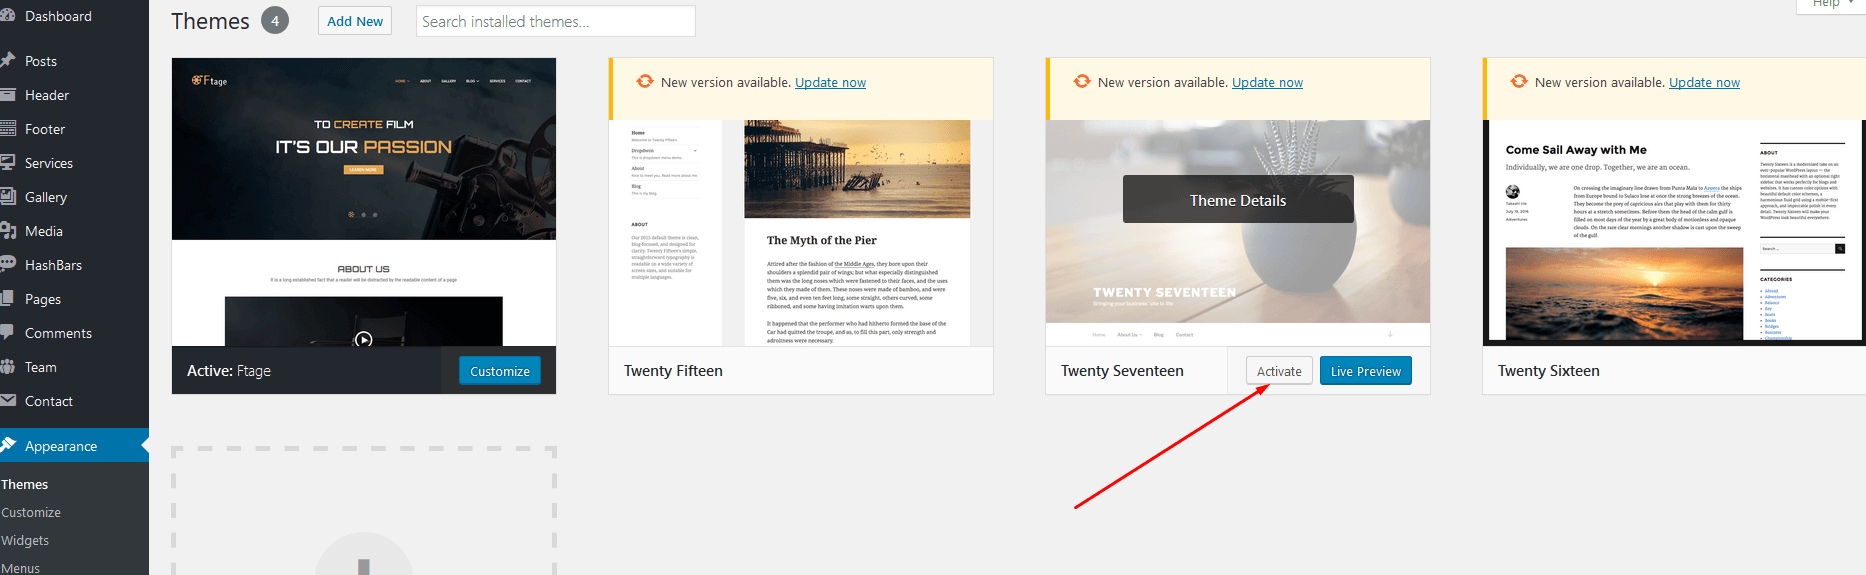
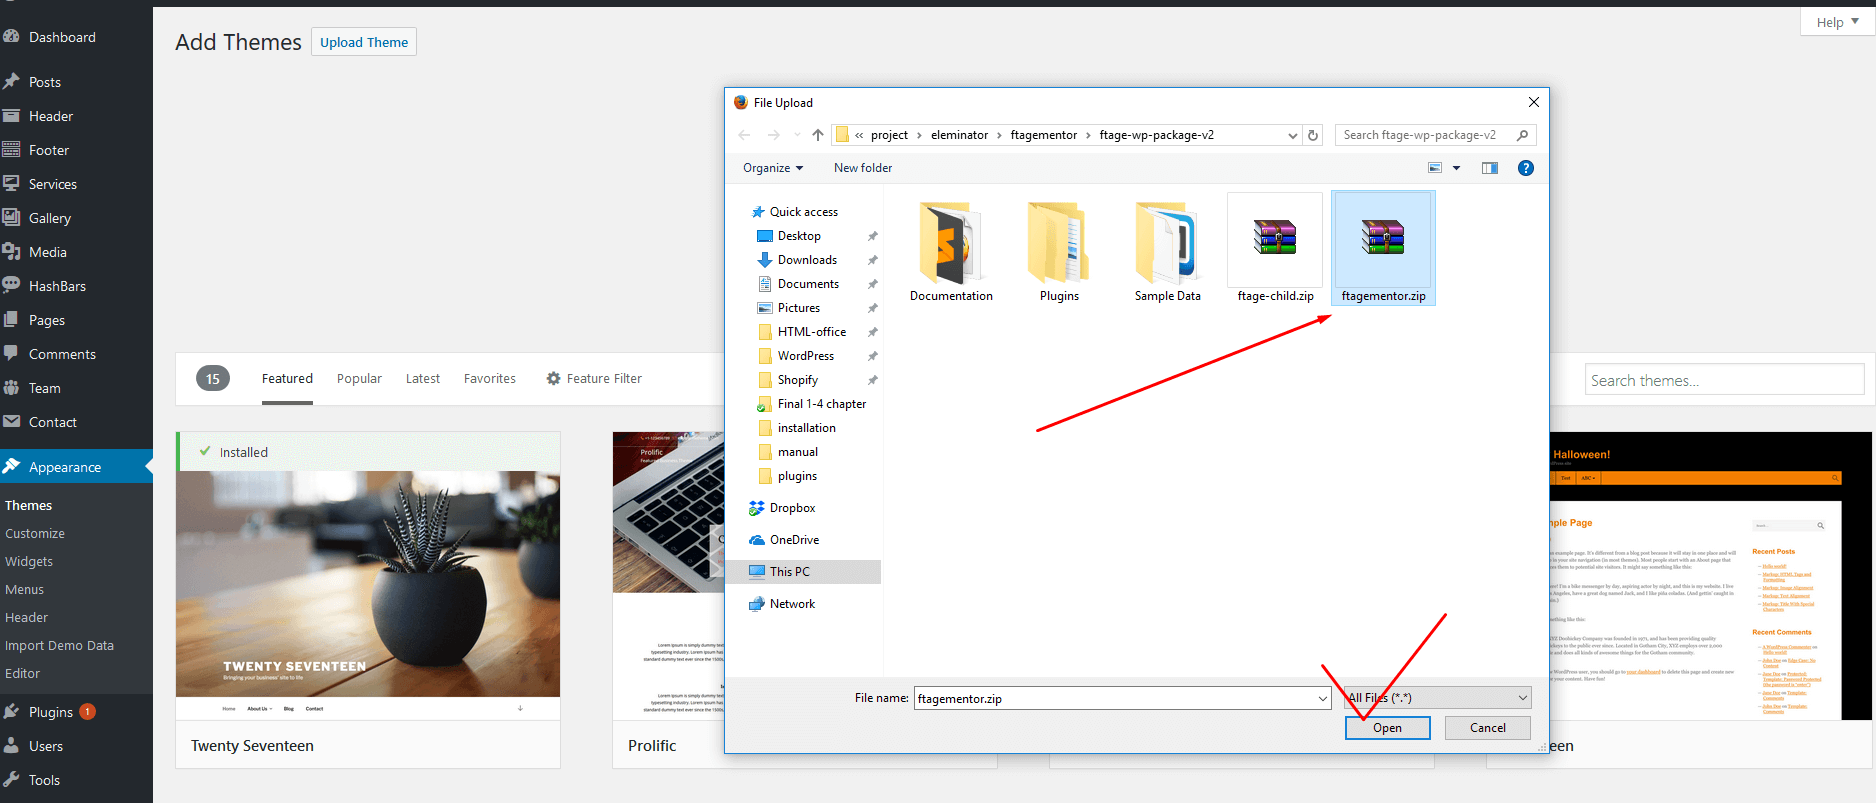
Install theme via WordPress Dashboard

- Go to 'Appearance > Theme section'
- Click 'Add New' and select the 'Upload' option
- Upload the ftage-installable-file.zip file
- All Done :)
Install theme via FTP
- Access to the file on your server using ftp editor program
- Go to 'wp-content/themes' folder
- Extract the zip file and put the ftagementor folder there
- Go to 'WordPress Dashboard > Appearance > Theme section to activate the theme
- All Done :)
Install Plugins
After you install the theme, there'll be a list of suggested and recommended plugins at the top of the wordPress dashboard.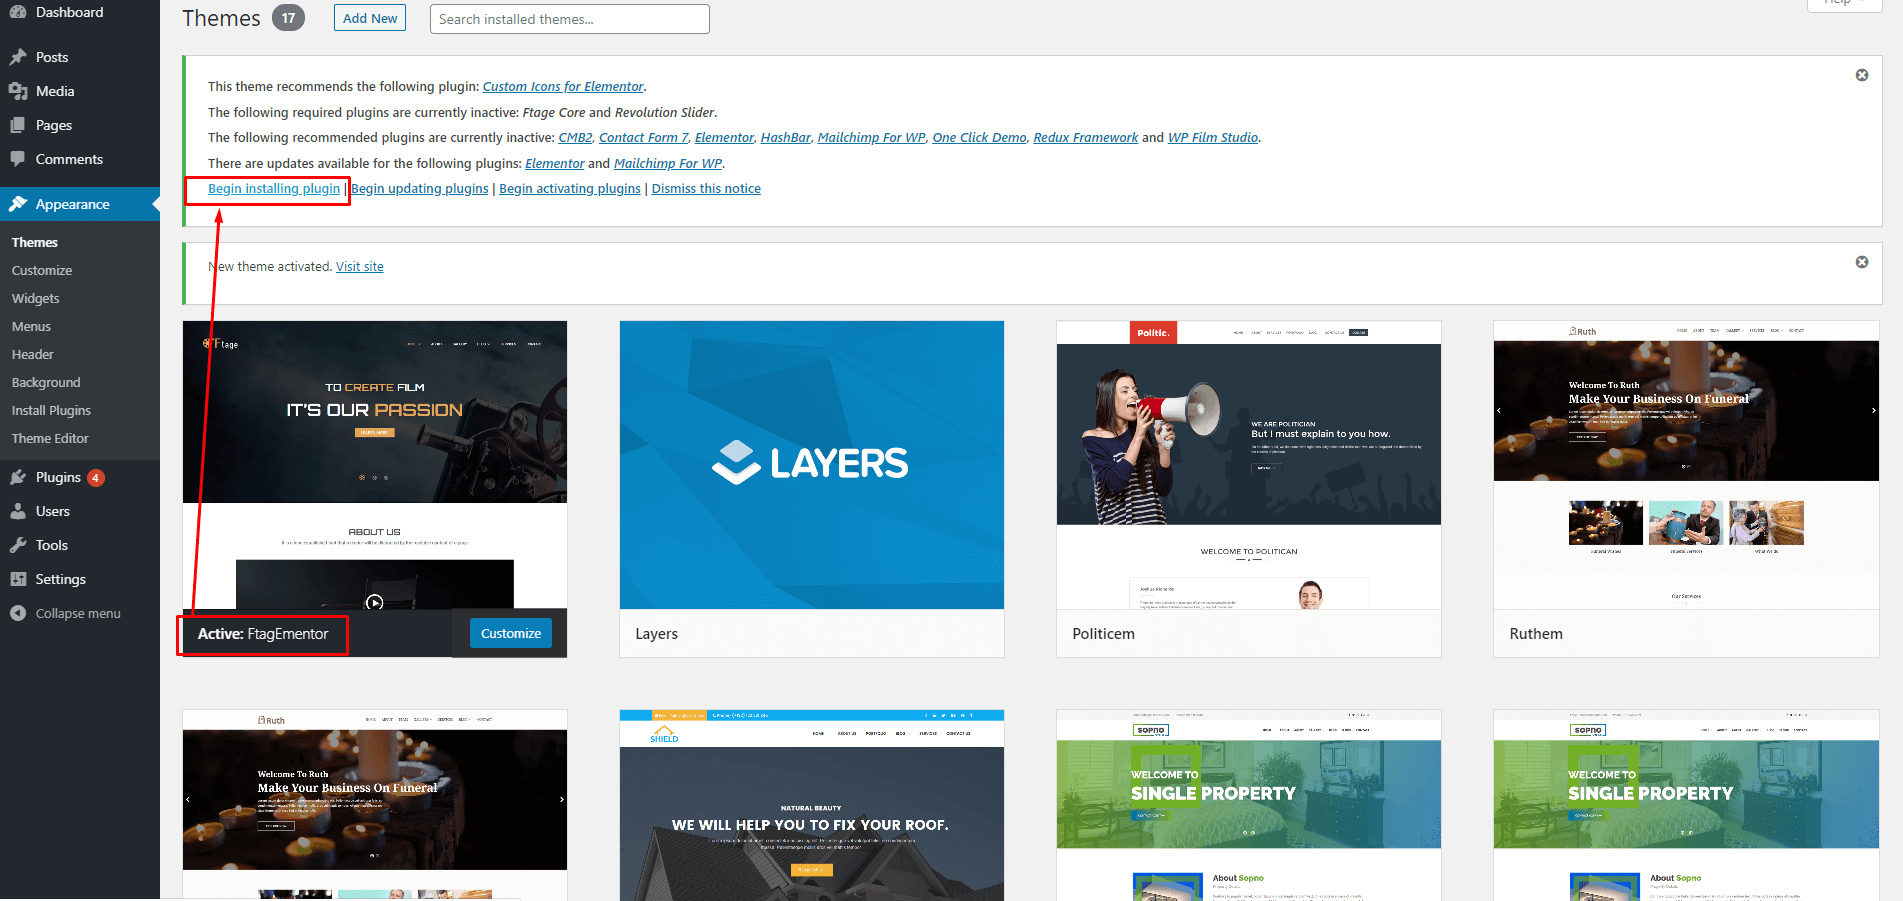
If you already hide it out, you can go to 'Appearance > Install Plugins' section instead too.
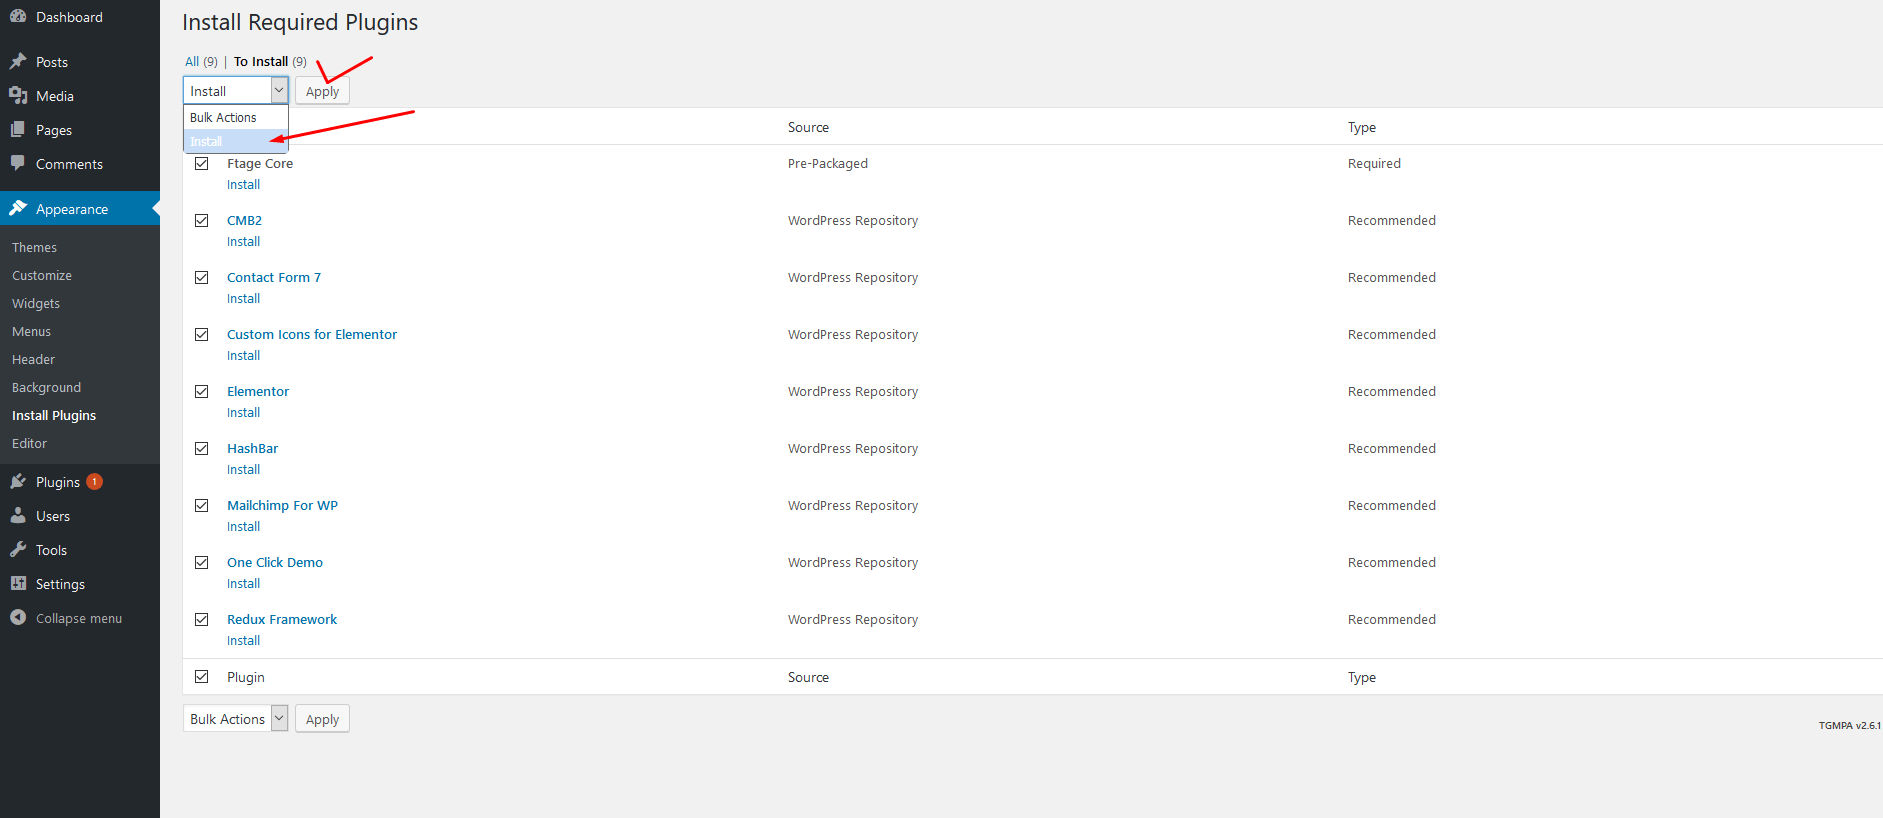
After installing all the plugin activate all the plugins

Now your theme is ready to add content. You can also set up demo content like our demo by importing a one-click demo installation.
Import Demo Content Manually
After activating the theme, there'll be suggested plugin listed at the top (if there aren't, you can go to 'Appearance > Install Plugins' section as well ). Try installing and activating these following plugins ( as it effects the importing process ). You can also install all suggested plugins at this step as well.
Go to 'Tools > import > run wordPress importer > choose file > set all_content.xml > upload'
Follow the steps mentioned on the screen, then, you'll get the site like the demo :)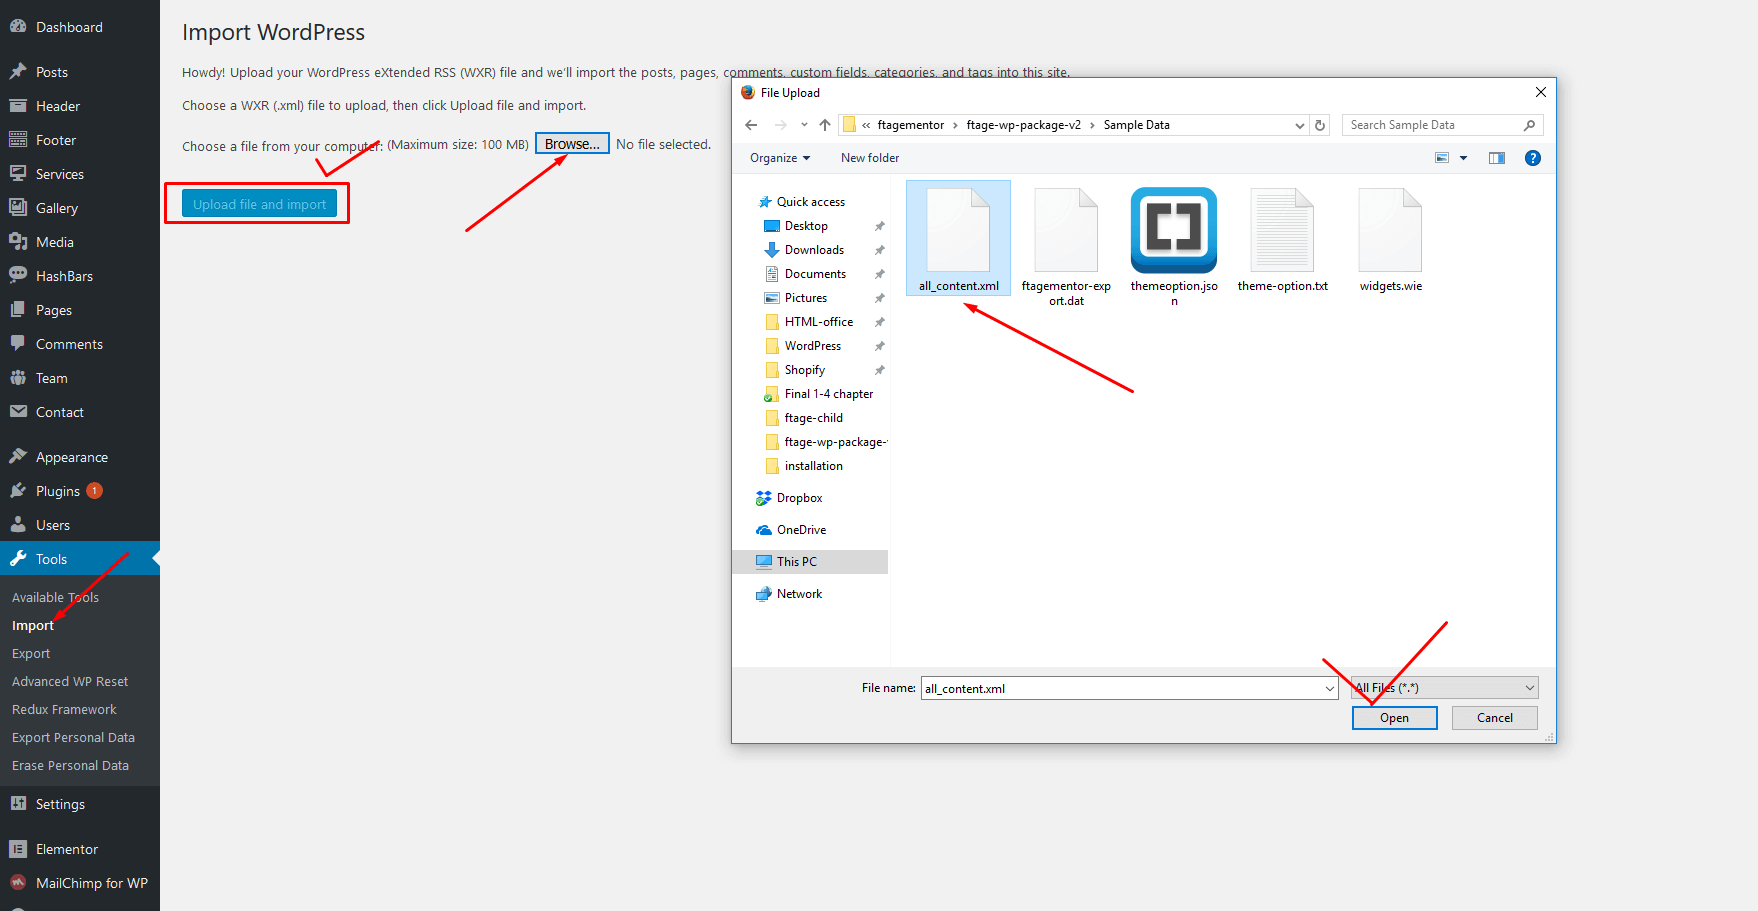
Import Demo Content By One Click
You must activate all the required plugins with one click demo importer plugin https://wordpress.org/plugins/one-click-demo-import/ which is alerady recomended in our theme. Then follow this instructions:
After importing the demo you need to import revolution slider file, To do this follow the plugin settings menu > revolution slider
Please watch this video to know how to import sample sliders.
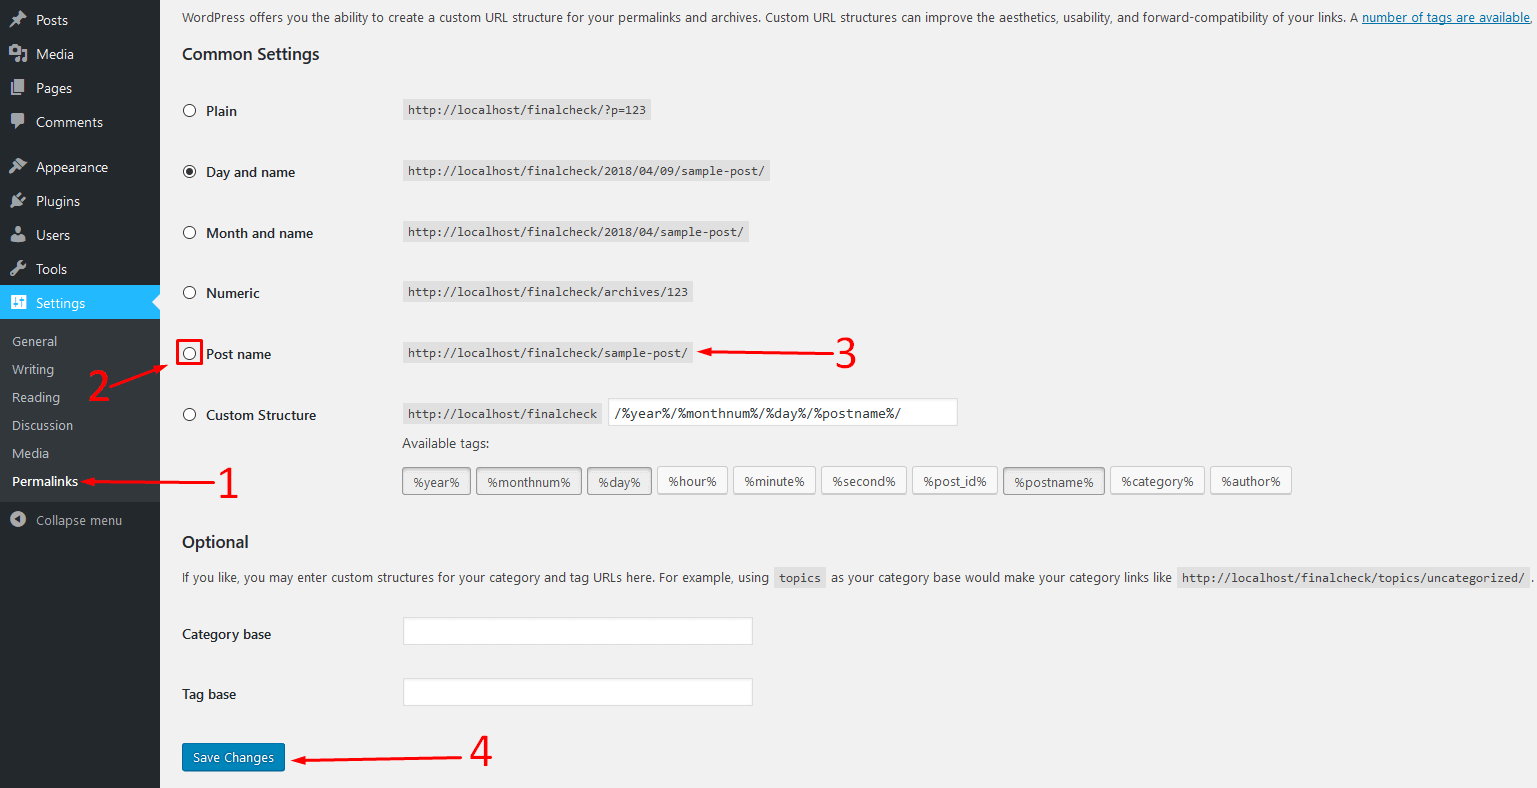
Update your permalinks after installing theme.
Set your header menu


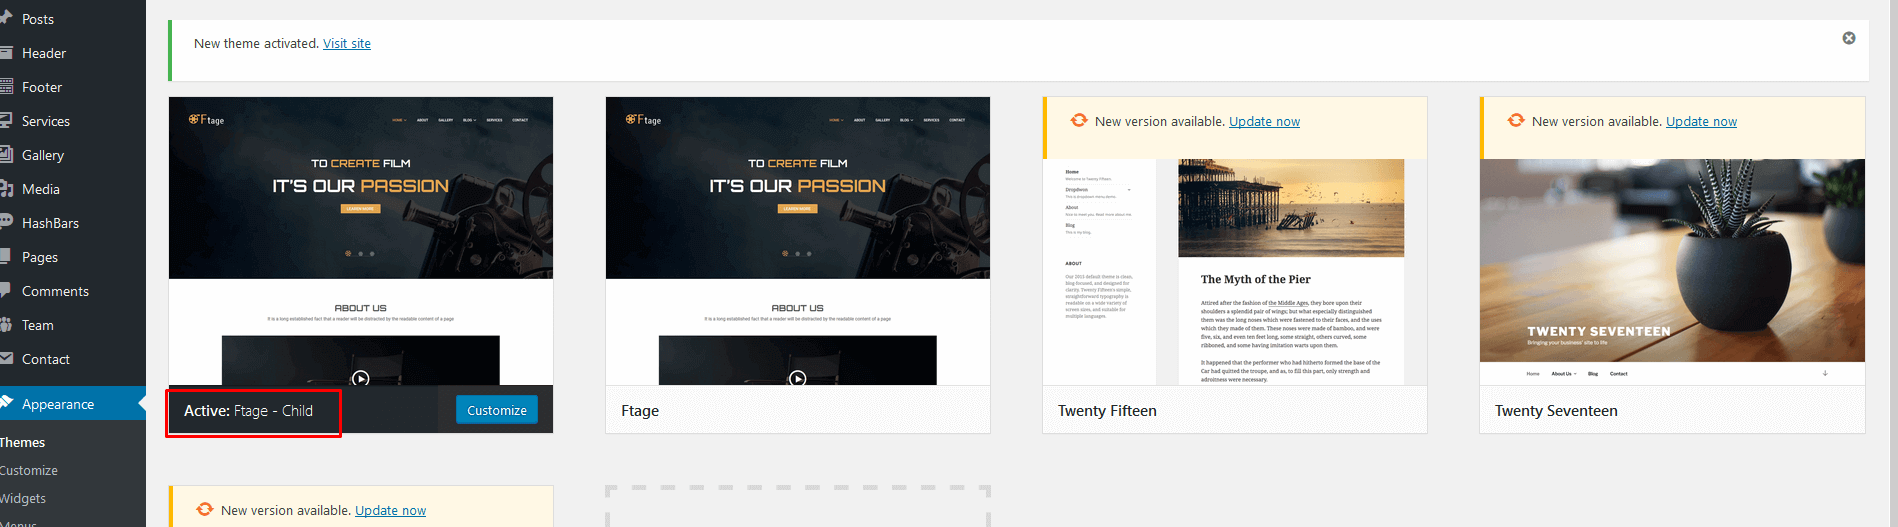
Install child theme
You must activate the main theme to install child theme, it will help you to override main theme features, you will have an advantage when the theme will be update and your own changes will have no effects while updating. Please follow these instruction to intsall child theme.

- Use functions.php to override logic and functions
- Use style.css to override theme default style
- Location: (wp-content/theme/theme-child/your-folder or your file
If you want to change another file of this theme just copied that file with same location on main theme folder and paste it at child theme.
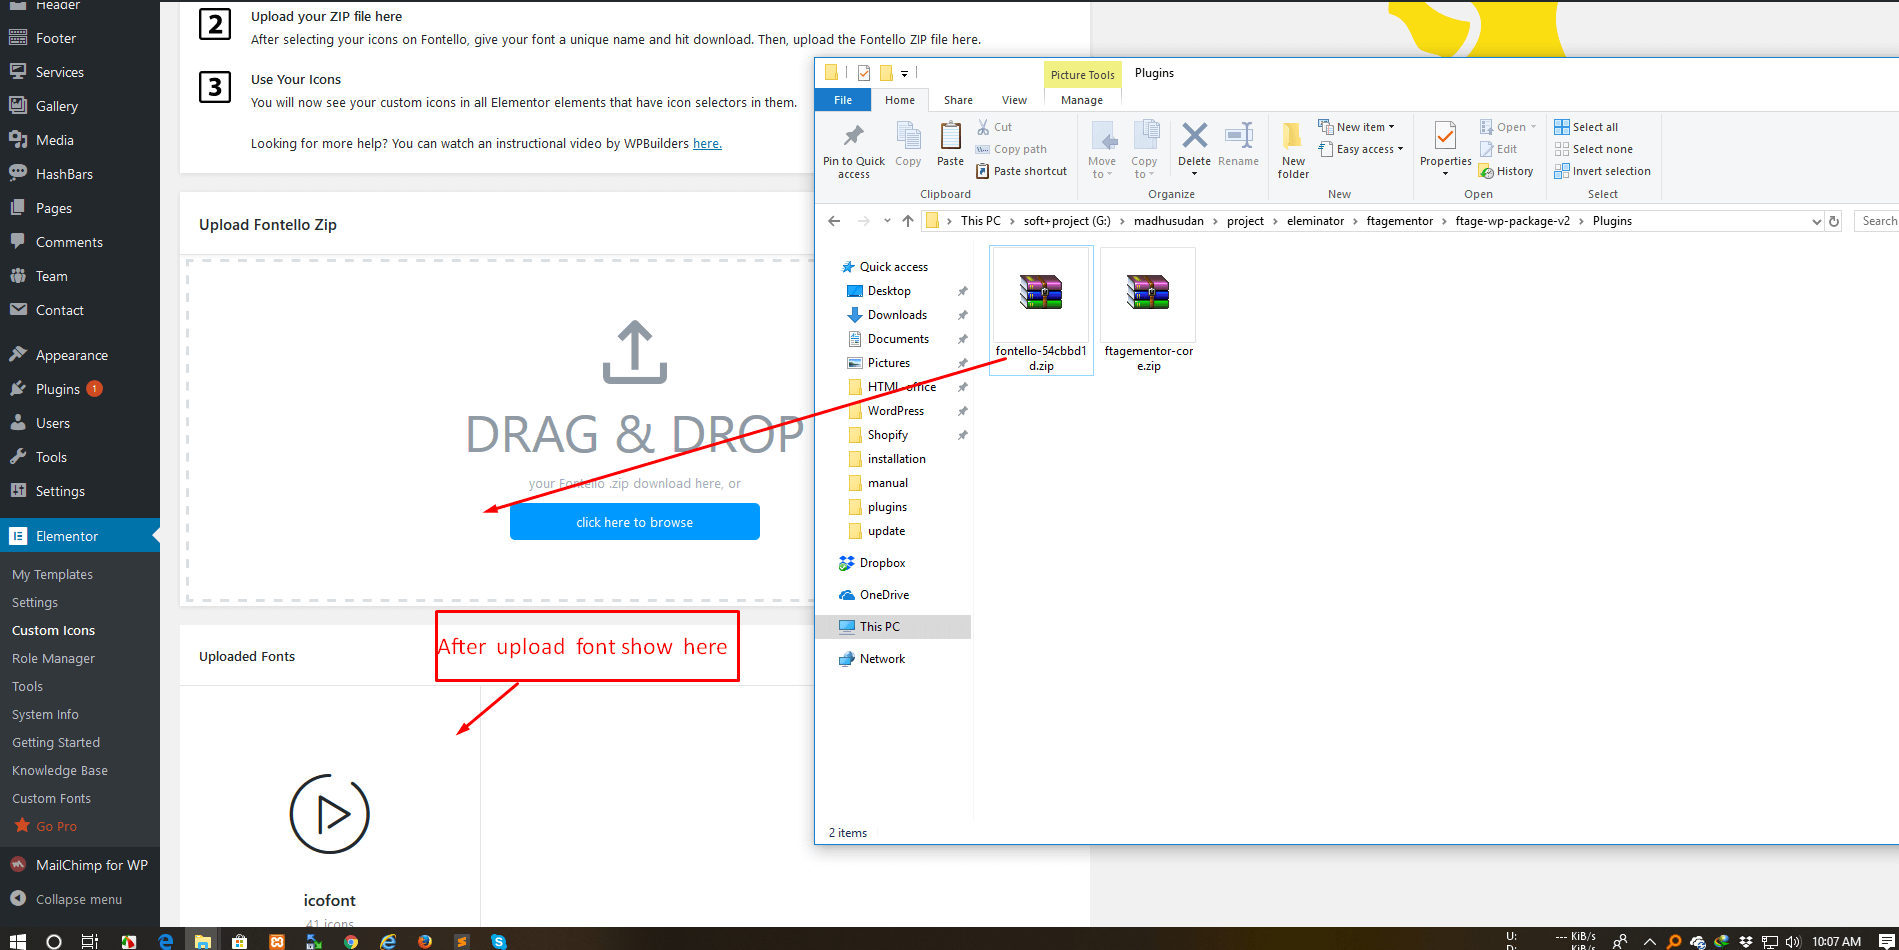
Import Custom Icon
You must activate the Custom Icons for Elementor plugin, it will help you to add any custom icon. To add custom icon follow the video instruction. Custom Icon Add.
We already
added In plugin folder all icon for this theme you can just upload it.
Create A New Page
You can create any number of pages with content. Our theme includes several page templates to choose from, and you will need to choose the page template that suits your needs. All of this is done in the pages section of your WordPress admin.
Navigate to Pages in your admin sidebar and click Add New option.

Elementor page builder options


Build Home Page
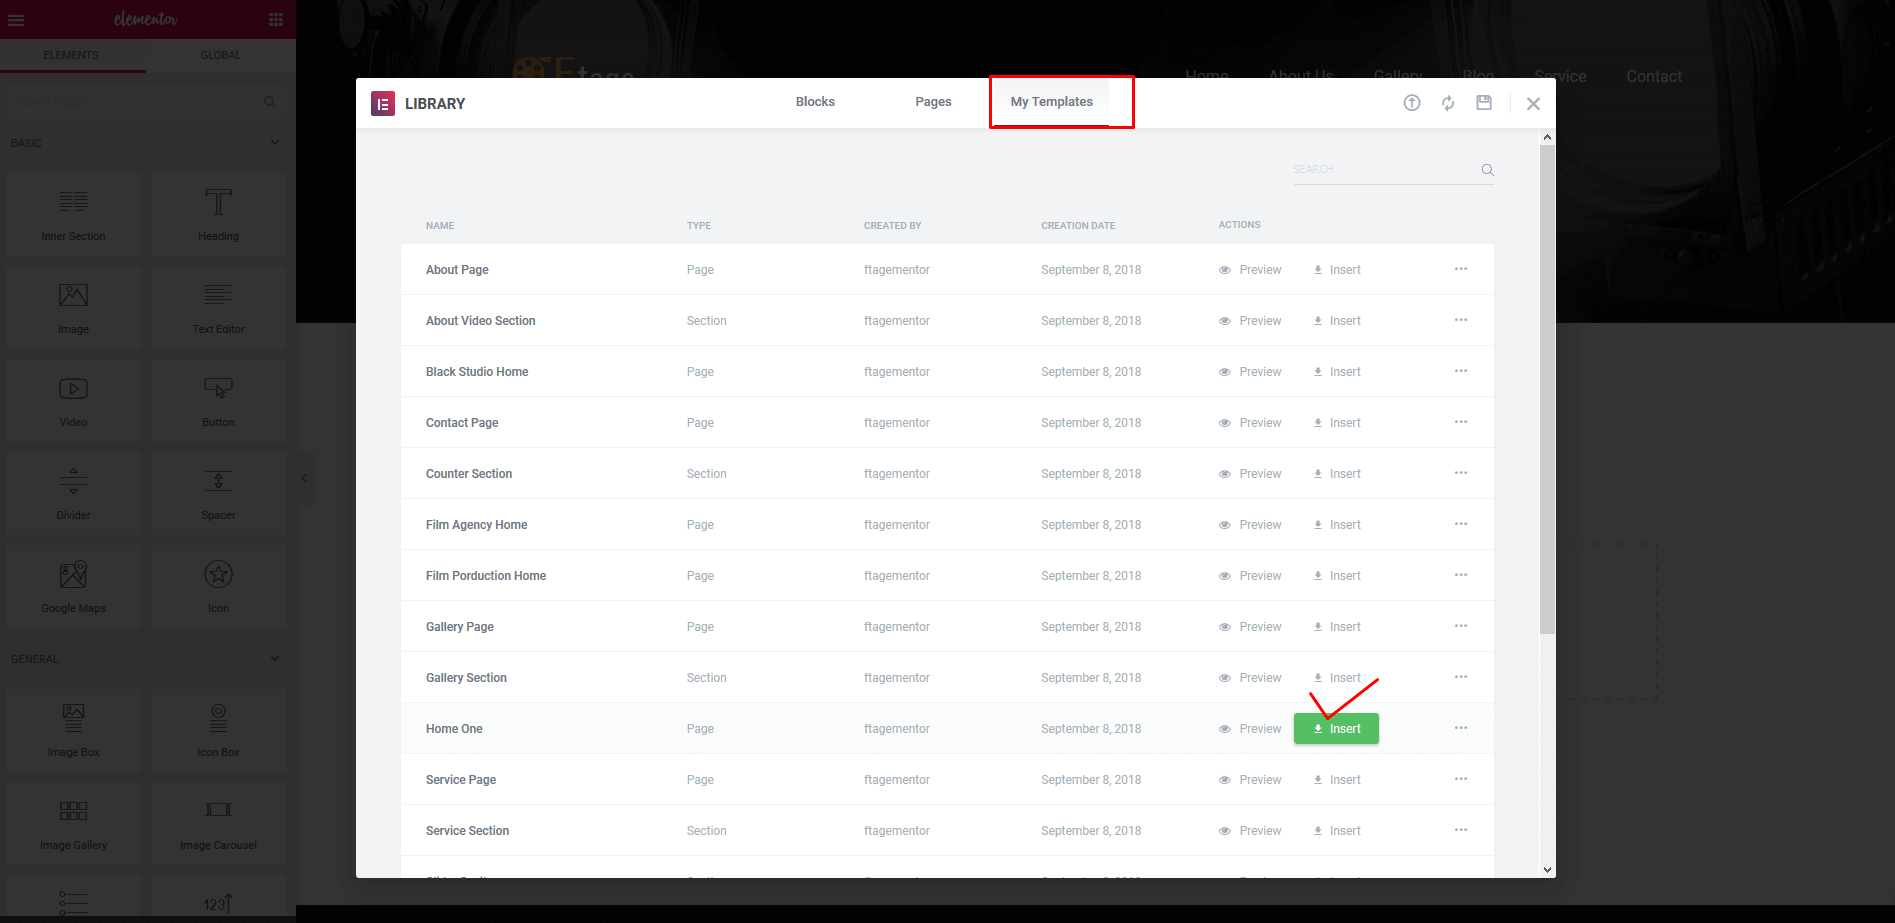
Home page is ready
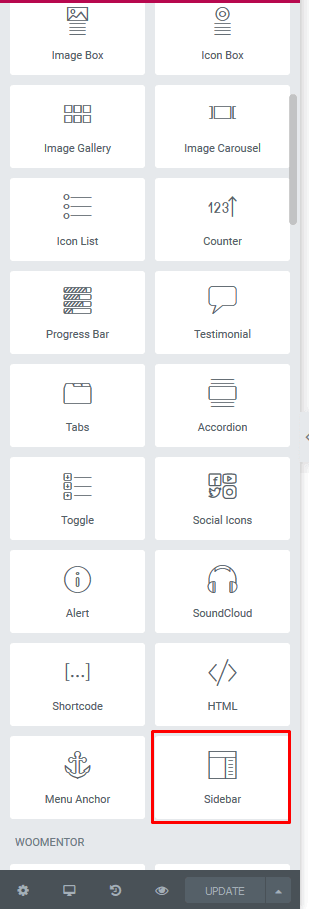
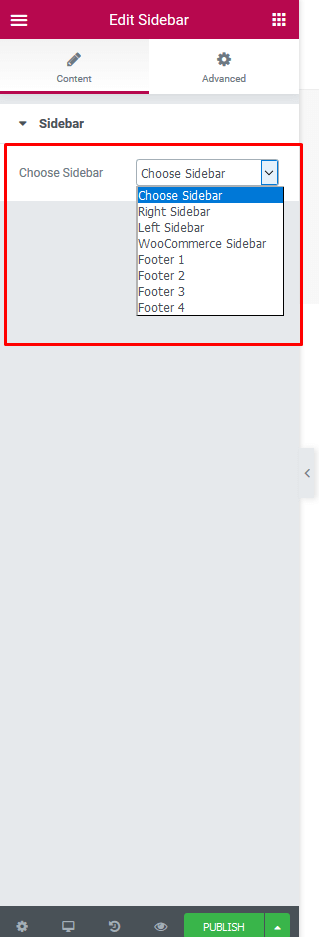
SIDEBARS AND WIDGETS
WordPress comes with built-in default widgets for your themes. Apart from these default widgets, ftagementor comes with 4 custom widgets. In order to use these widgets, from WP dashboard, navigate to Appearance → Widgets. These screenshots below are list of pre-defined sidebars as well as their locations on a page, so that you will find it easier when pulling out widgets to set up your site.

Widgetised Sidebar in Elementor : You can use Widgetised Sidebar element in Elementor to build a Content Block then use this Content Block to display as Top Bar, Top Drawer, Bottom Bar, Footer in Theme Options (or Preset)
Widget Area on frontend
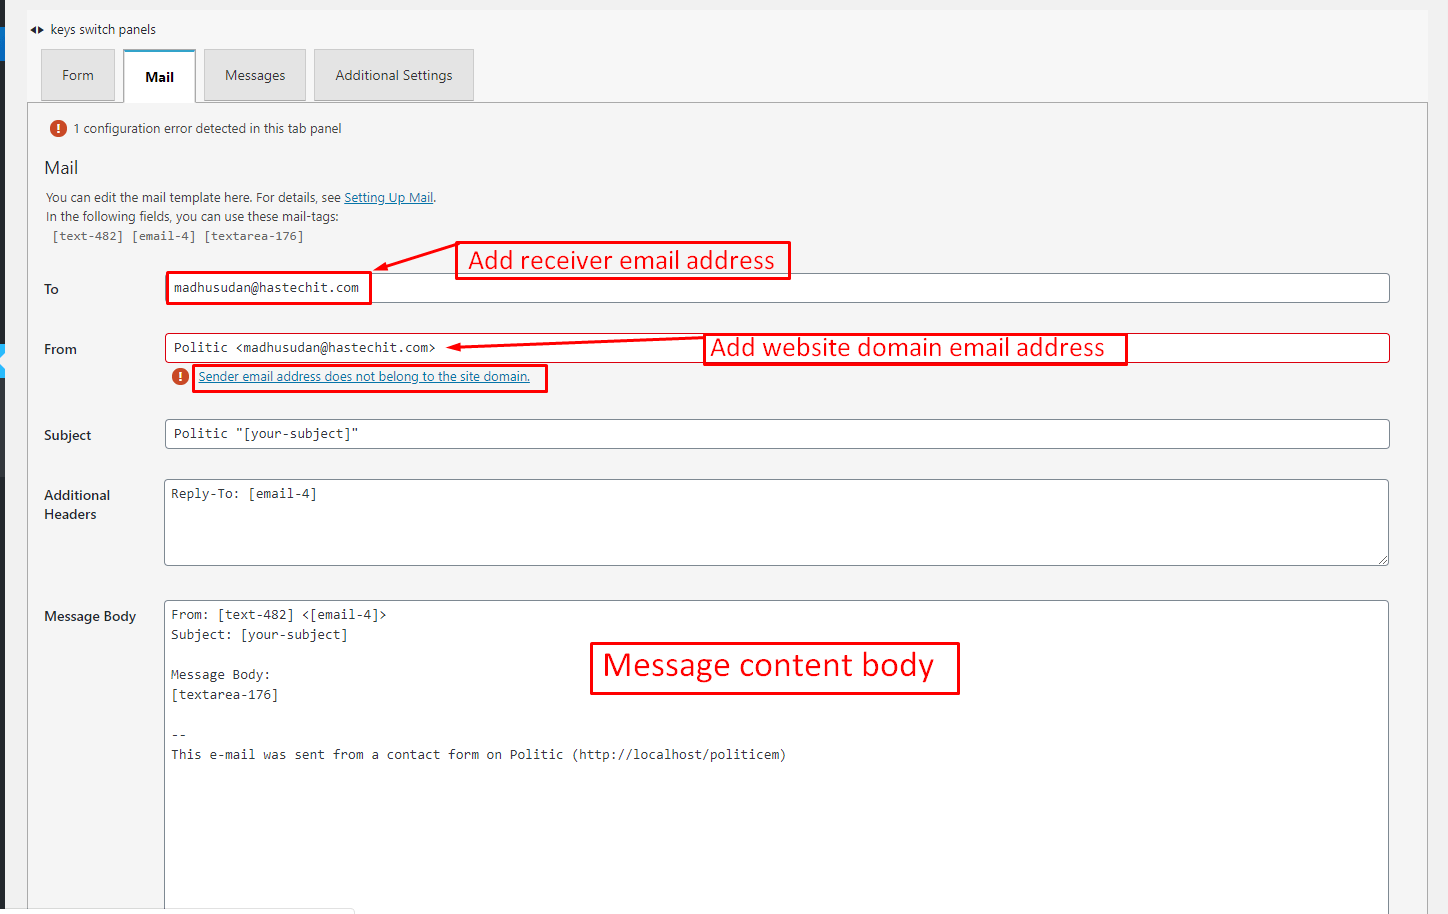
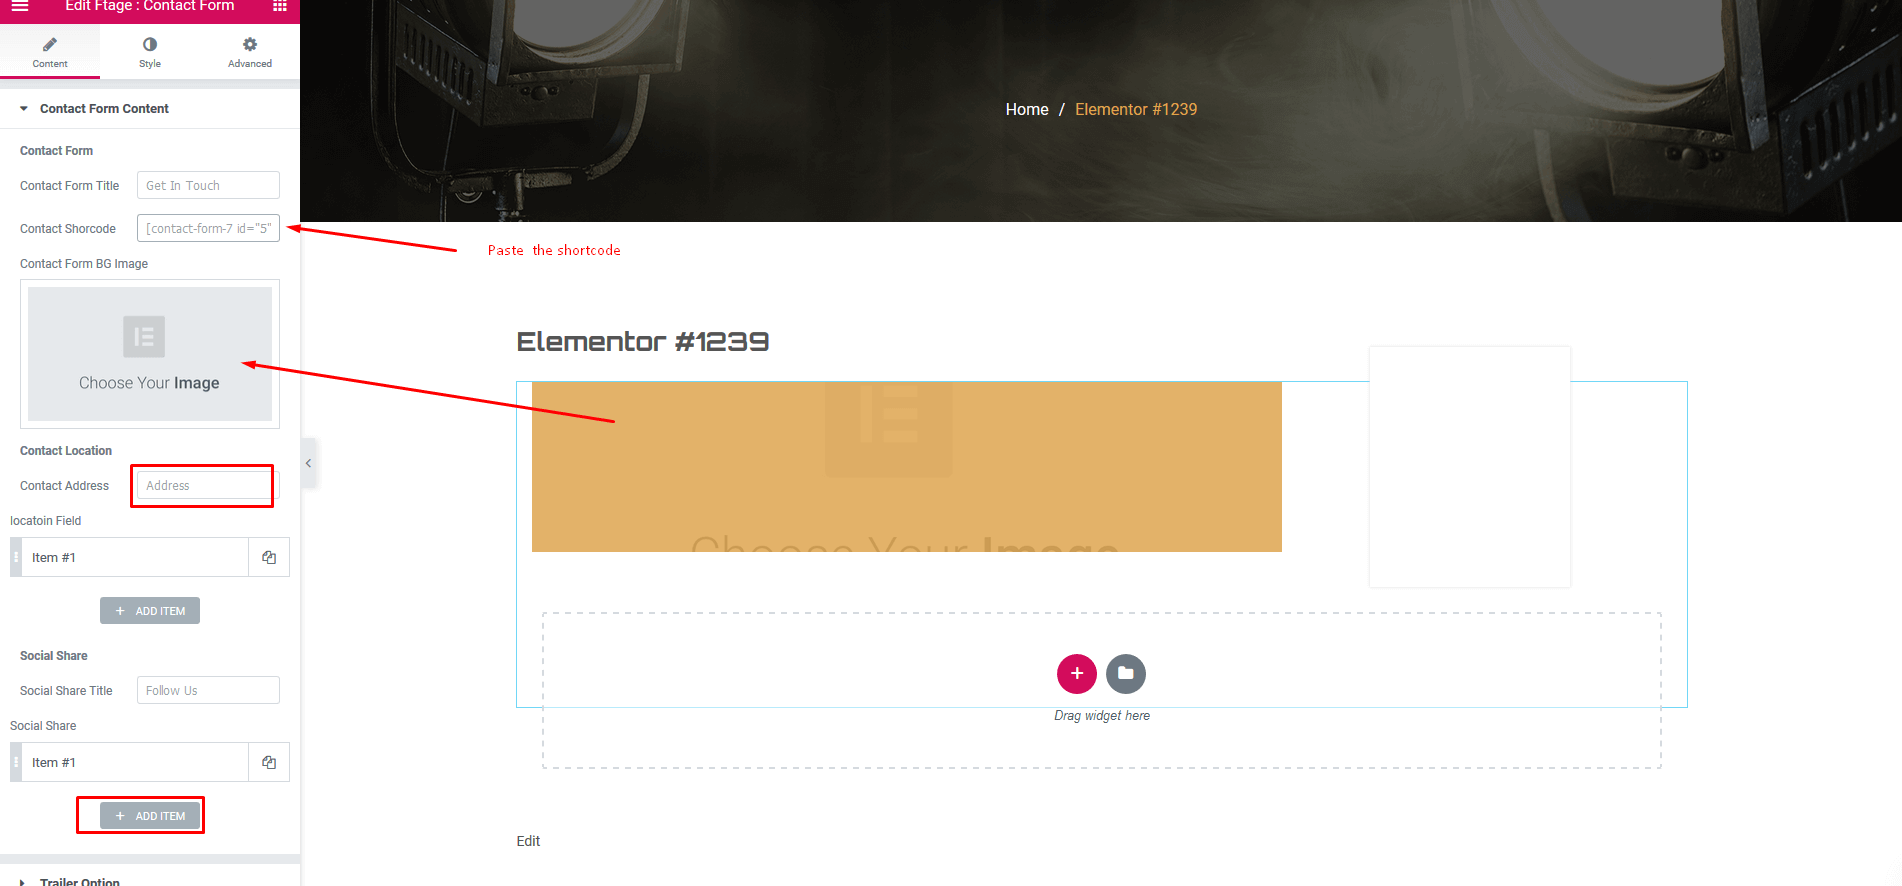
Contact Form
You can do step by step as image below to build contact form
Add New Contact Form


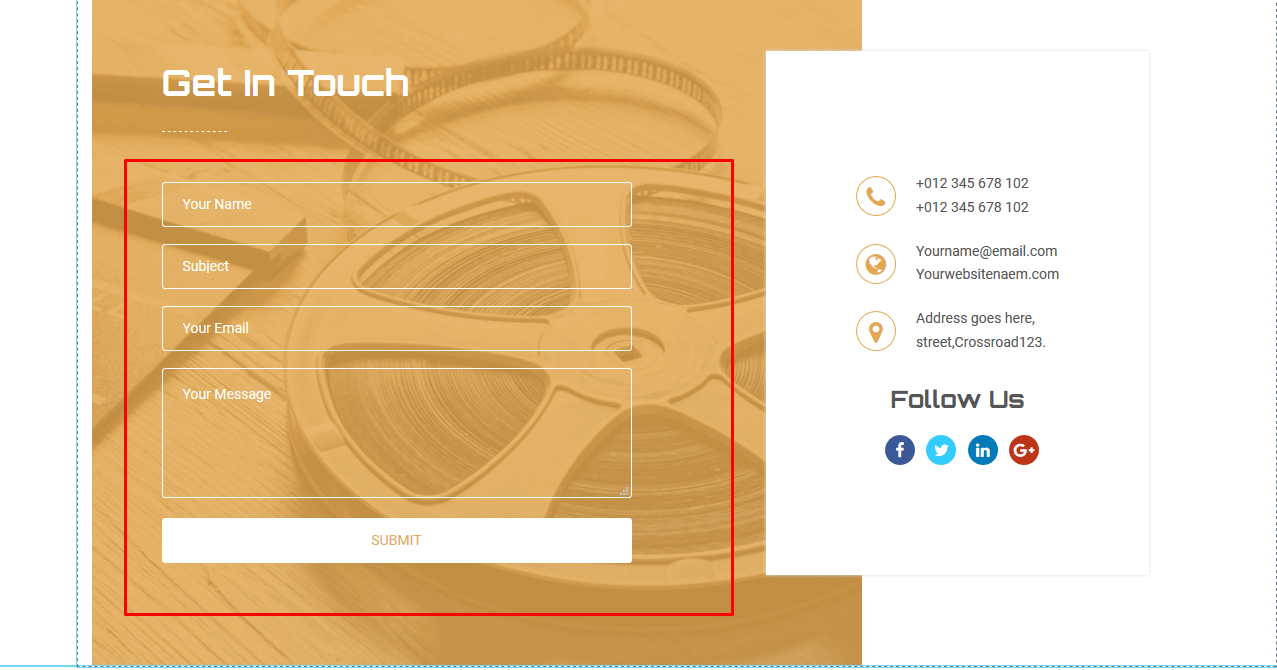
Set your contact form by Elementor
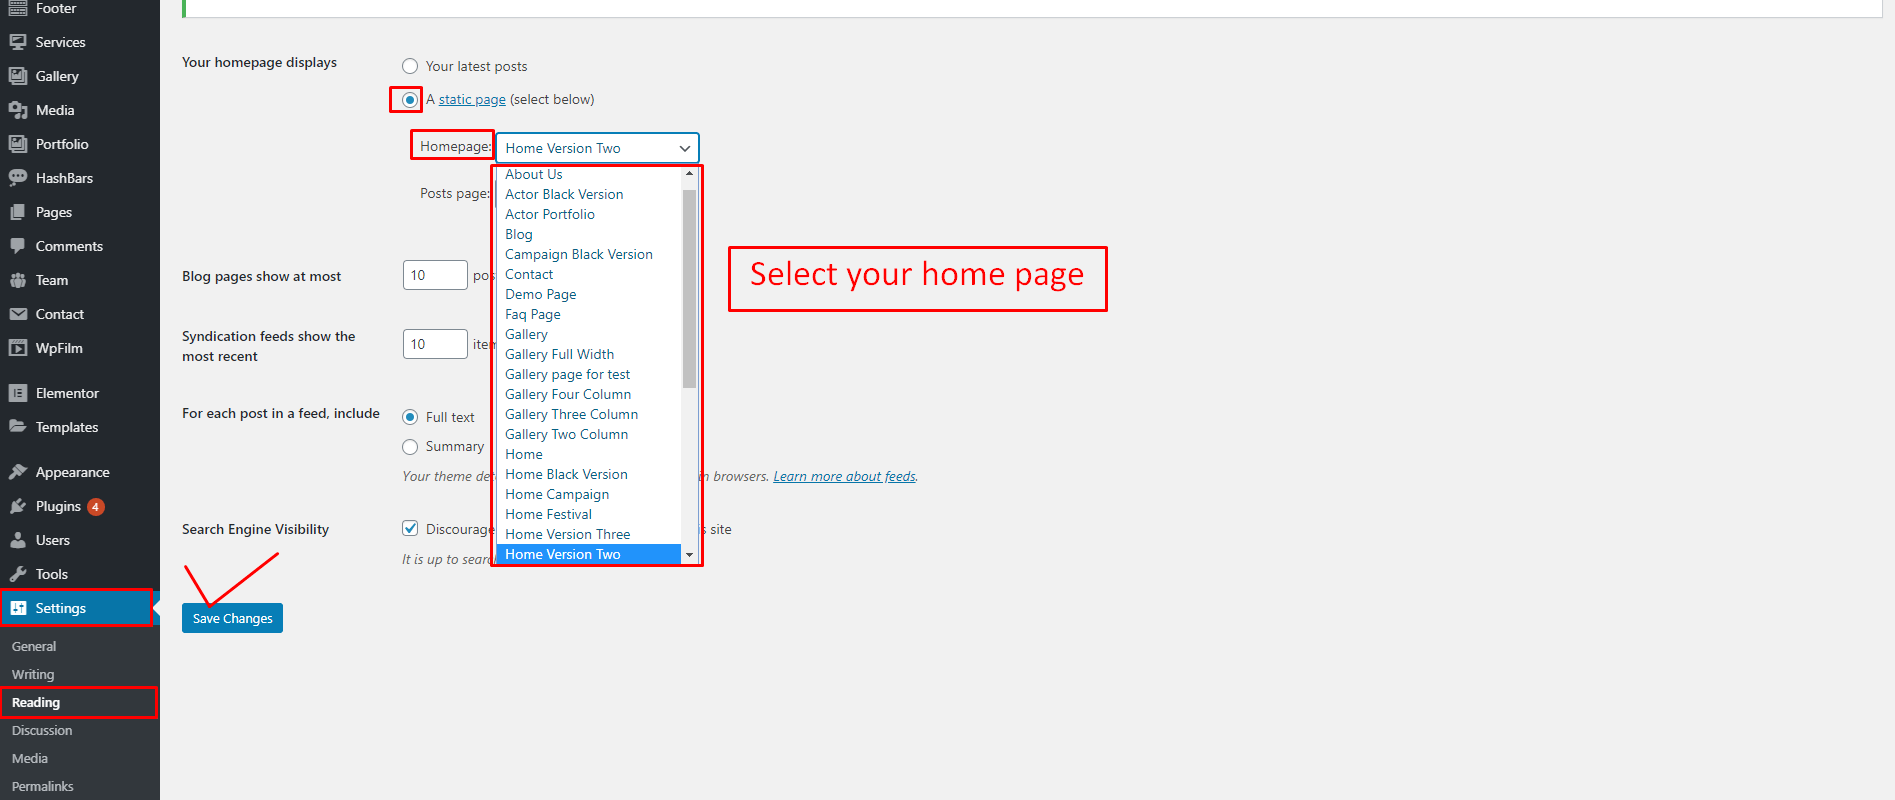
Setting up your homepage as a front page and blog page as a post page
If you installed Ftage demo Data, you don’t need to create a new Home Page, you just need to choose from the list Home Pages that were automatically created from the demo content, following these steps:
- Go to Settings -> Reading.
- For Front page displays, select A static page ( select below )
- Choose any homepage as you want... from the dropdown for Front page
- Click Save Changes
Set your header menu
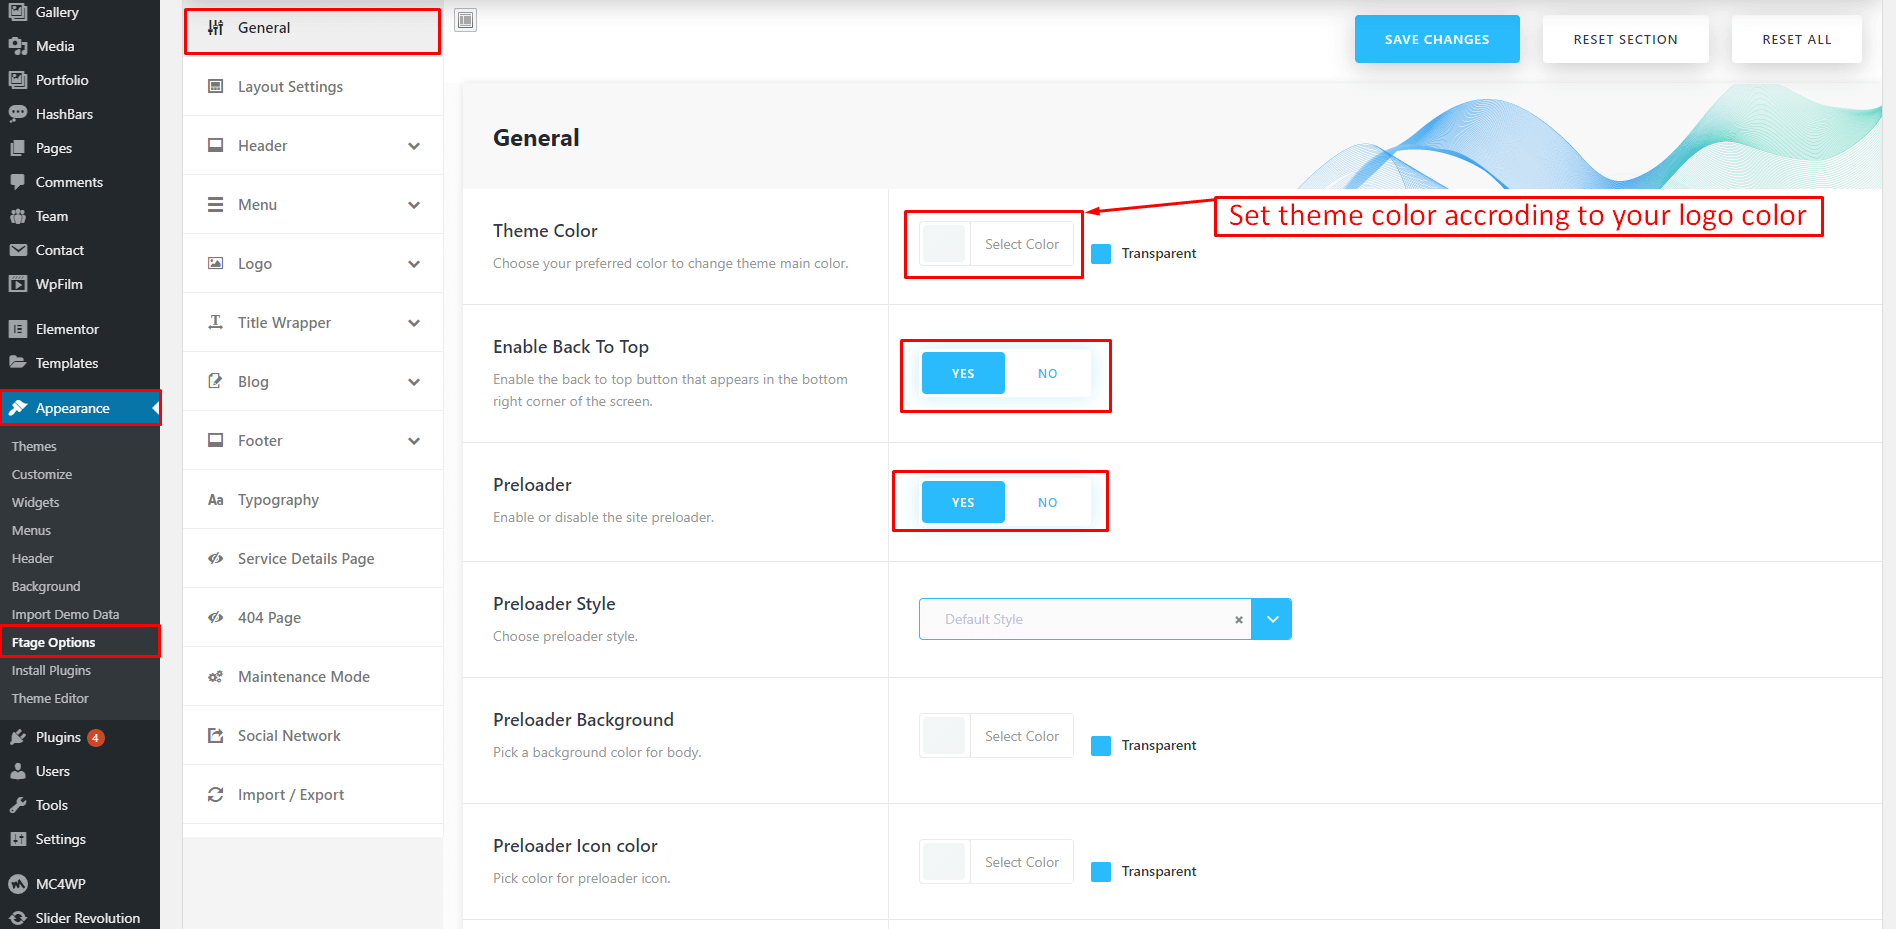
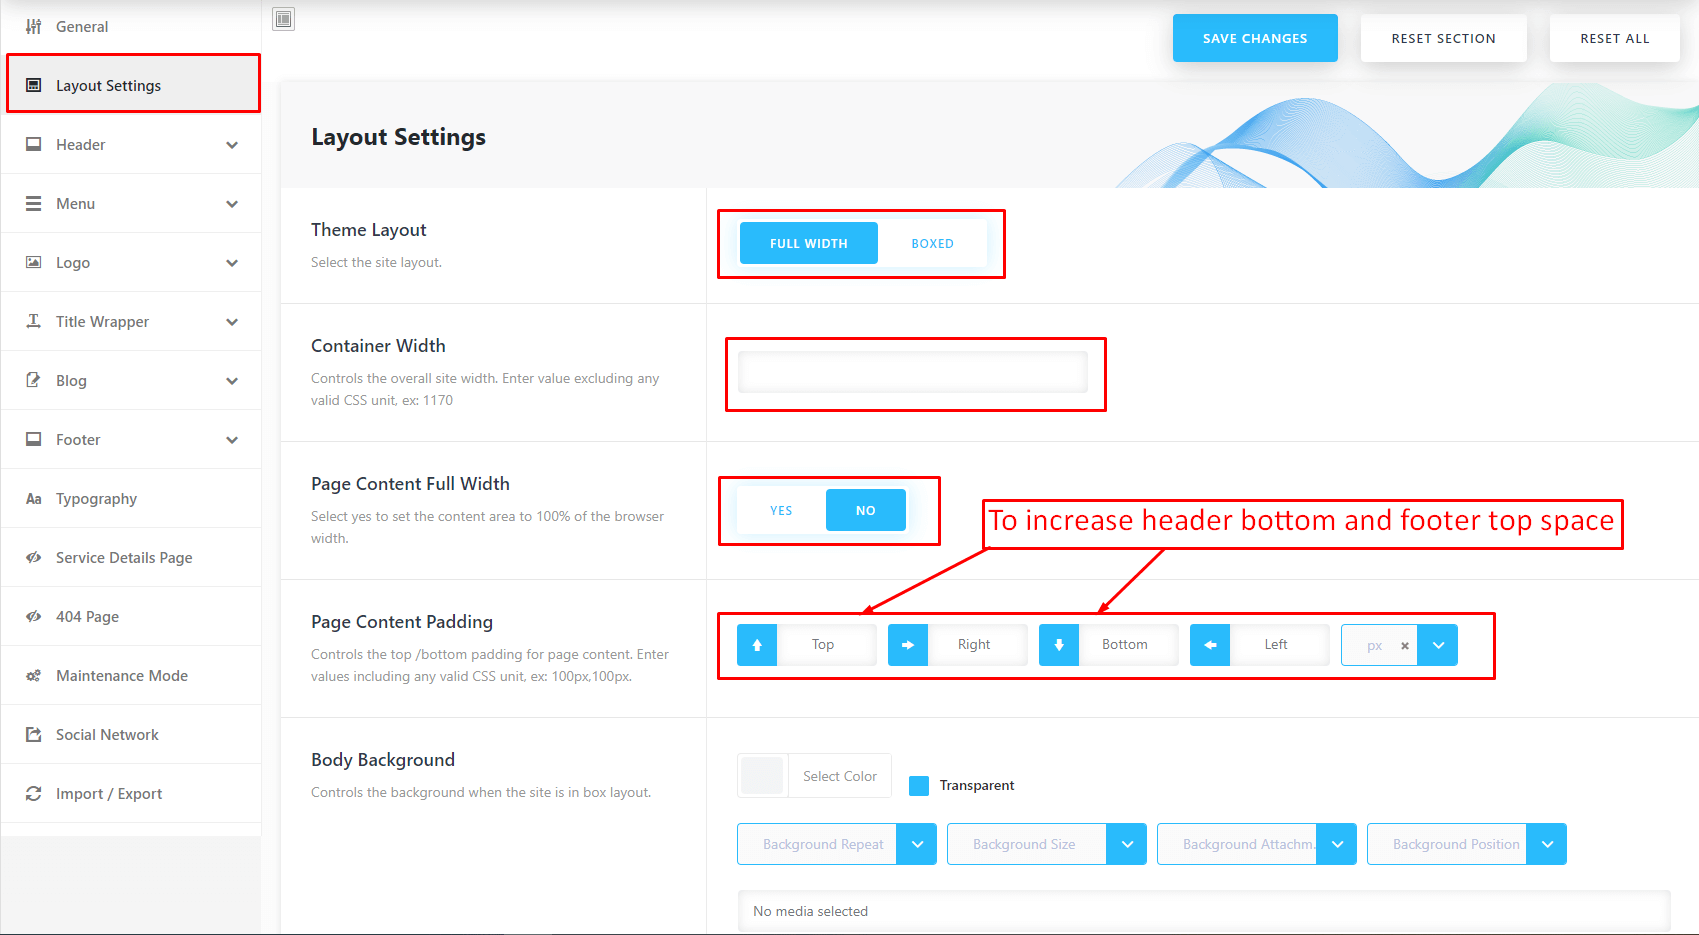
General Layout
- Theme color
- Theme Layout
- Site Width
- Page Content Padding
- Body Background Color.
Header Settings
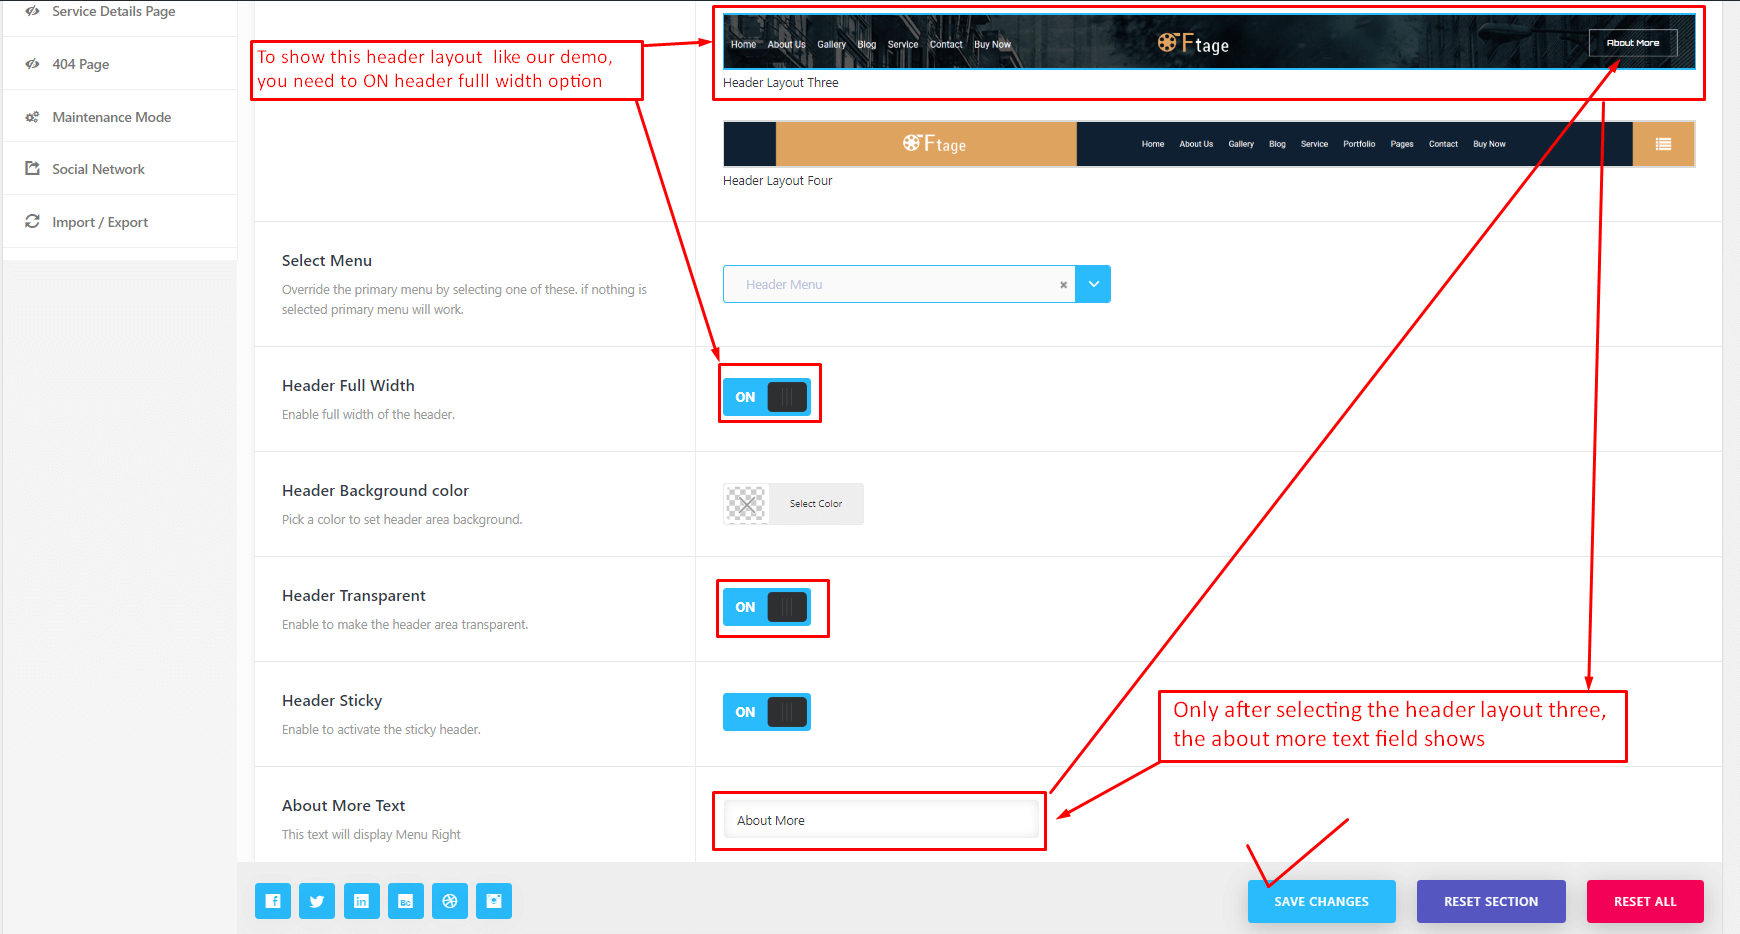
1. Header Layout Options
- You can choose 1 in 3 header layout options to display on your website.
- Header bakground color
- Header layout
- Header logo position
- Header Transparent
- Header Sticky

Header layout three About more text and link change
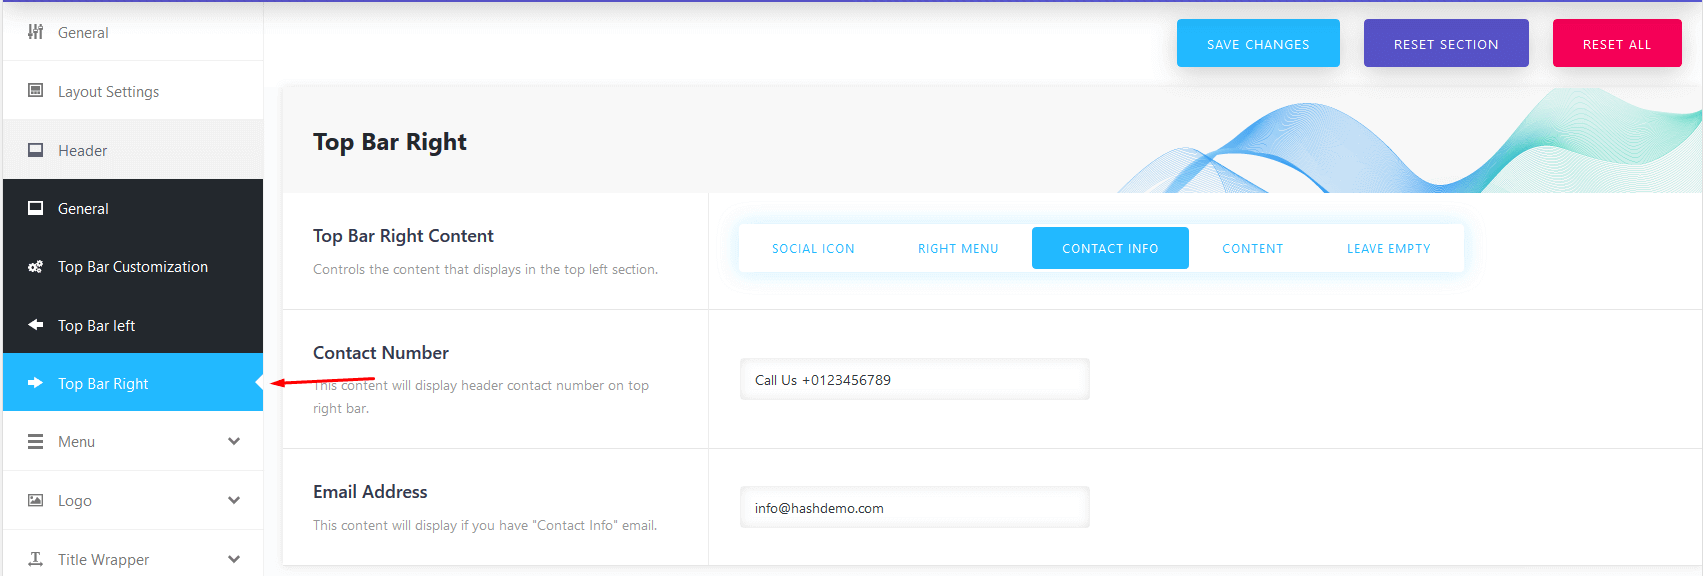
2. Header Top Settings
- Have options for you can customize text display on header top "Content Left" (phone number, email, socials that's help your customer easy contact with you) or you can display promotion message for your customer with header top "Content Center" html, add short code to display language switch on "Content Right"
- You can config to header top display
- Top bar hide or show

- Top bar content

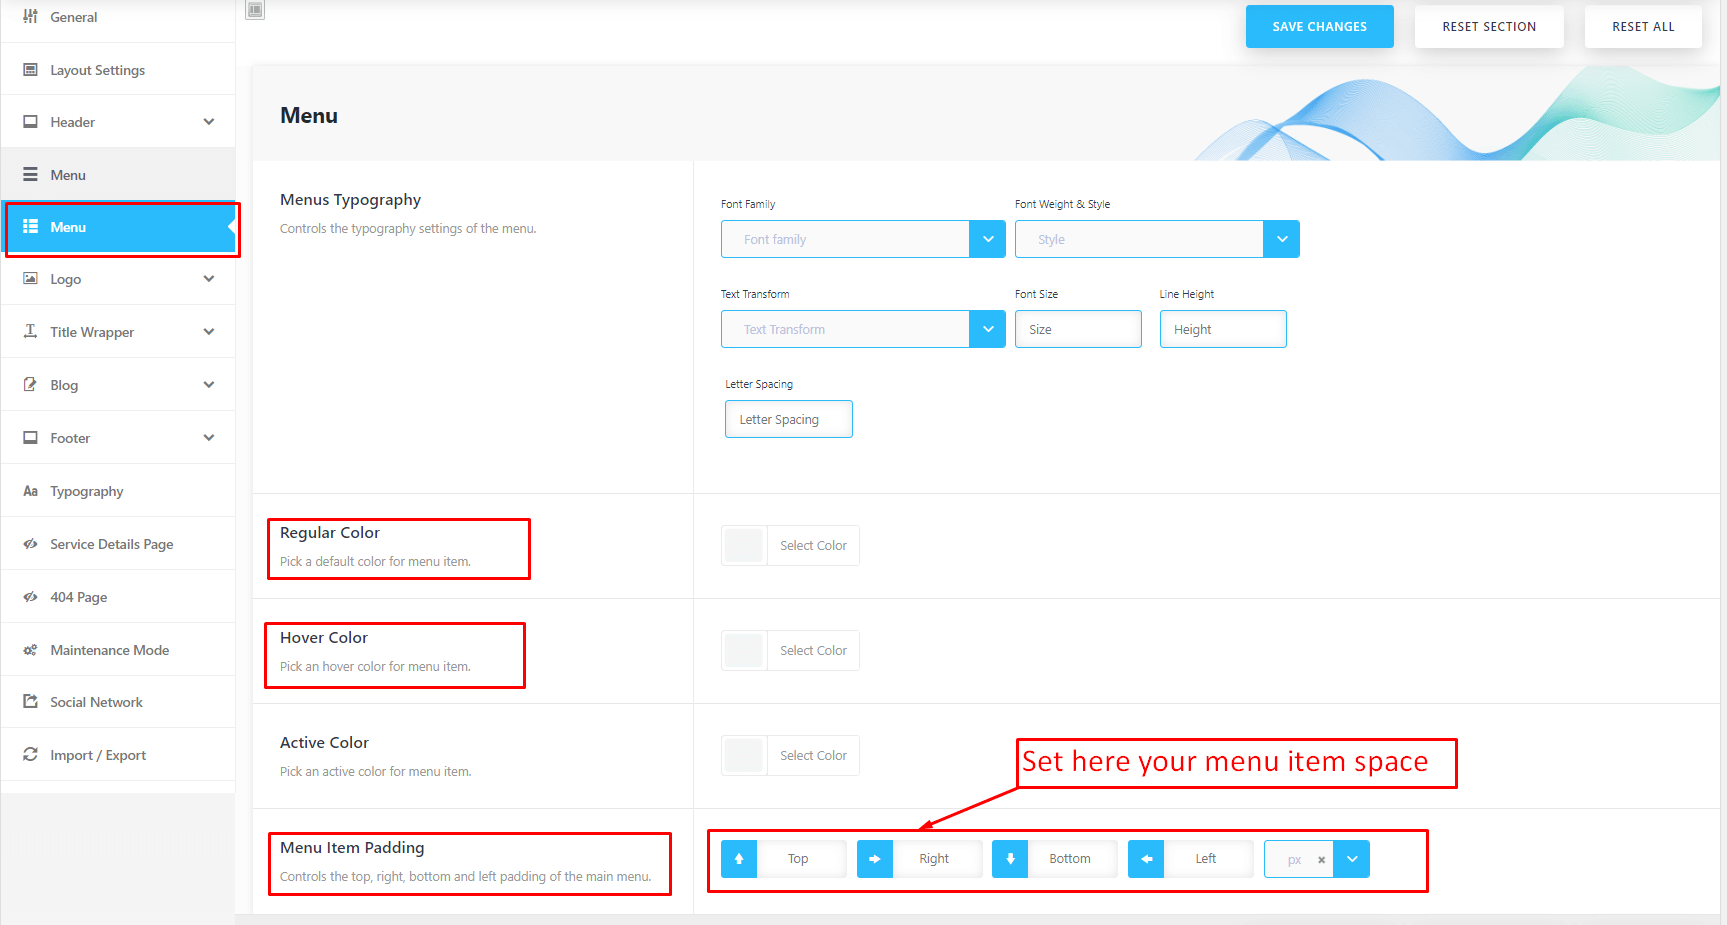
Menu Settings
1. Menu Typography
Header layout three menu about more button options

Logo Settings
1. Logo Upload
To show your logo you need to upload all the logo fileds
![]()
After uploading all the logo field if any page show the default logo then check the page option logo of that page
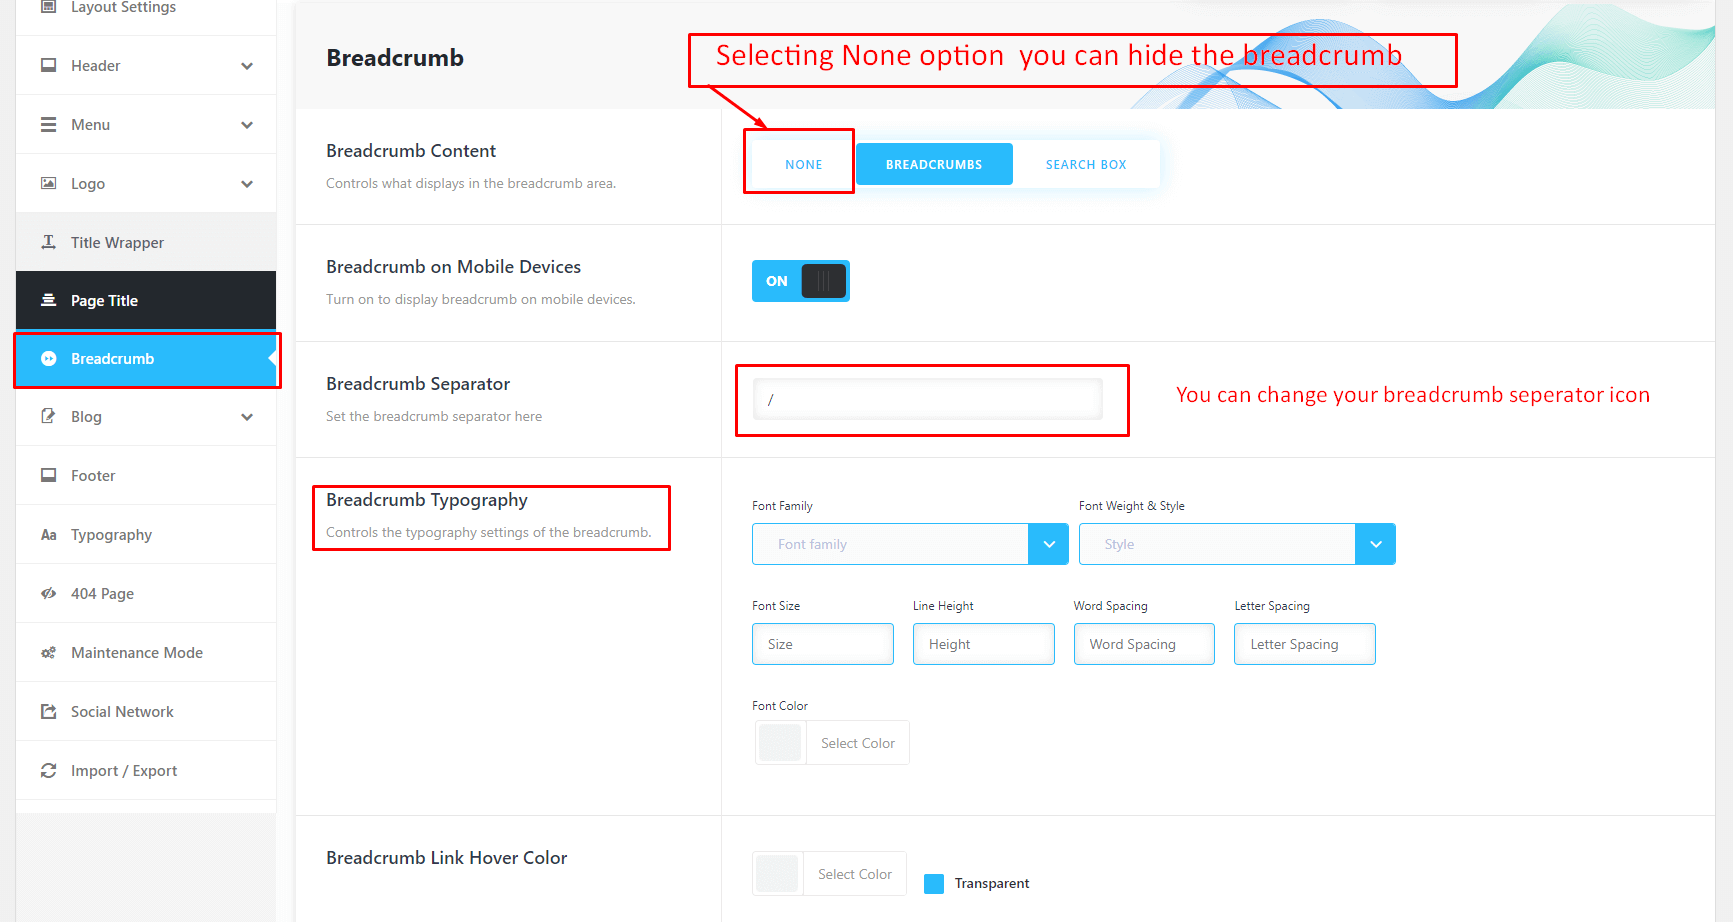
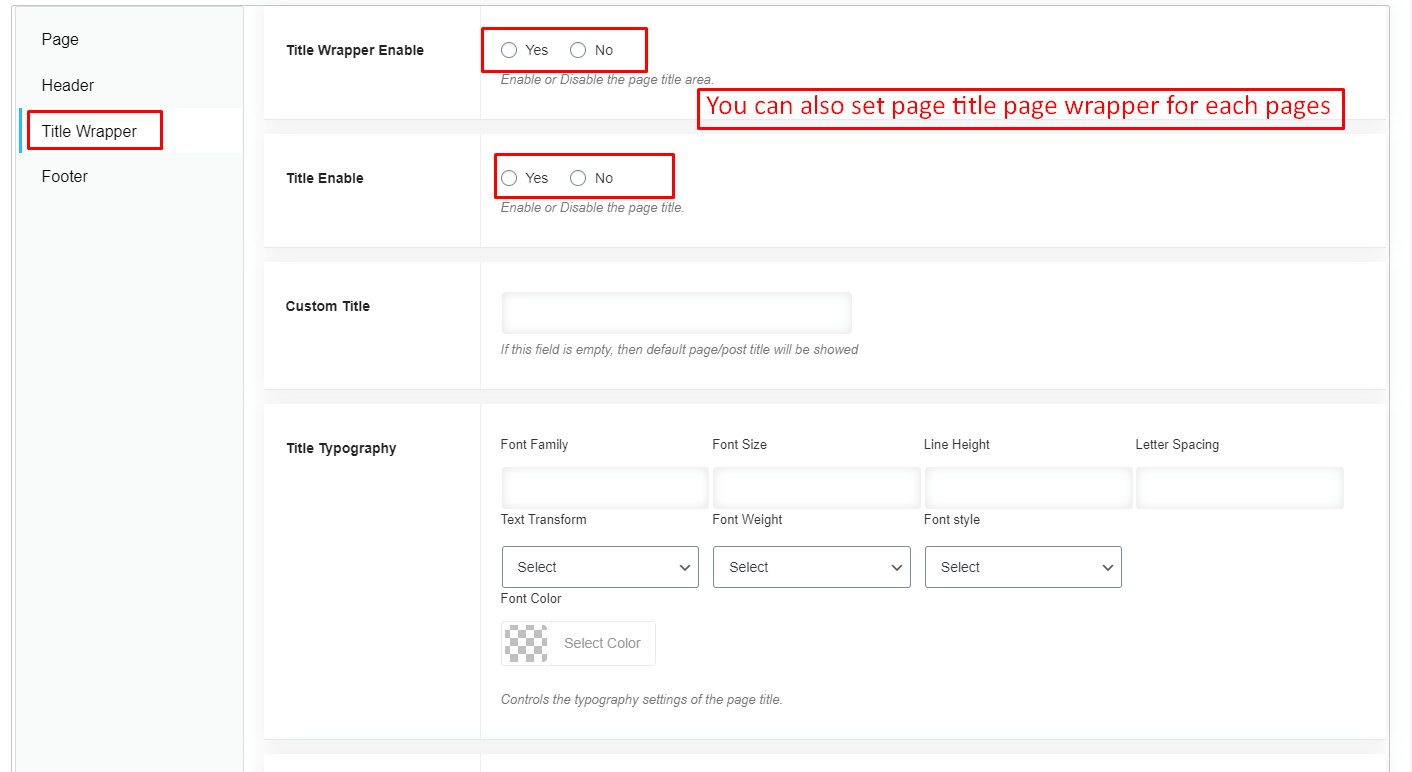
Page Title and Bredcrumb Settings
Front View

Page Title

Breadcrumb
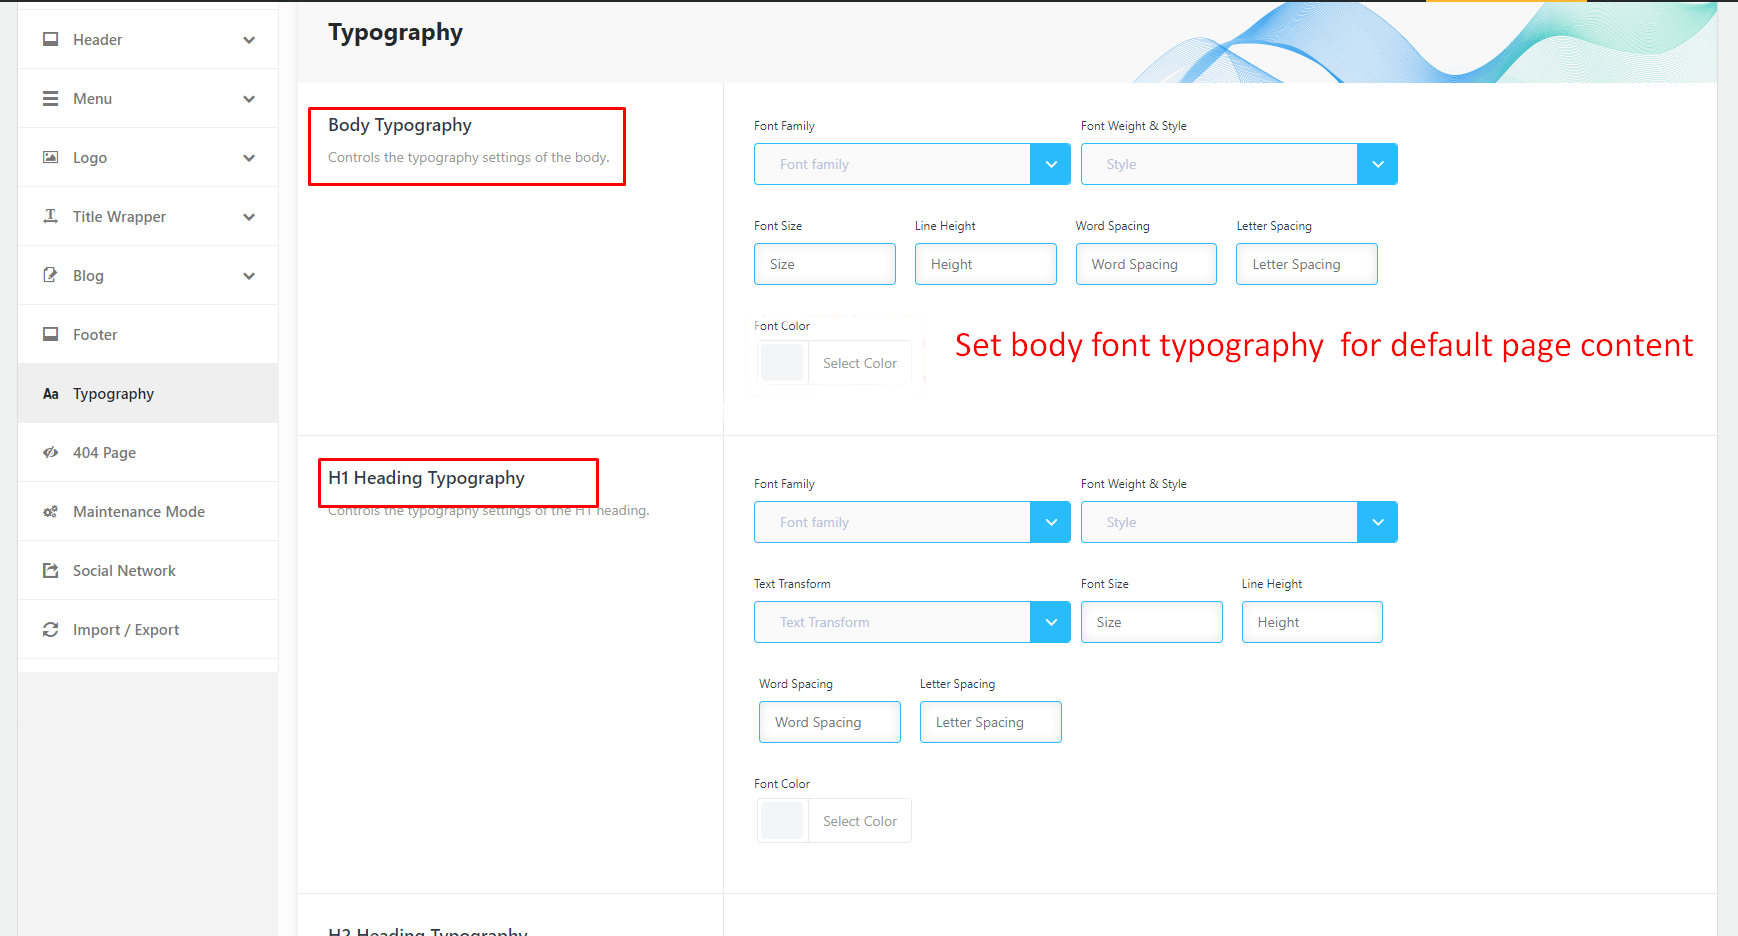
Typography Settings For Default Page Content
Blog Page Title


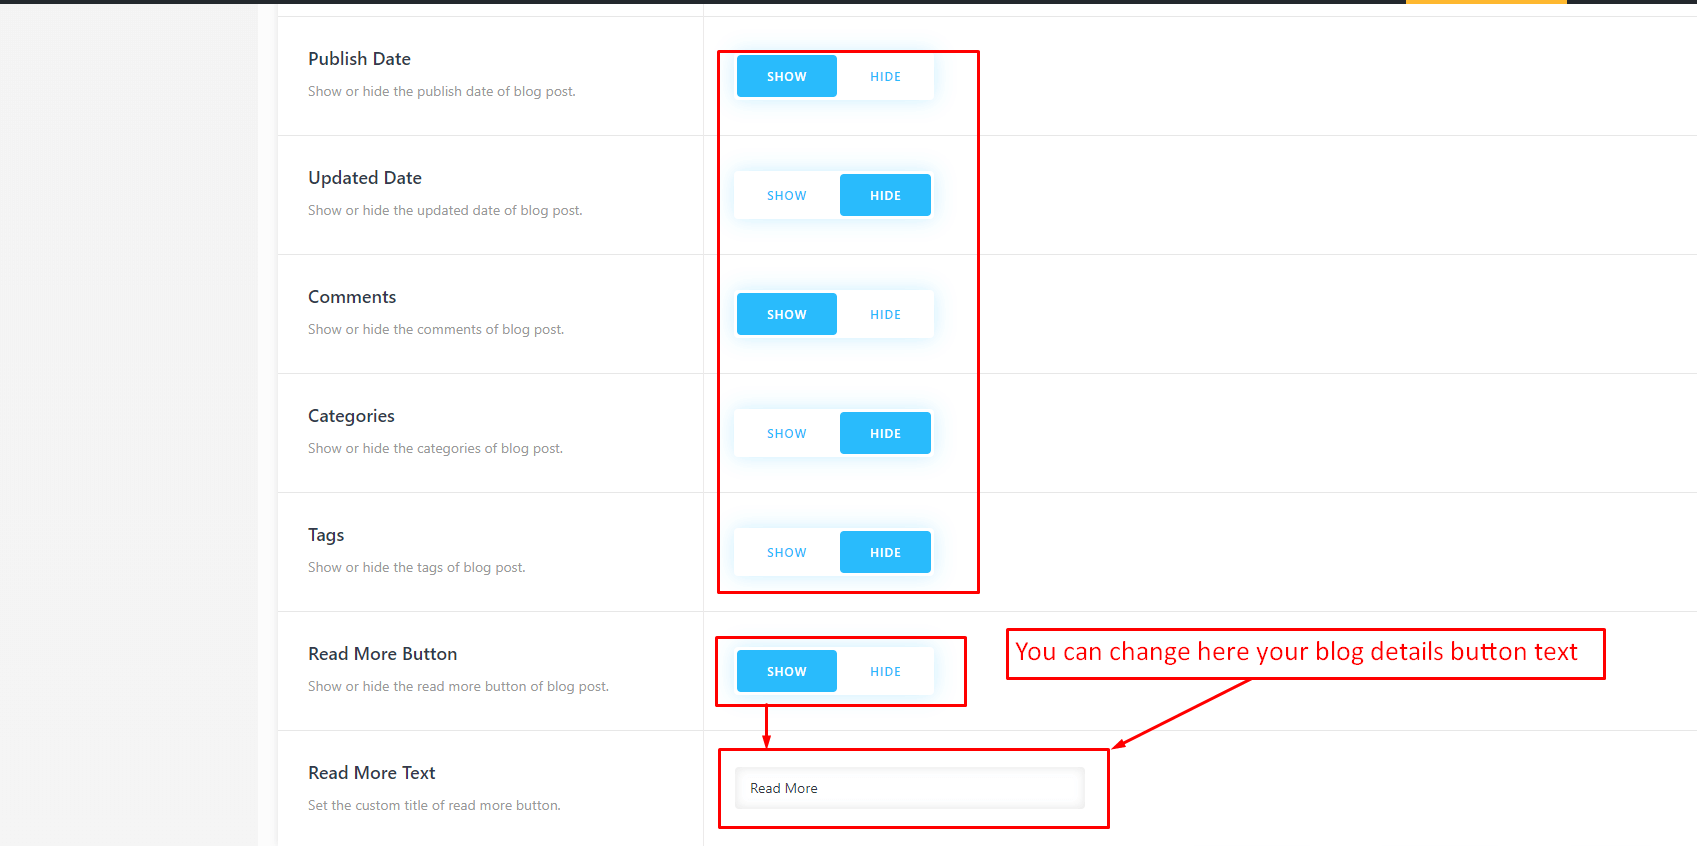
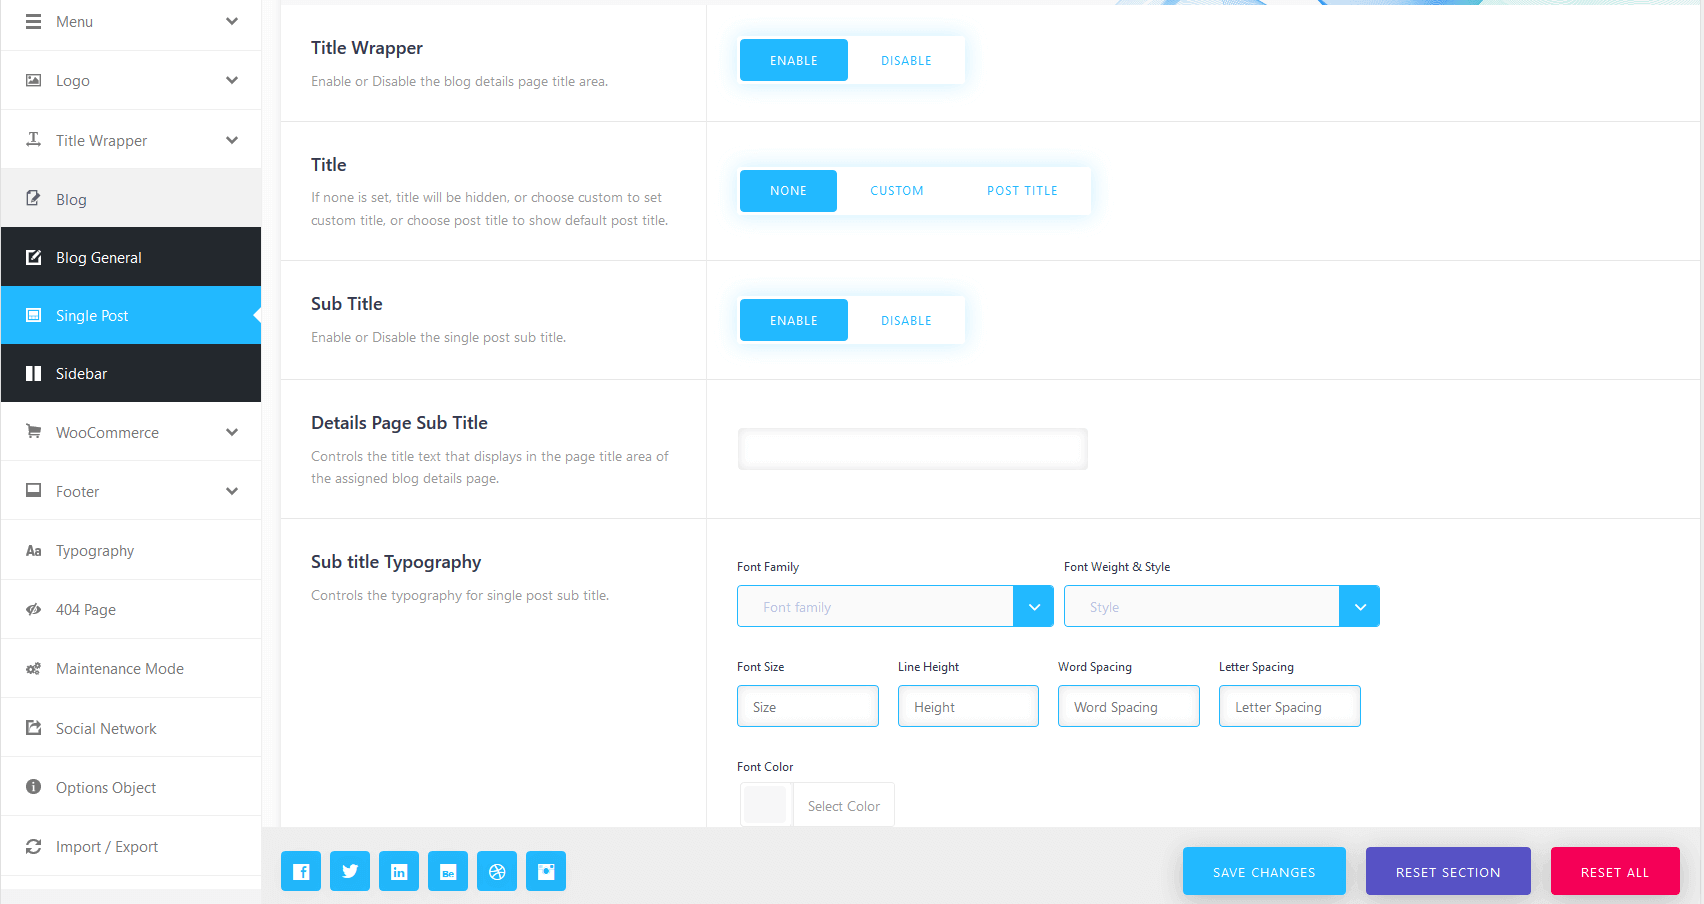
Blog Details
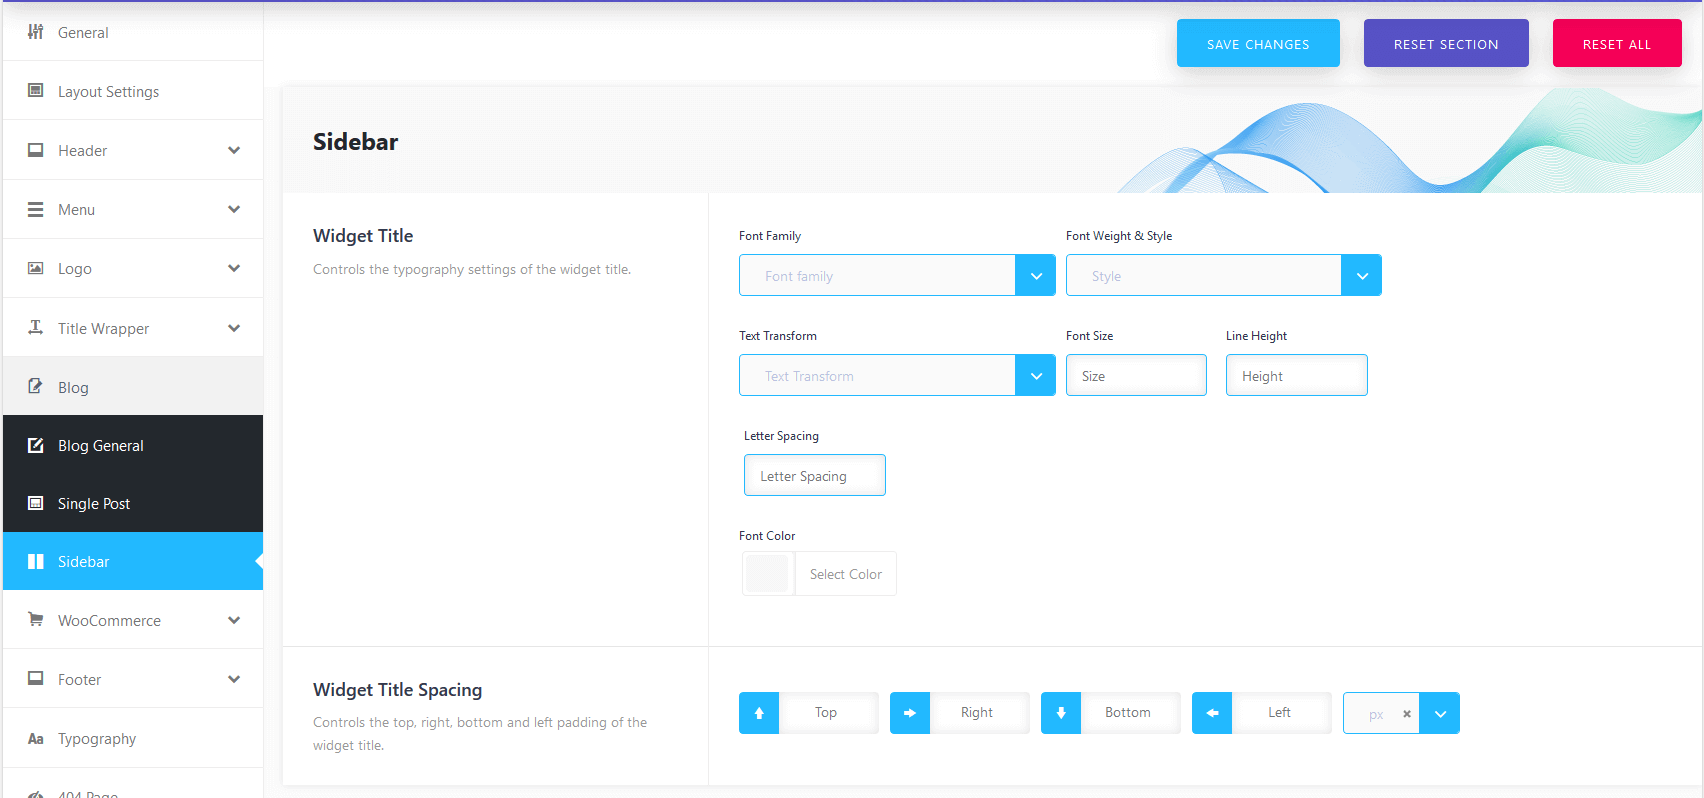
Blog Sidebar
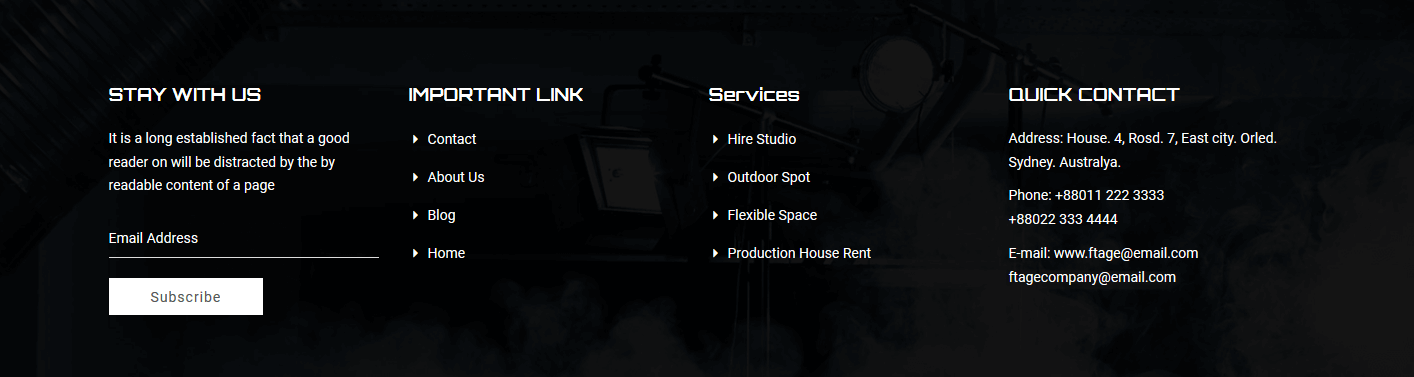
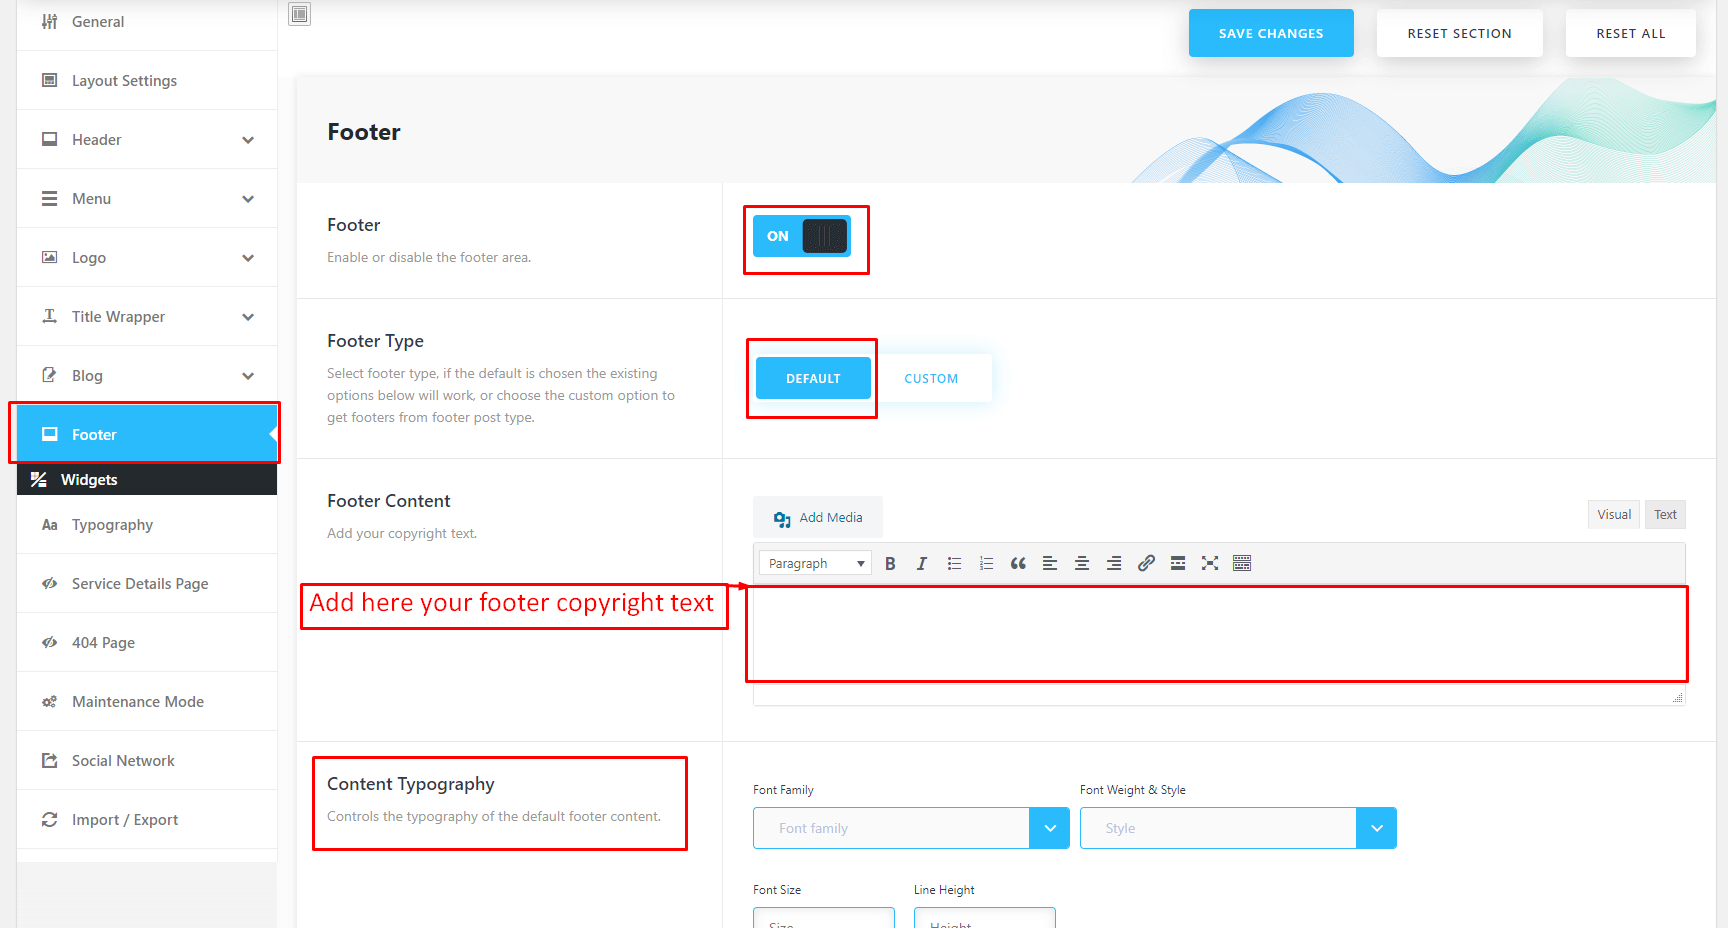
Footer Settings
- Footer copyright text
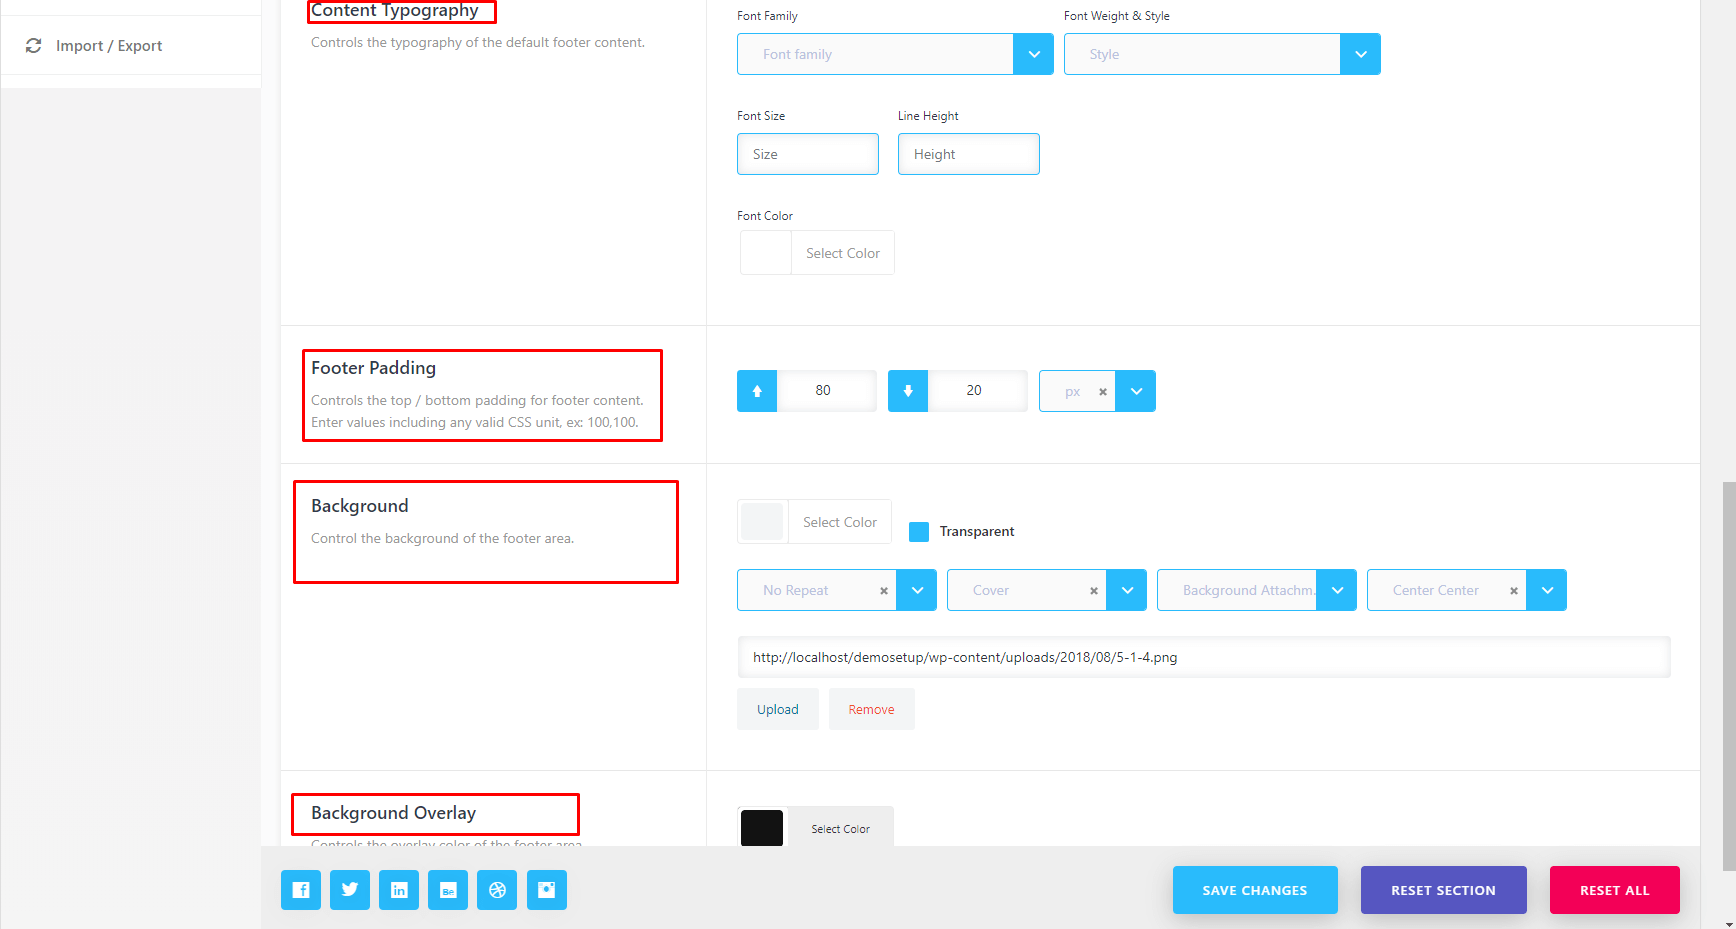
- Background option
- Overlay color option
Footer Typography
- Widget Typography
- Footer Body Typography
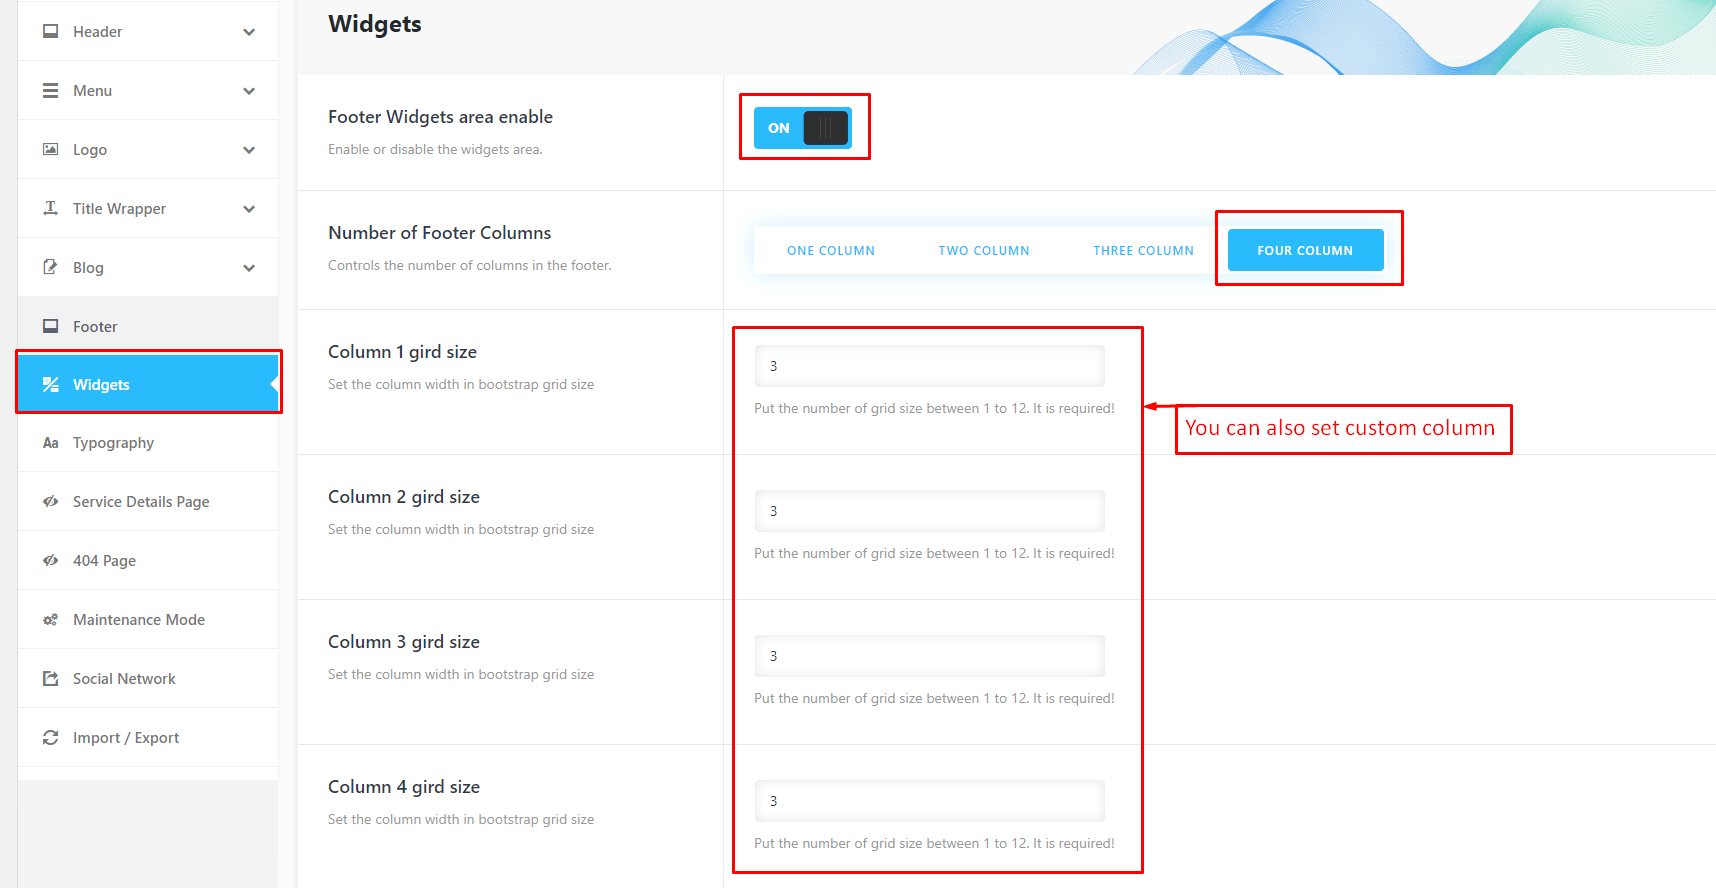
Footer Widgets
- Footer widget area on/off
- Set no of footer columns
- Background option
- Overlay color option
- Footer area padding option
- Widgets area enable/disable
- Widgets Column
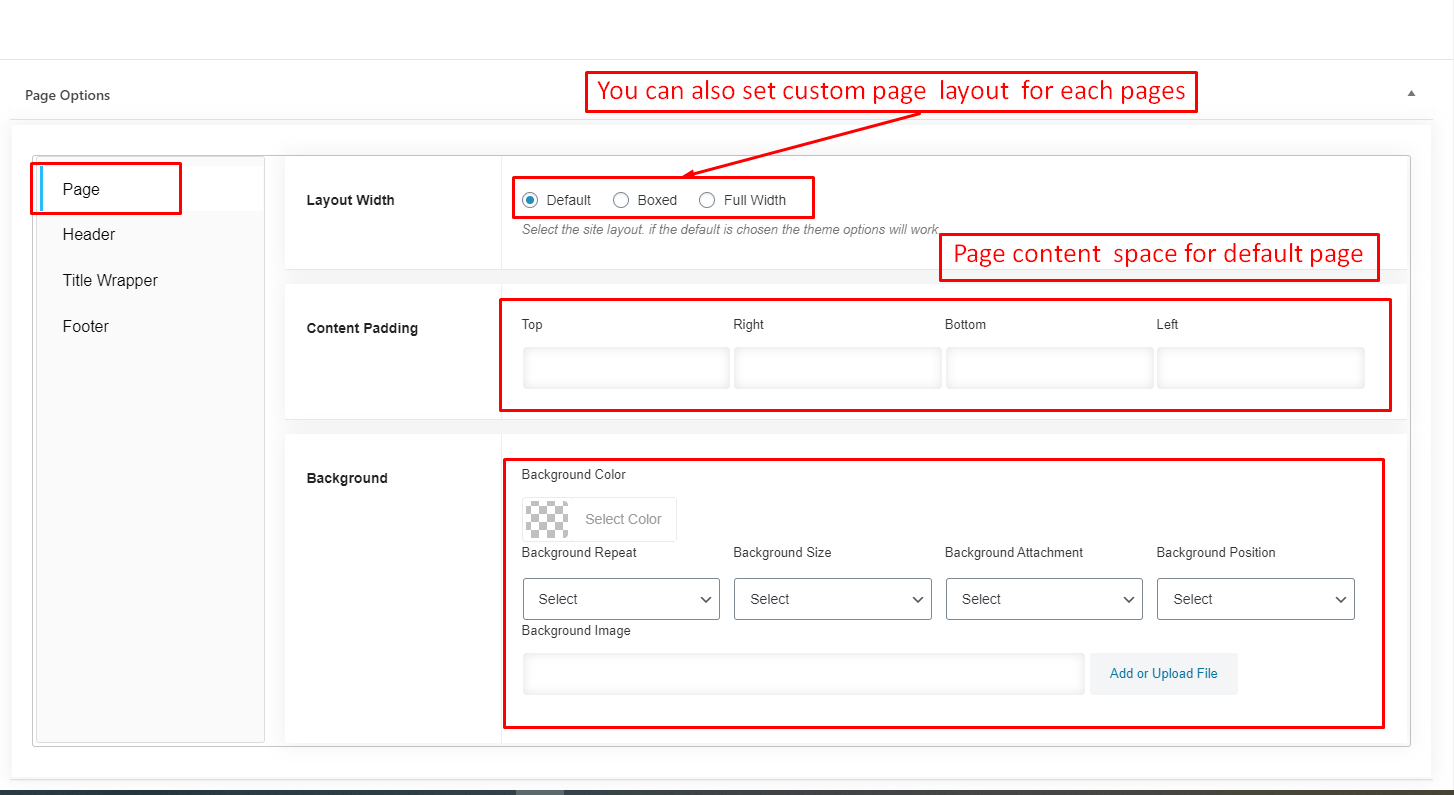
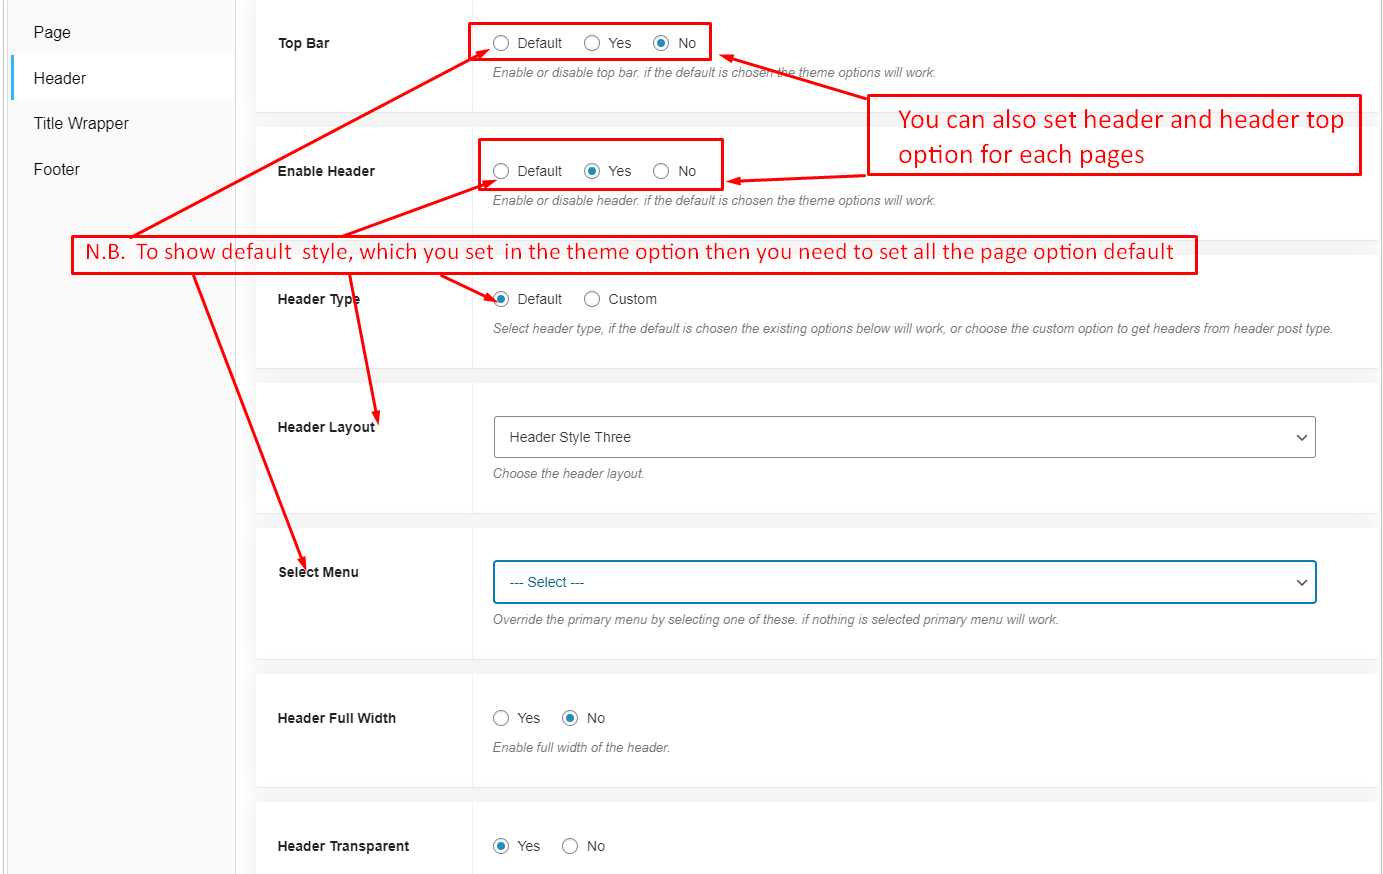
Page settings
- Page Layout
- Content Padding
- Background
- Header Topbar
- Header Type
- Header Layout
- Breadcrumb enable/disable
- Breadcrumb Background Color
- Breadcrumb Image Upload
- Breadcrumb Overlay Color
- Breadcrumb Text Position
- Overlay Color
- Breadcrumb Area Padding
- Page Area Padding
- Footer layout
- Footer Background
- Footer enable/disable
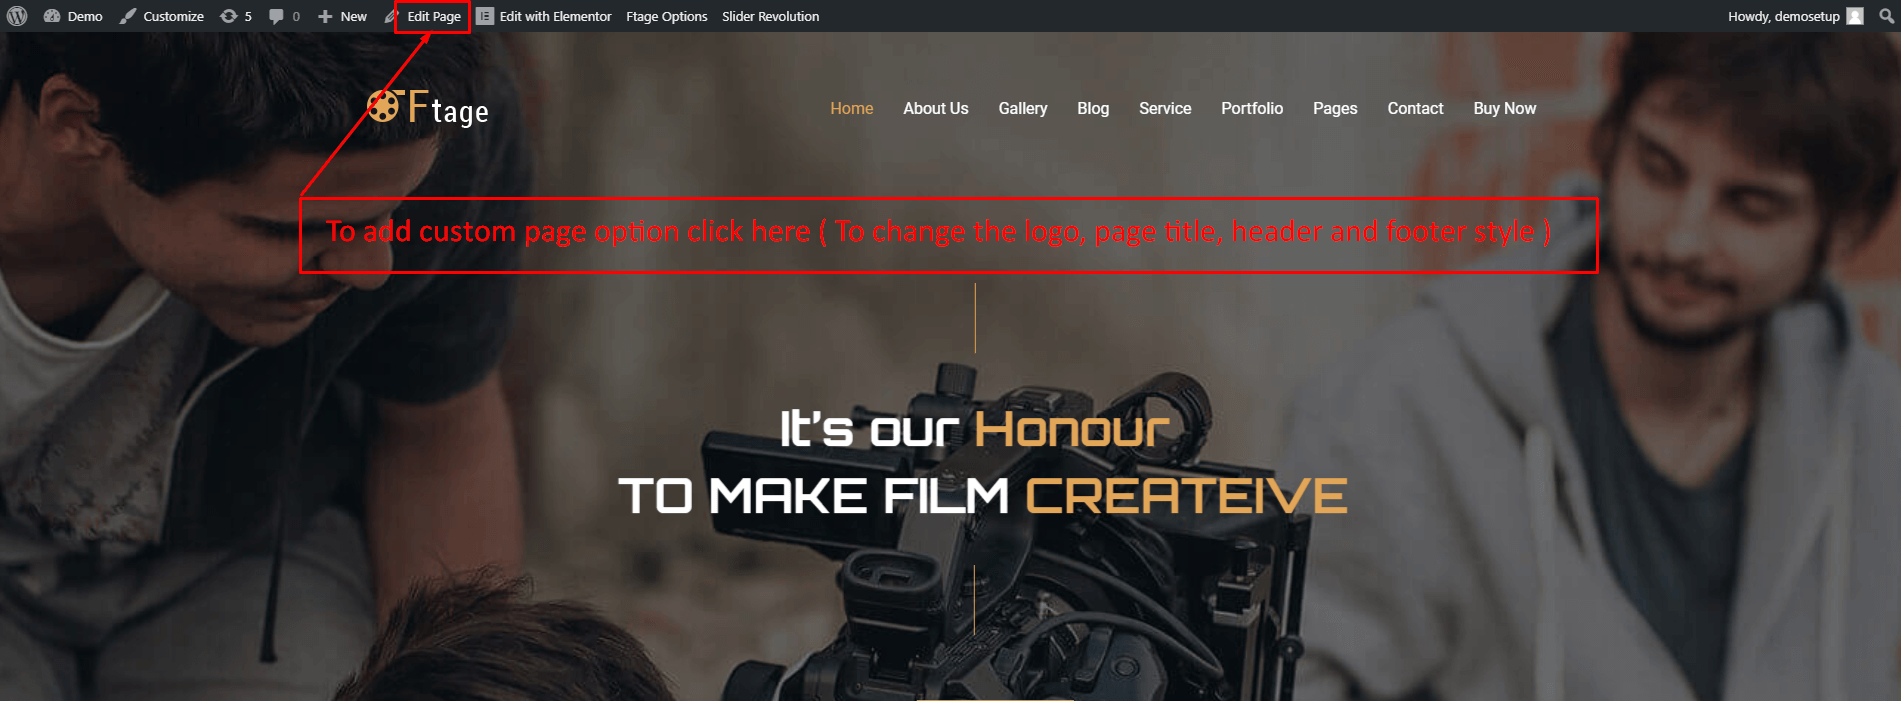
- Create any page and come to the bottom of the page, Here are some several optoins, that will help you to build your desired page.

Page Header, Footer And Topbar
- Top Bar enable/disable
- Header Layout
![]()

Mailchimp Wp
1. You need to install Mailchimp for wp plugin
2. Create an api key and mailchimp list from https://mailchimp.com/
3. Set your api key

4. Create a form

4. Assign your mailchimp list to your form and hit save.
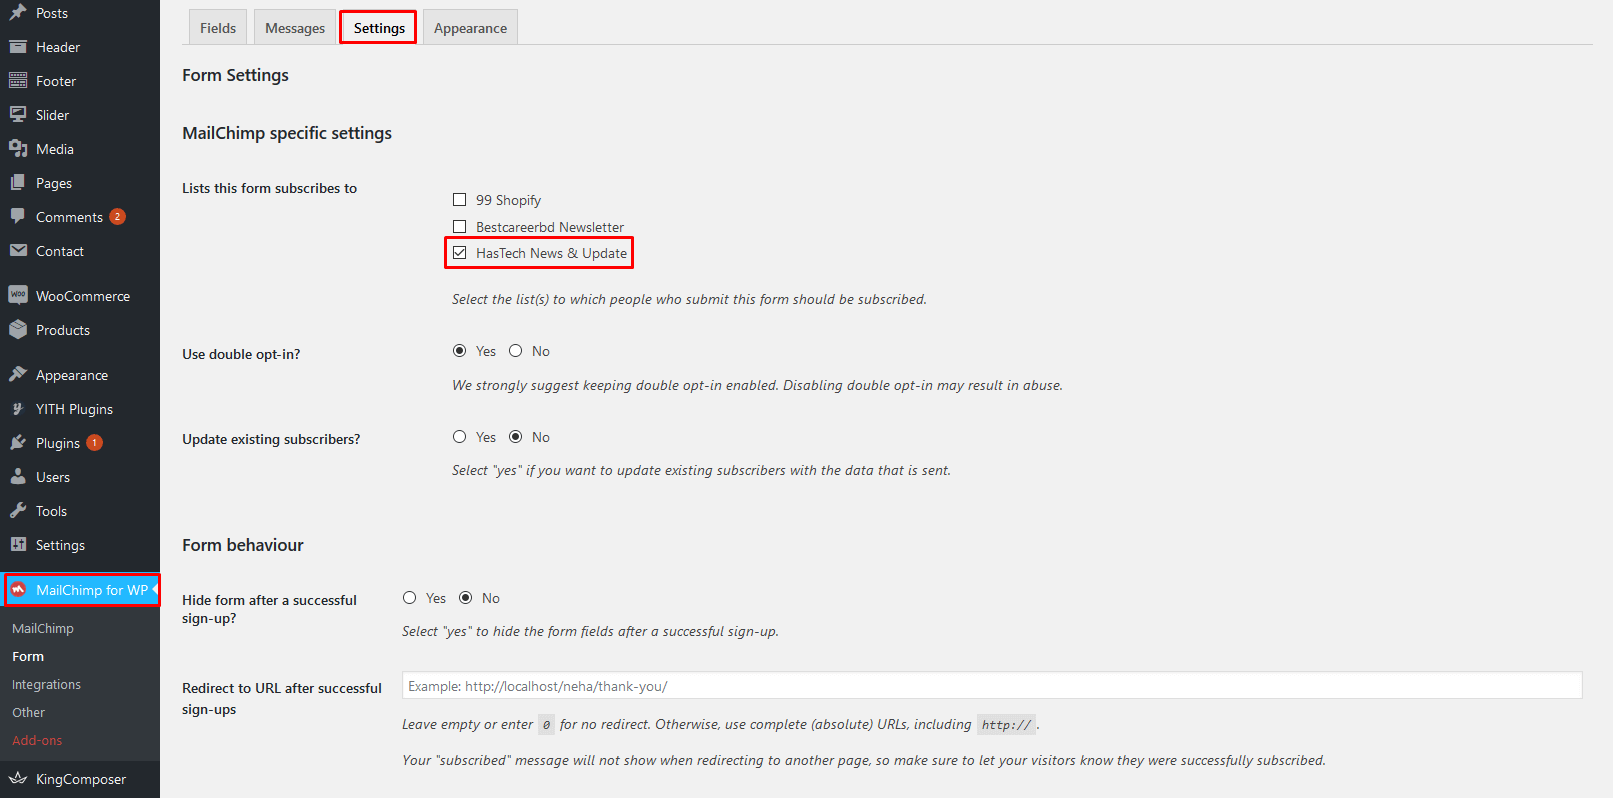
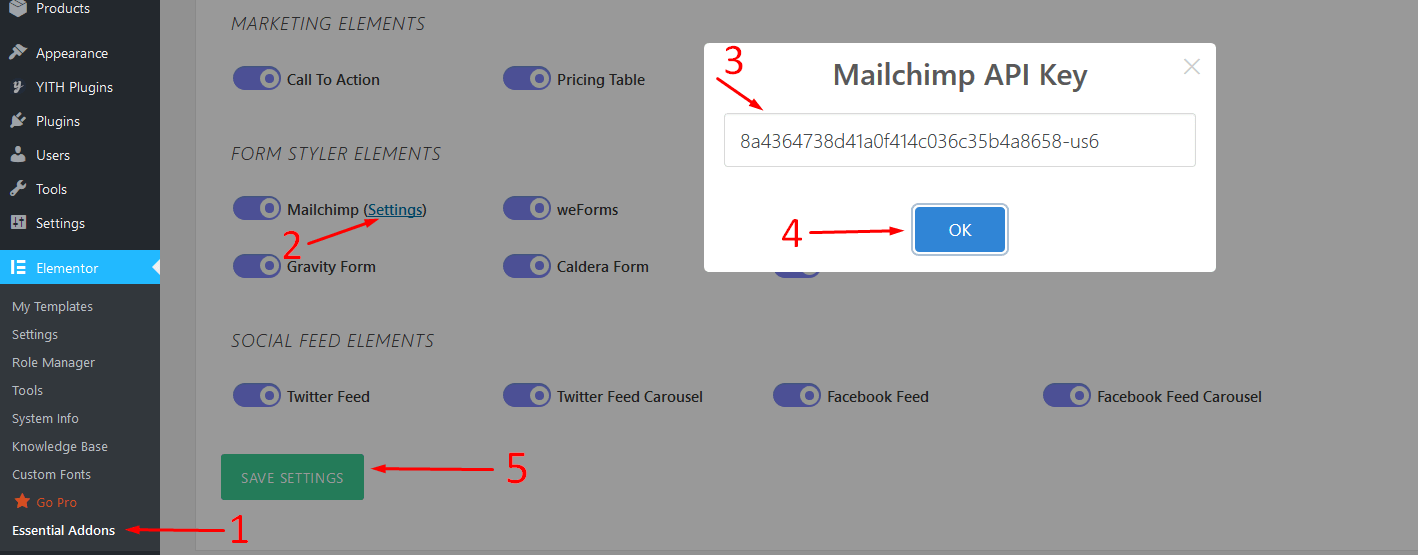
Mailchimp Essential Addons setting.
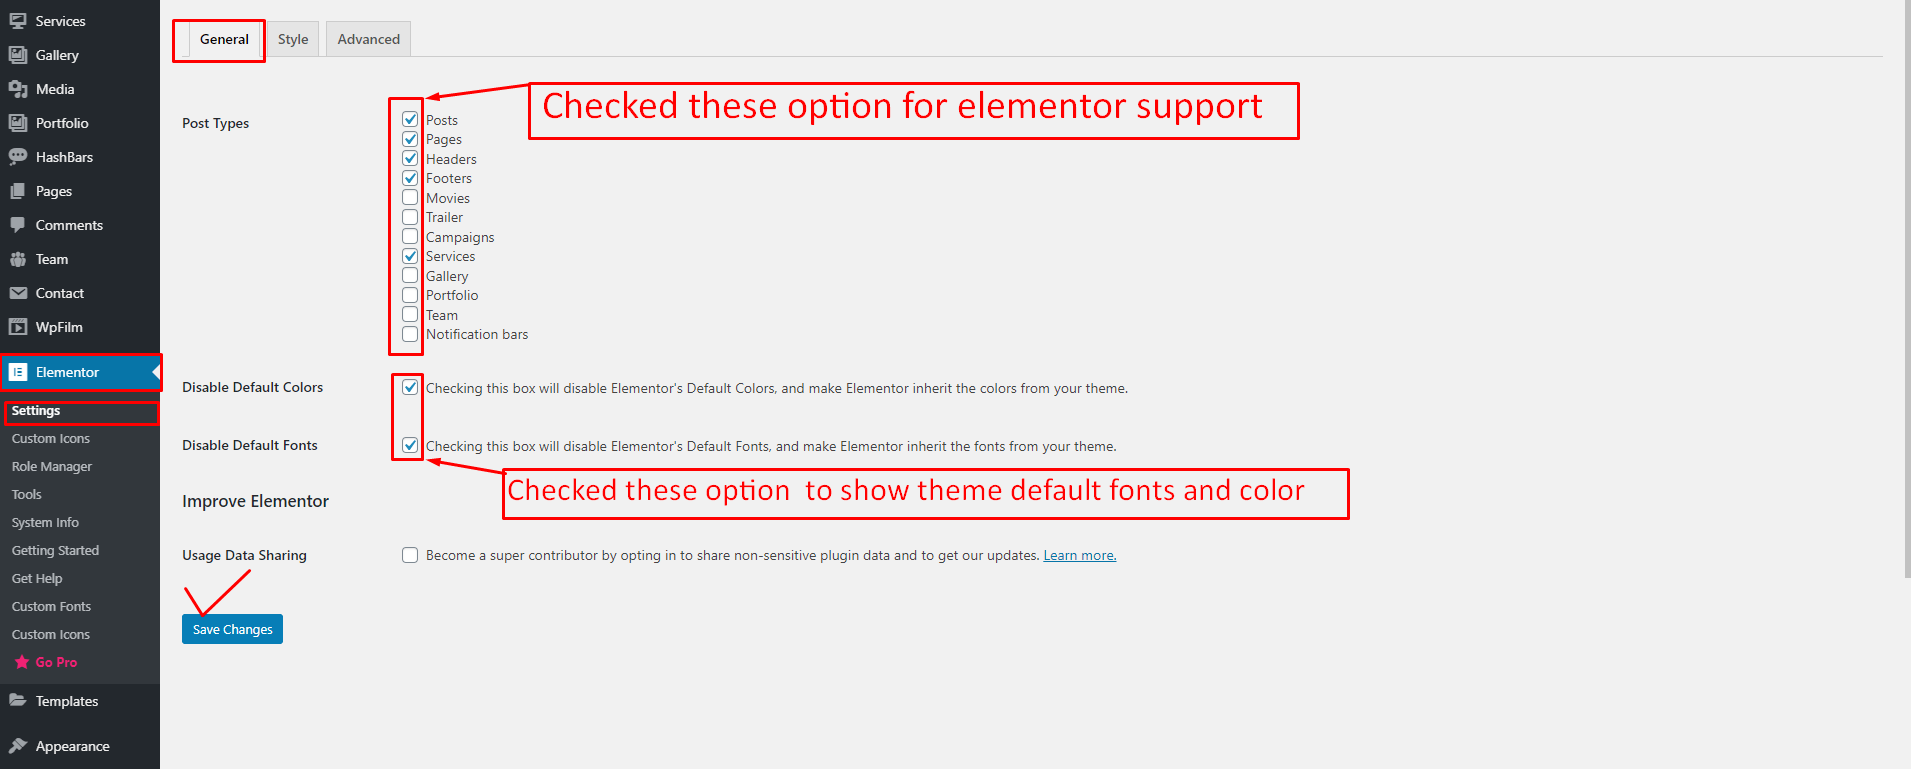
Elementor is the most advanced WordPress page builder plugin. It's lightweight and extremely powerful.
Elementor is the fastest page builder ever. It’s real-time and instant process. With professional Back-End Editor for free 100%, it comes complete with top-notch features embedded and a truly intuitive UI. With no programming knowledge required. Elementor can save you both time and headache, allowing you to easily create pages like a true professional web designer.
- Full features Back-End Editor.
- CSS system in backend
- RESPONSIVE system in backend
- Install free online section presets
- Offline section presets
- Documents
- Videos tutorials
- Easy Customization
- Without Hand Coding
Elementor Default Settings

Revolution Slider Plugin
This theme includes "Revolution Slider" plugin. You can import sample sliders from the theme package.
Go to Revolution Slider then click on Import Slider
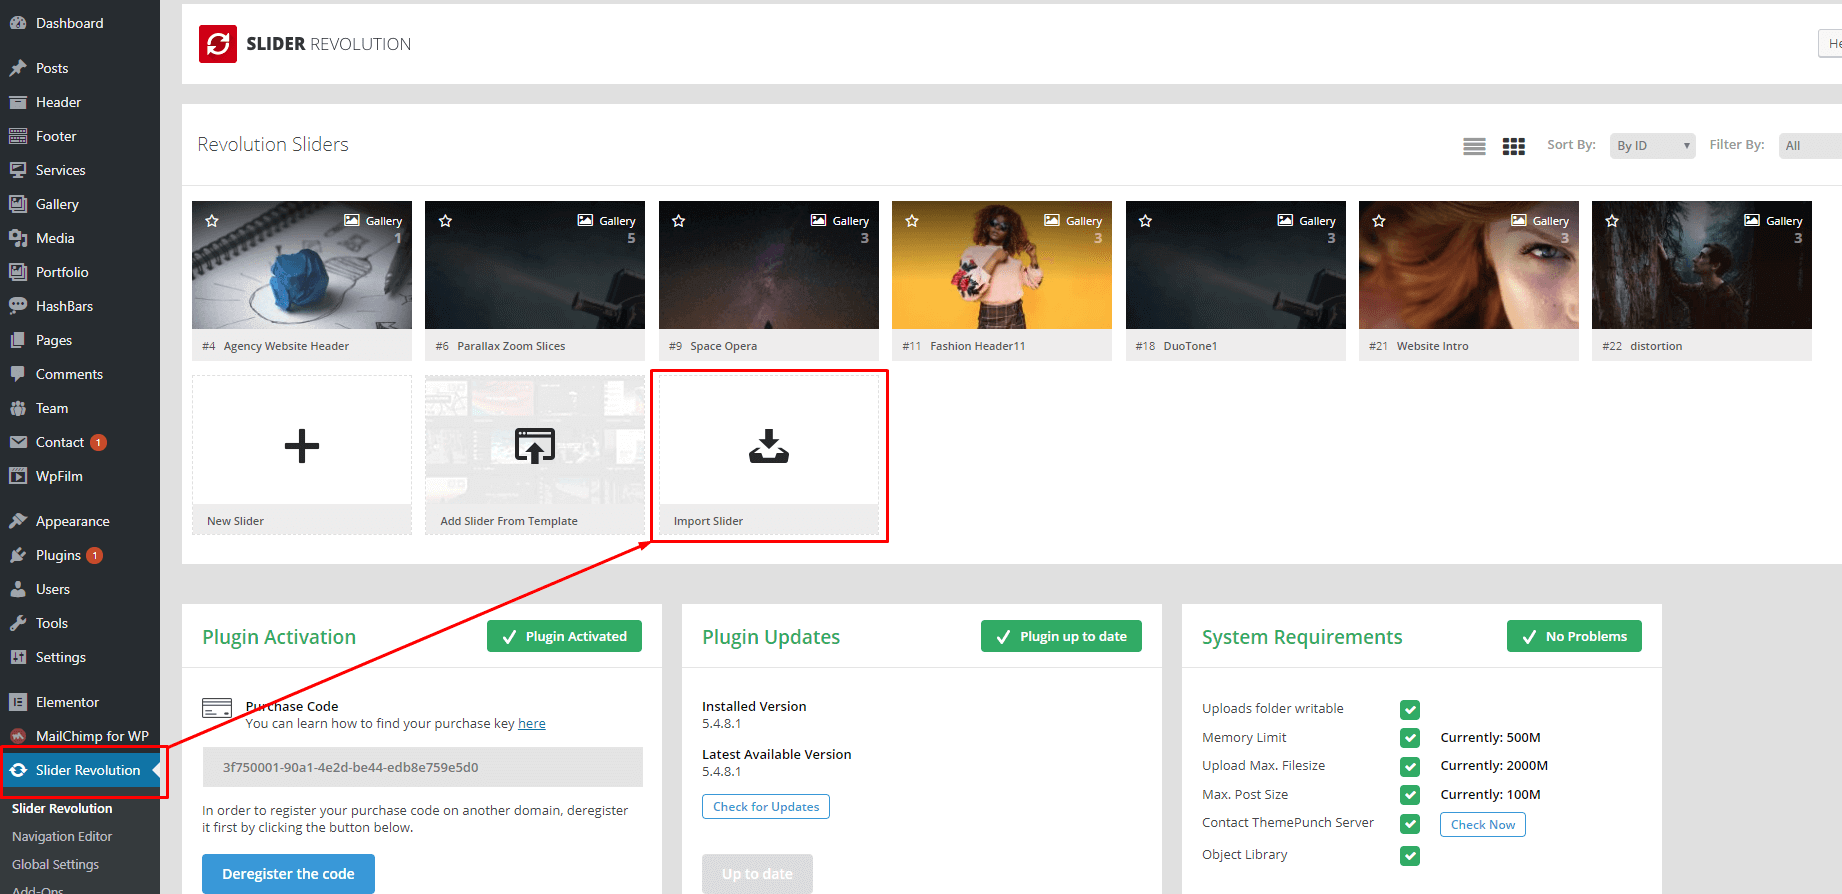
Click on Browse button and select a .zip file in the "sample-sliders" folder. Click on "Import Slider".

After import sliders, you can go to edit slides, change the image, text, animation ... Please read Slider Revolution document before you working on Revolution Slider.
Please watch this video to know how to import sample sliders.
Elementor Page Setting
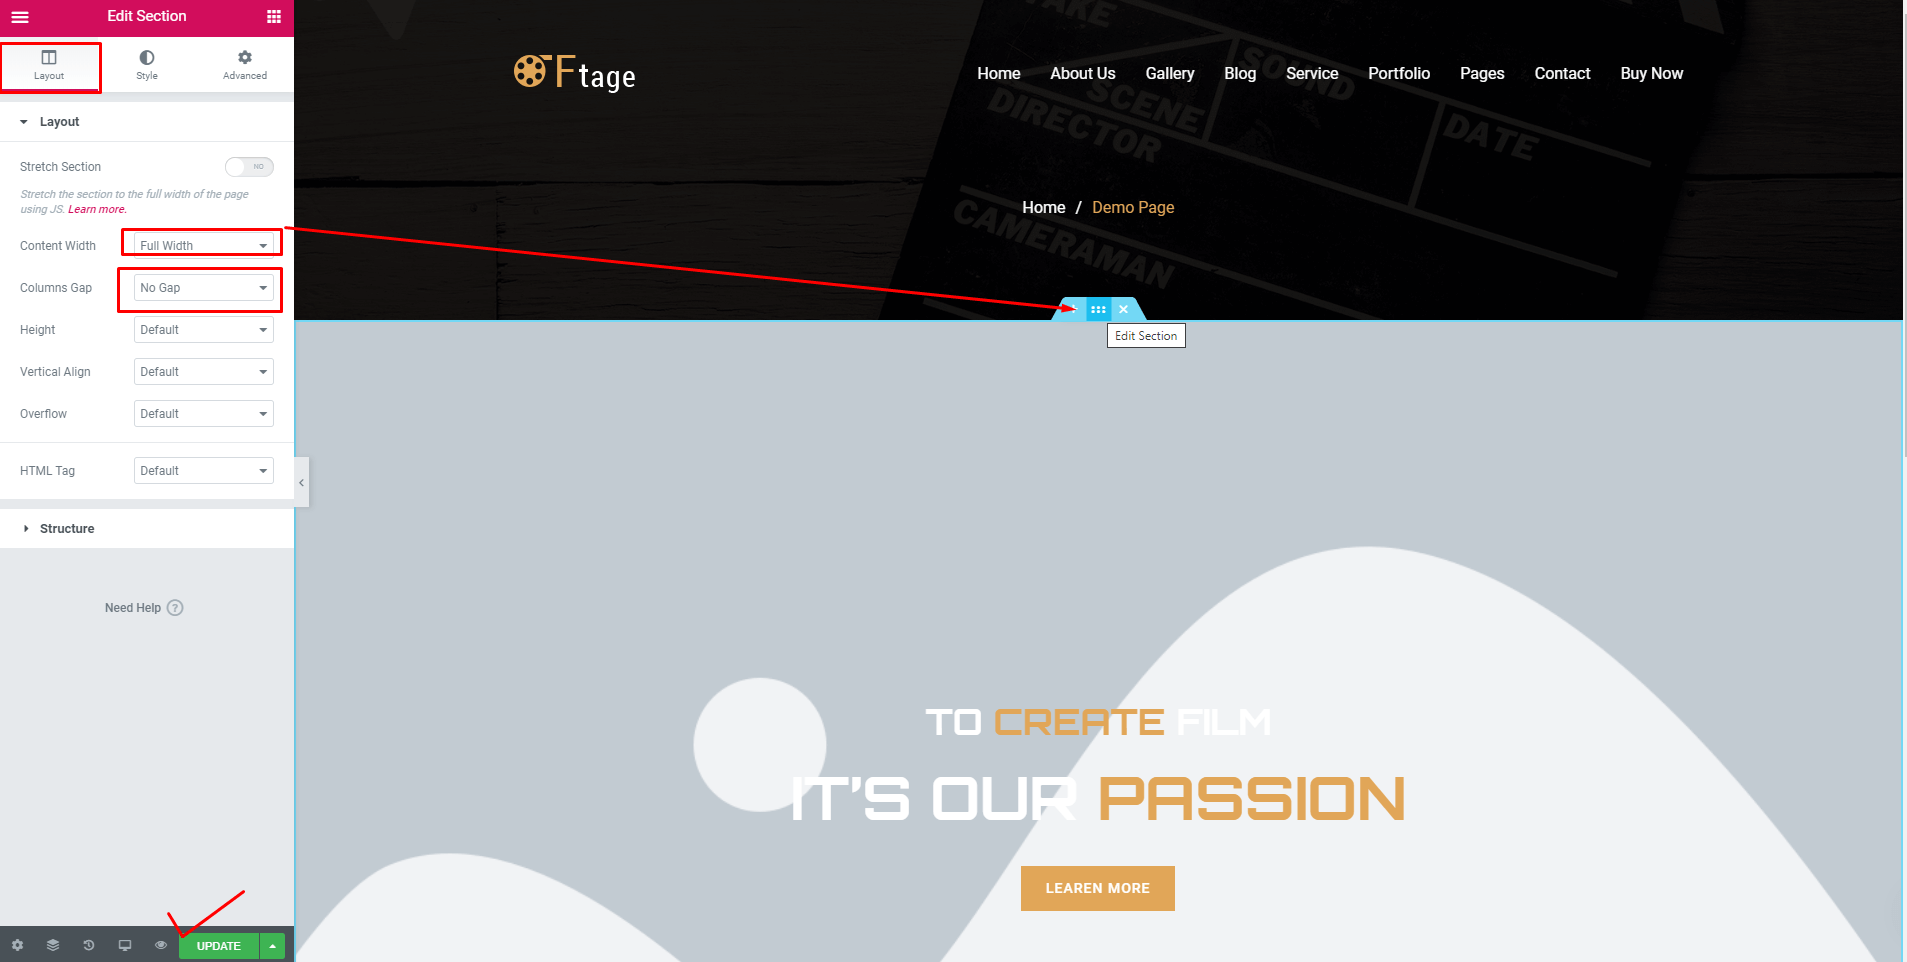
Create a page adding Elementor fullwidth
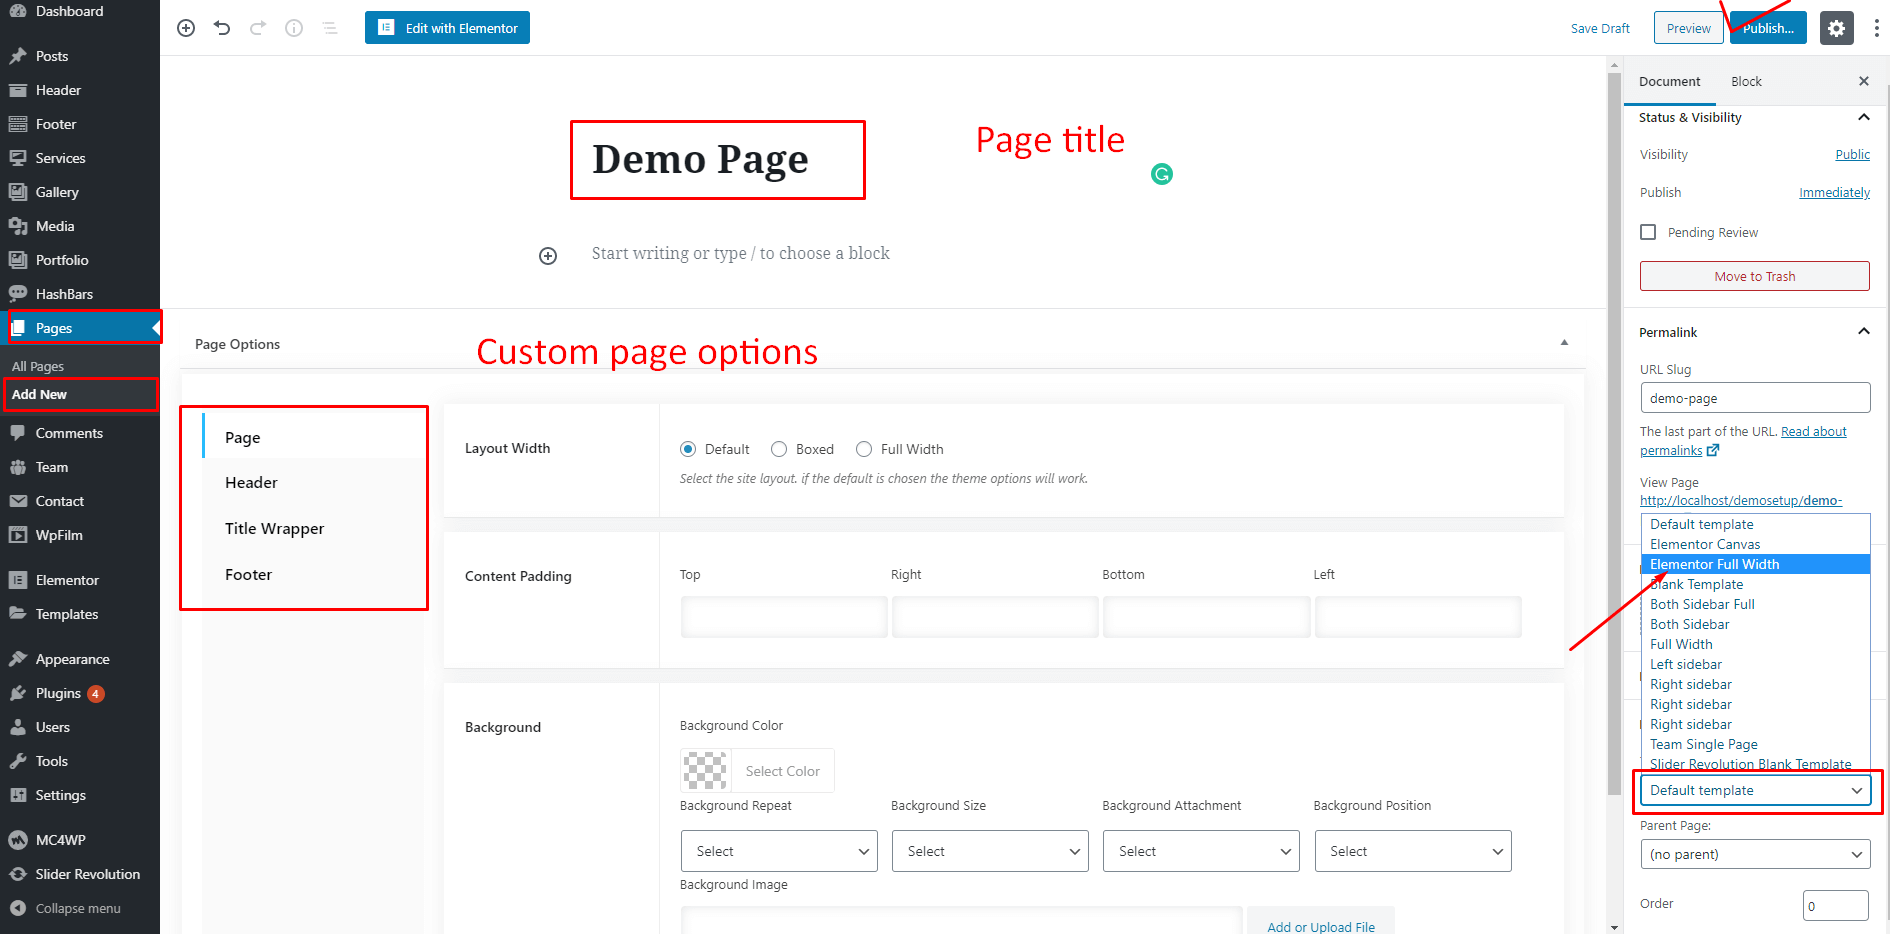
After publishing the page open with Elementor Editor

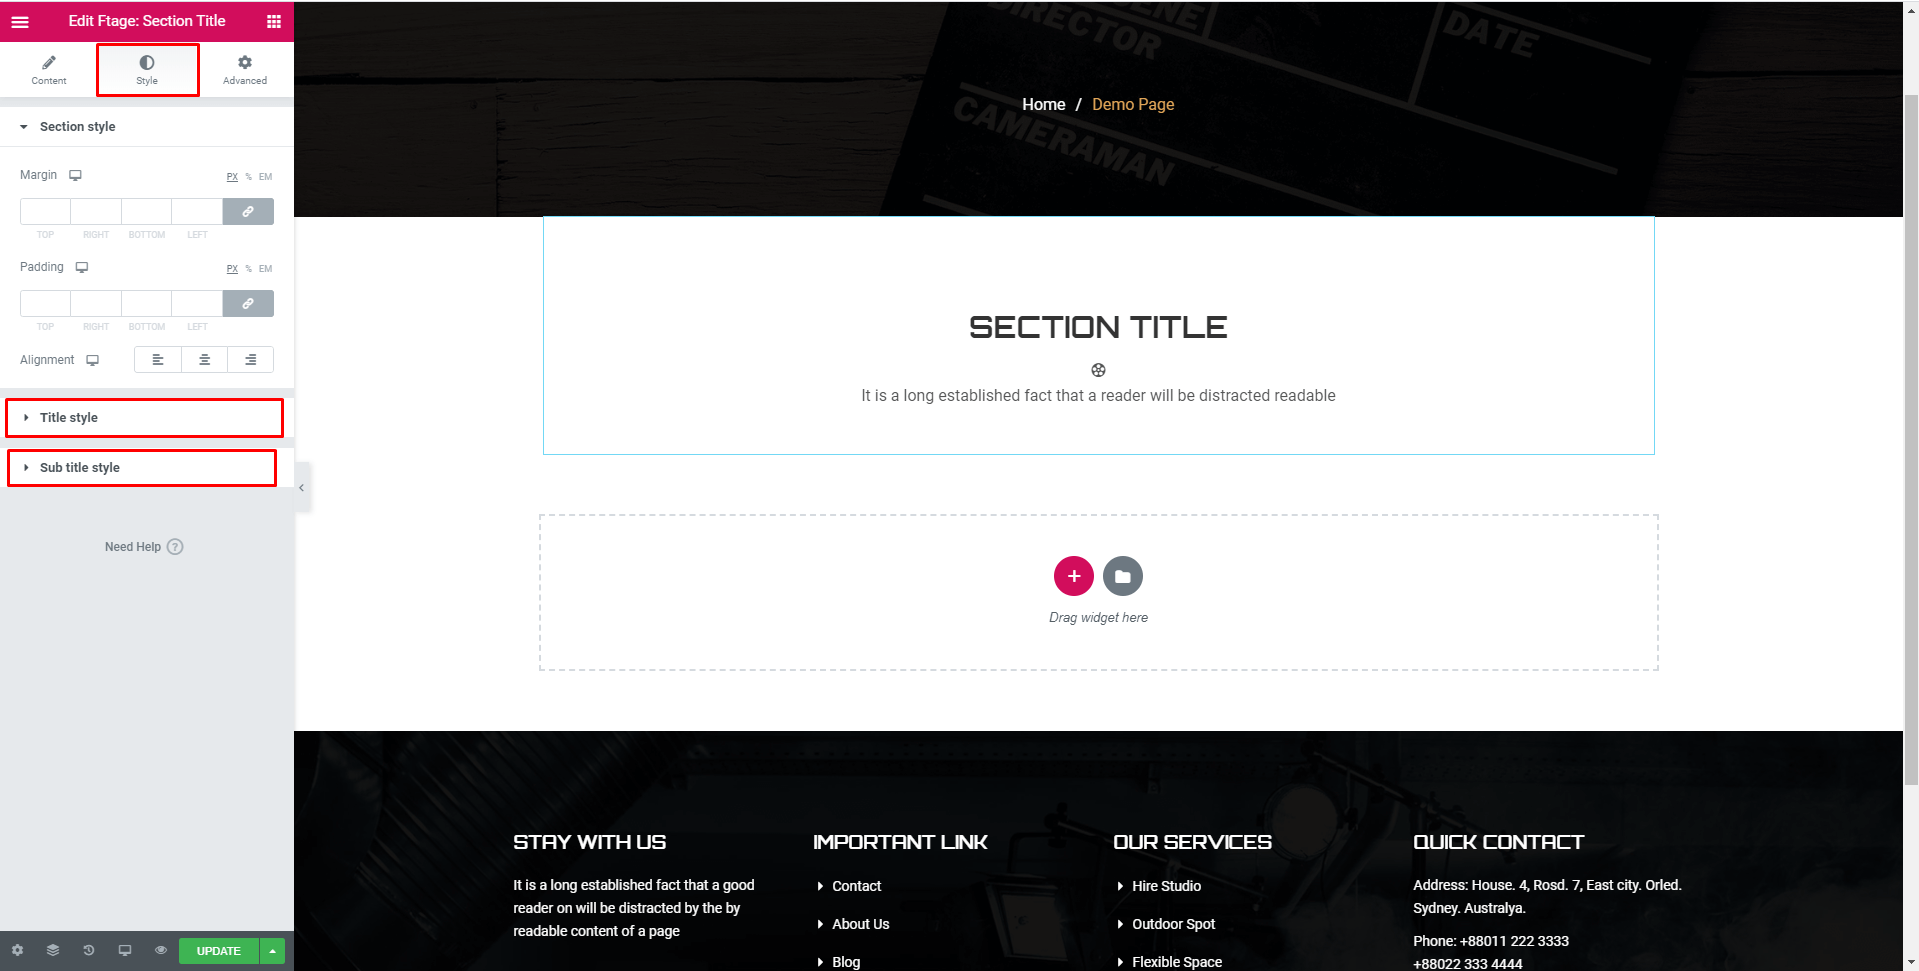
Section Title Adding/Customize
1. Drug & drop the Section Title
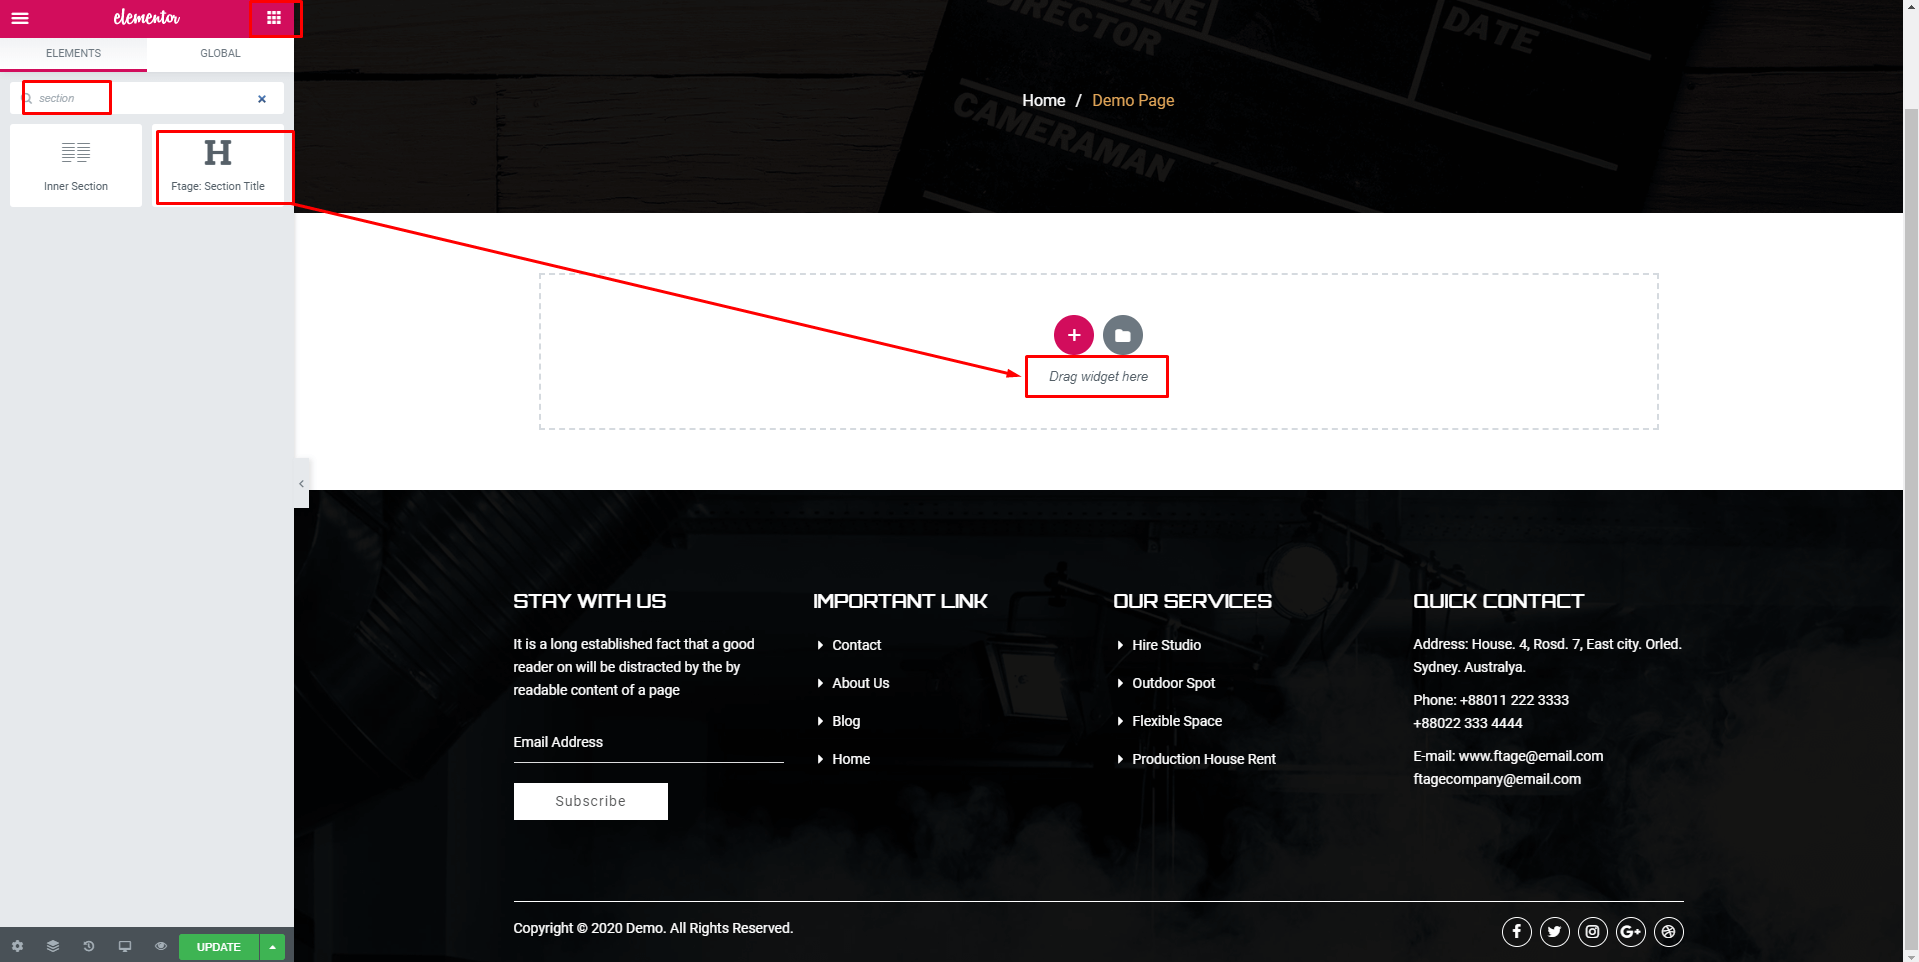
2. Select your layout

3. Add Title content

4.Title style
Slider Section Adding/Customize
1. Drug & drop the slider addons
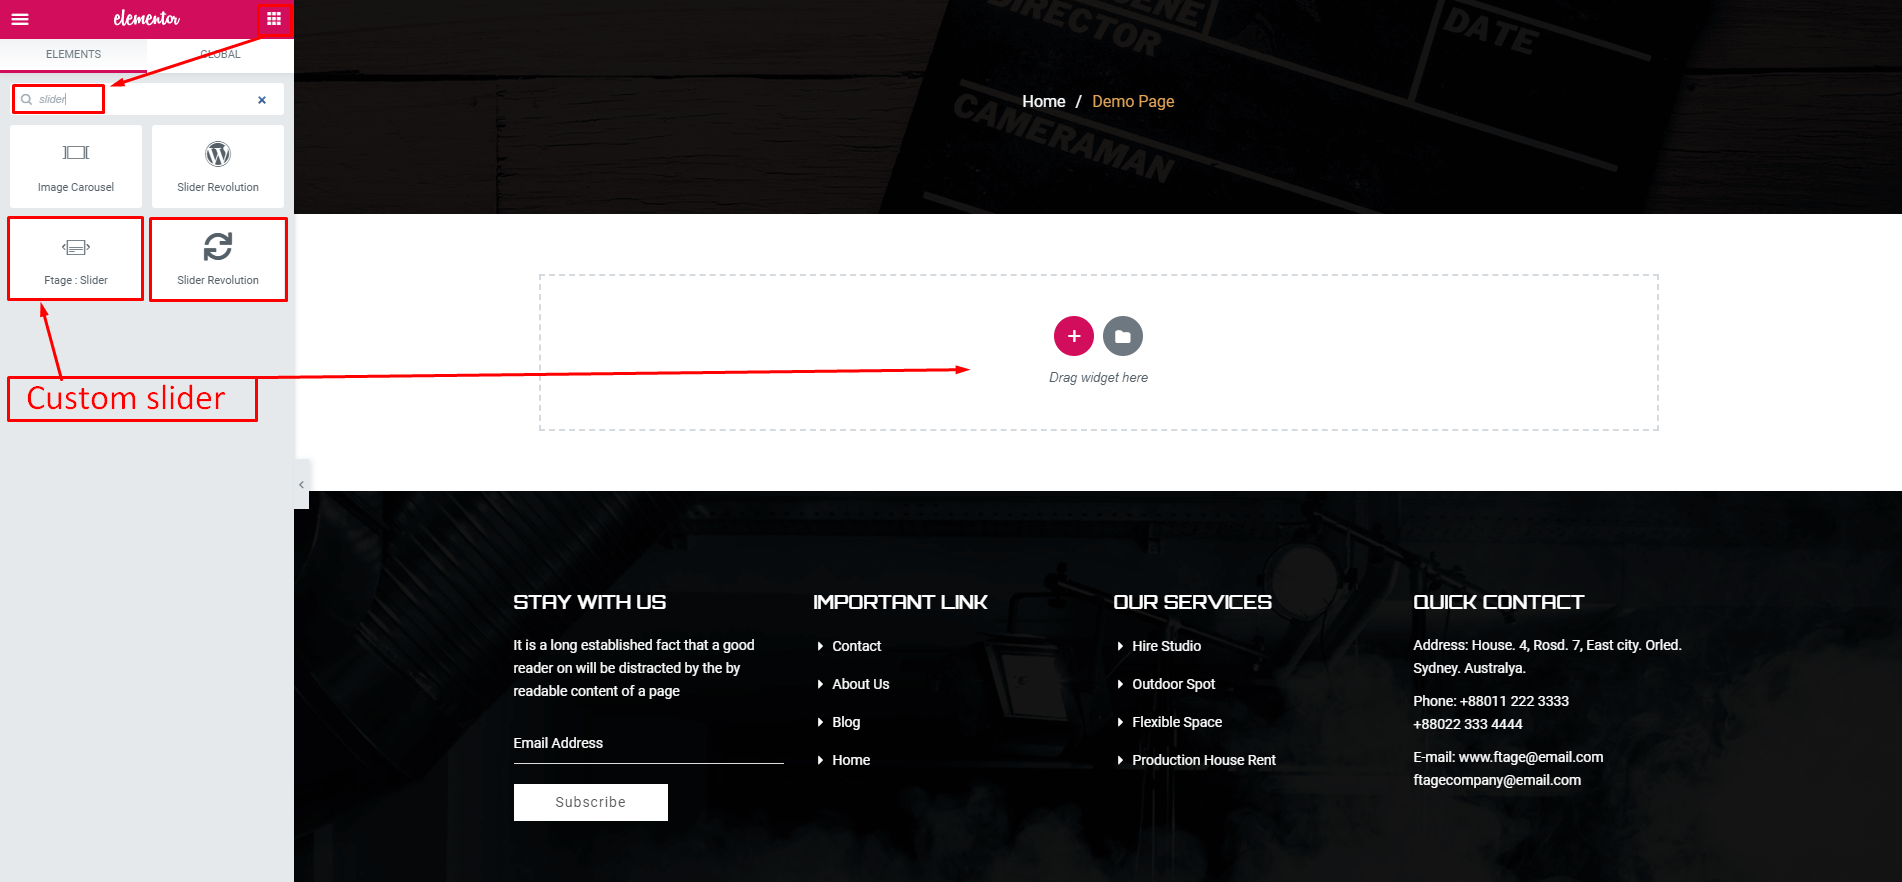
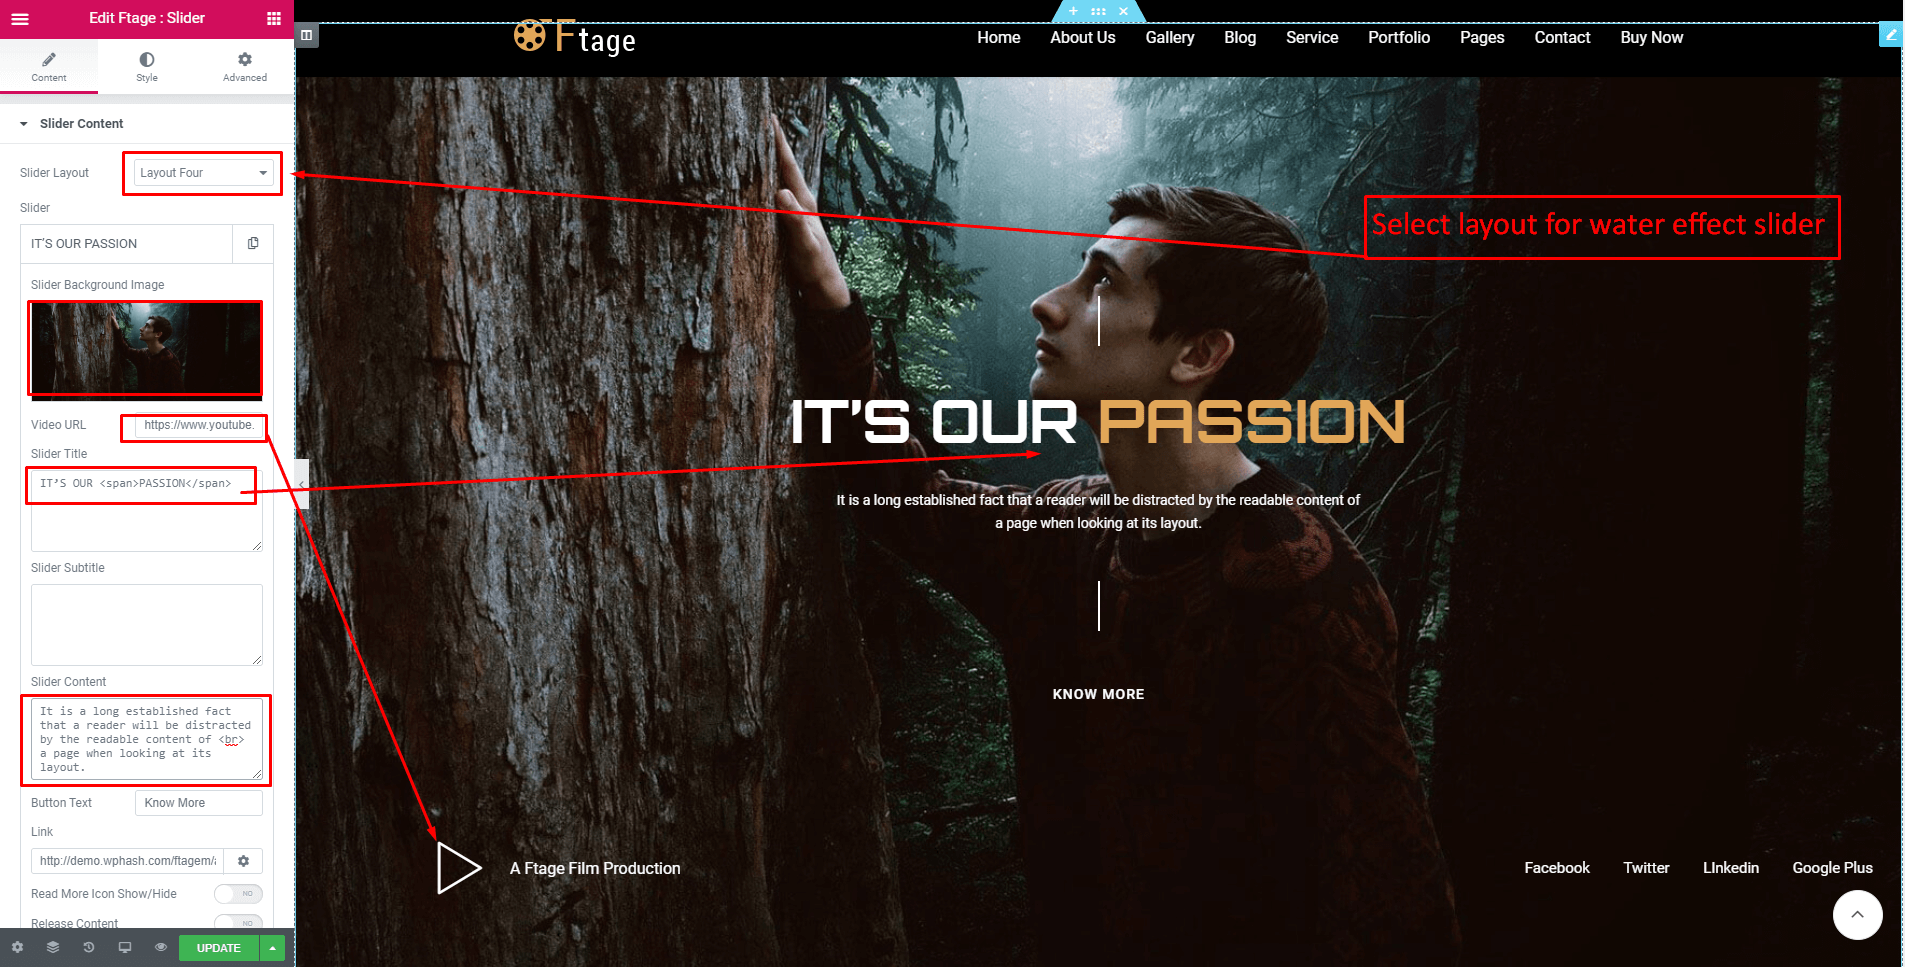
2. Select your layout
3. Add slider content for Water Effect slider
4. Add slider content for Film Campaign Slider
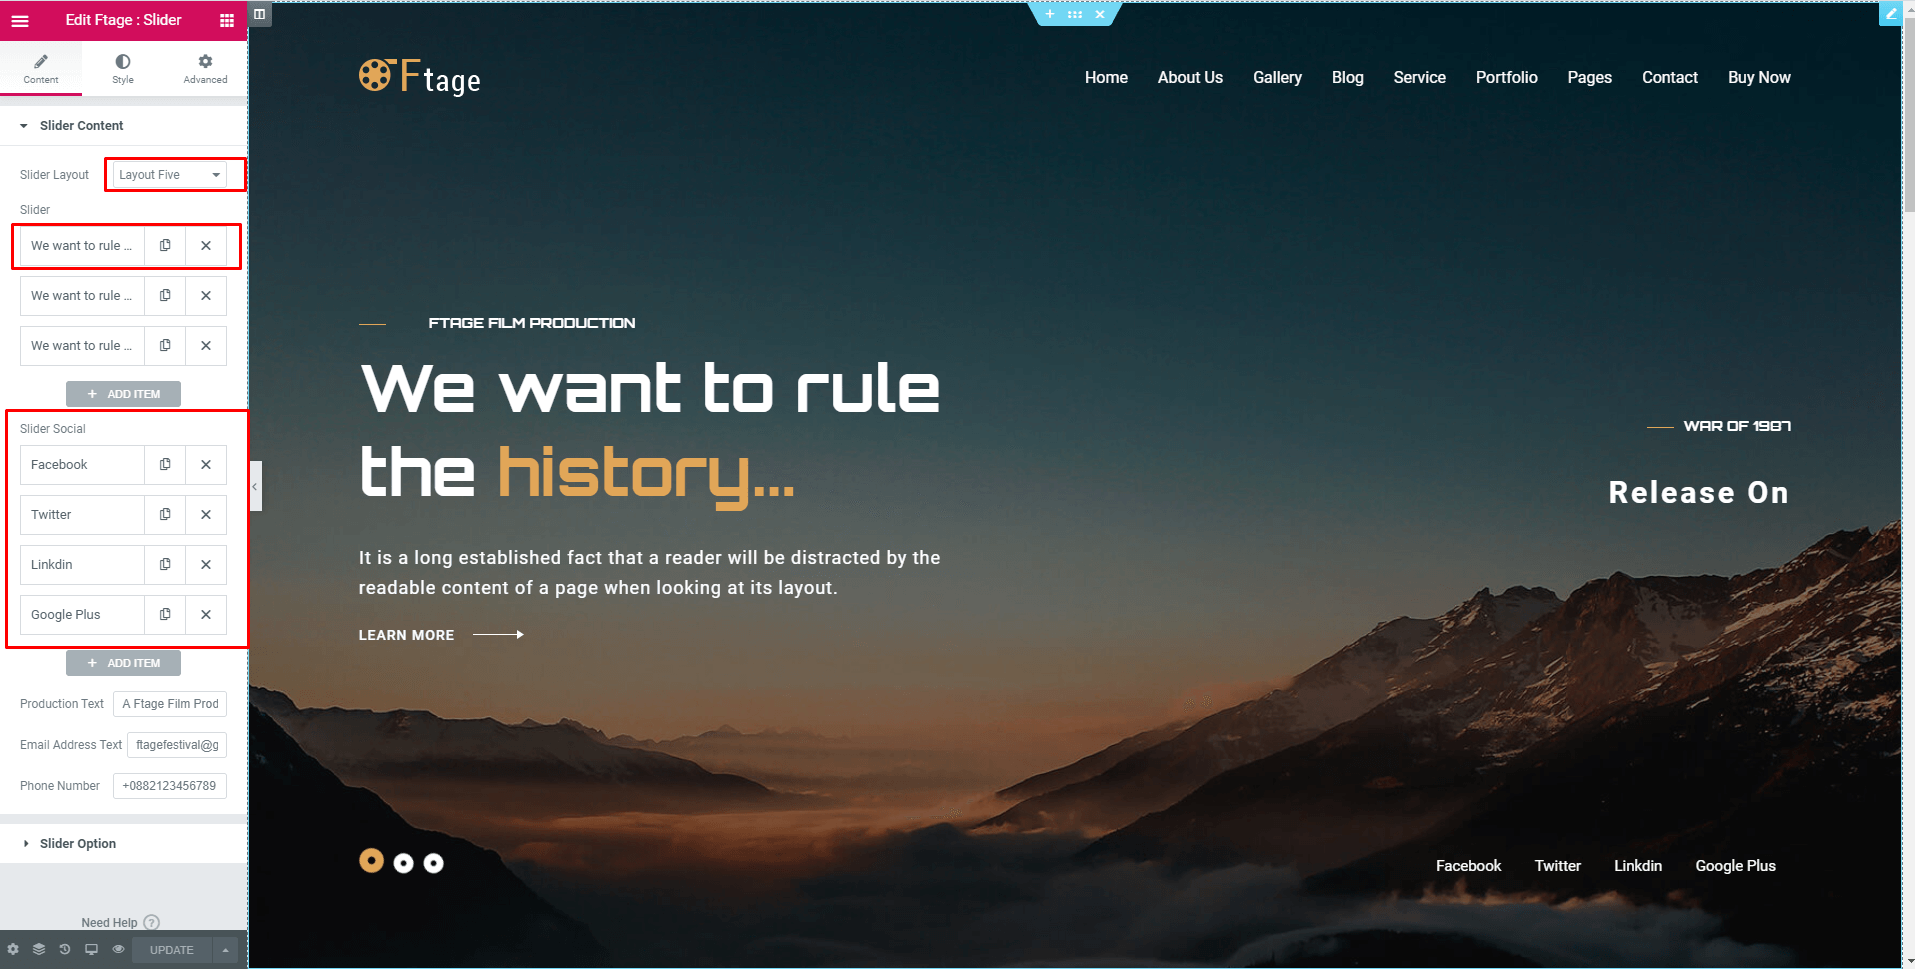
5. Add slider content for Film Festival Slider

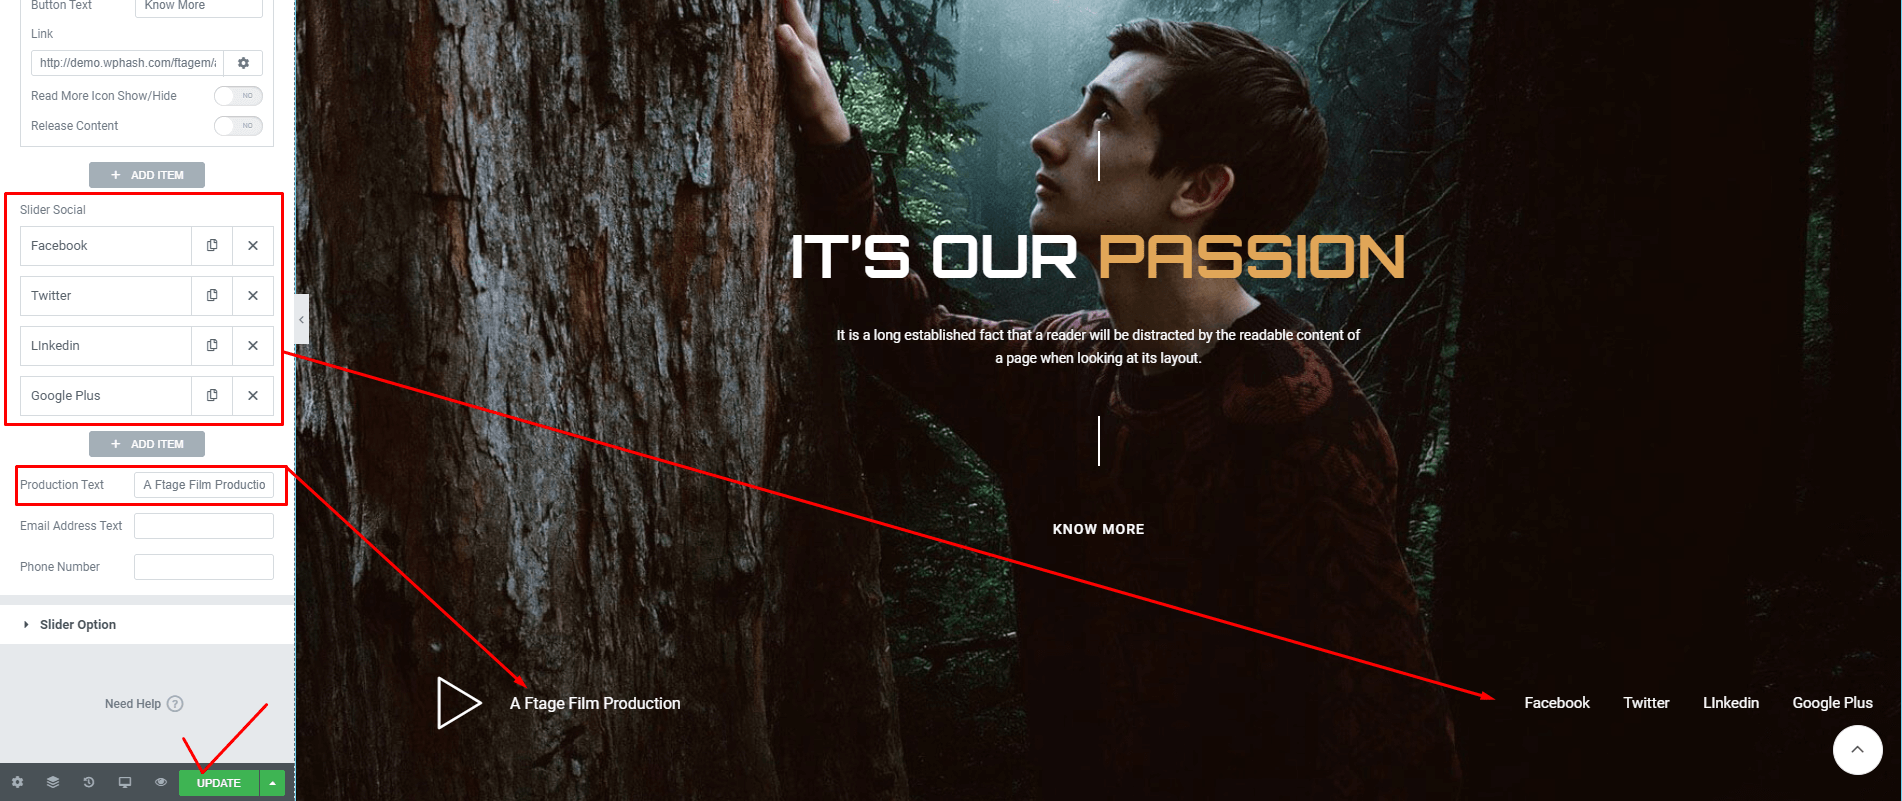
4. Set slider option
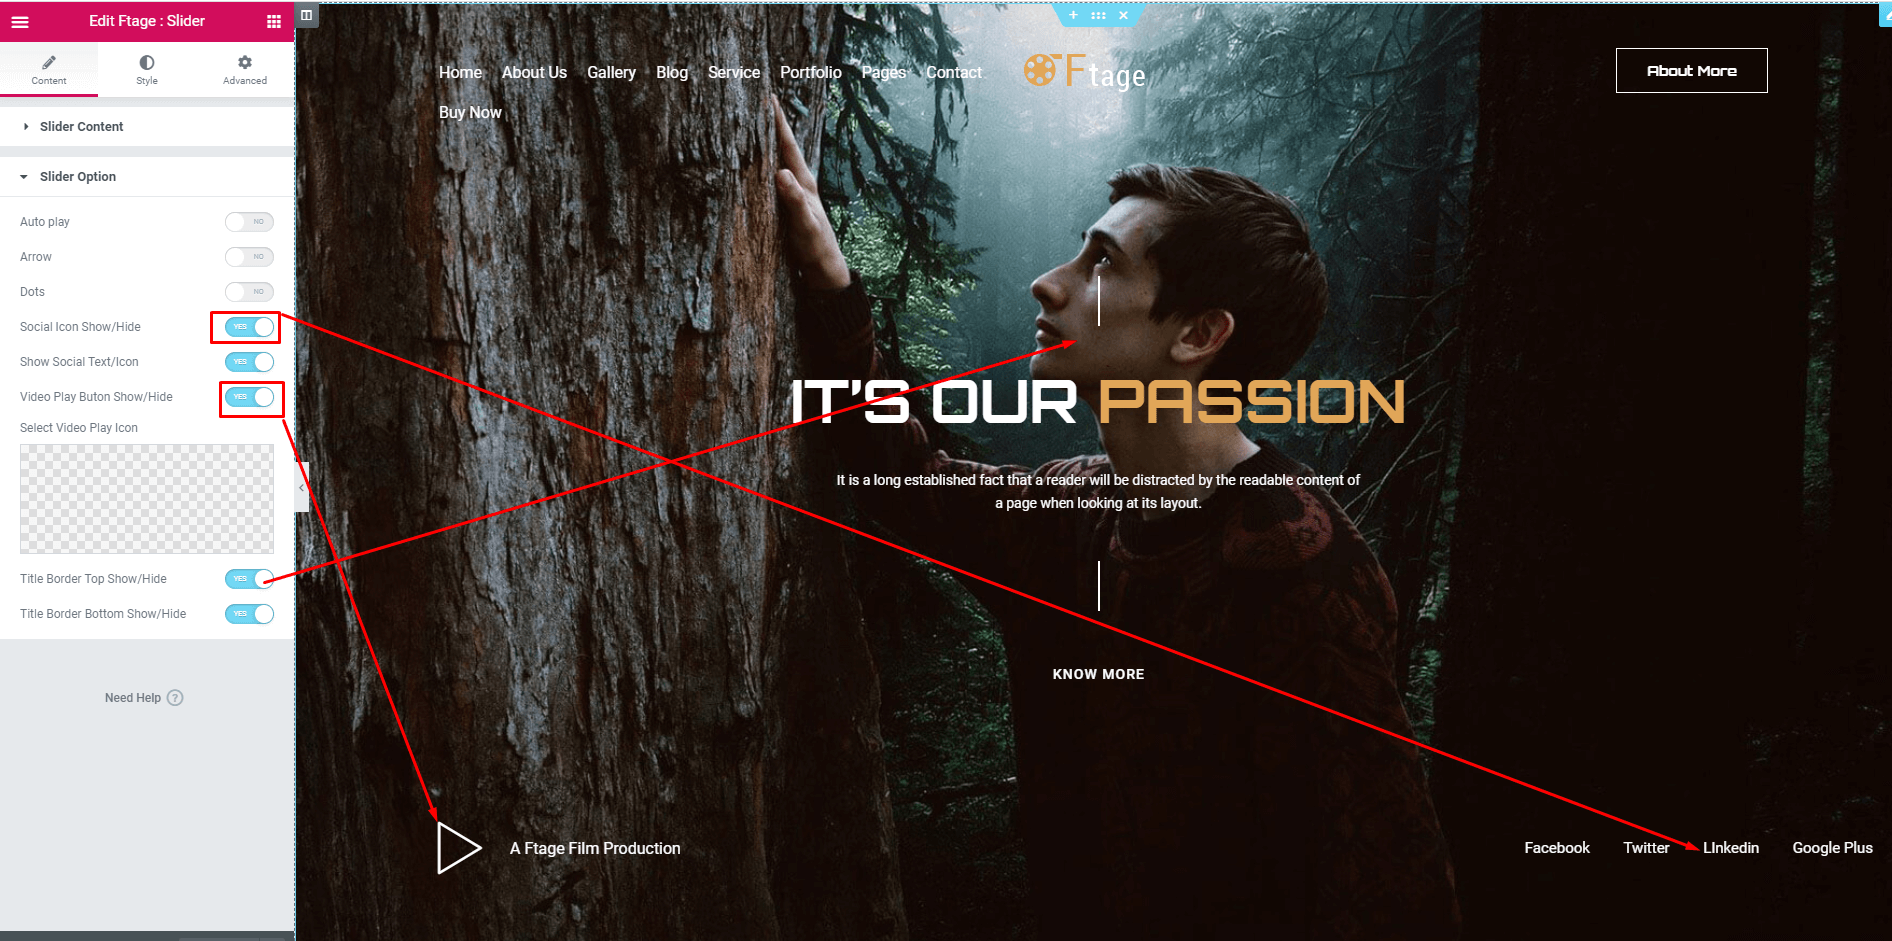
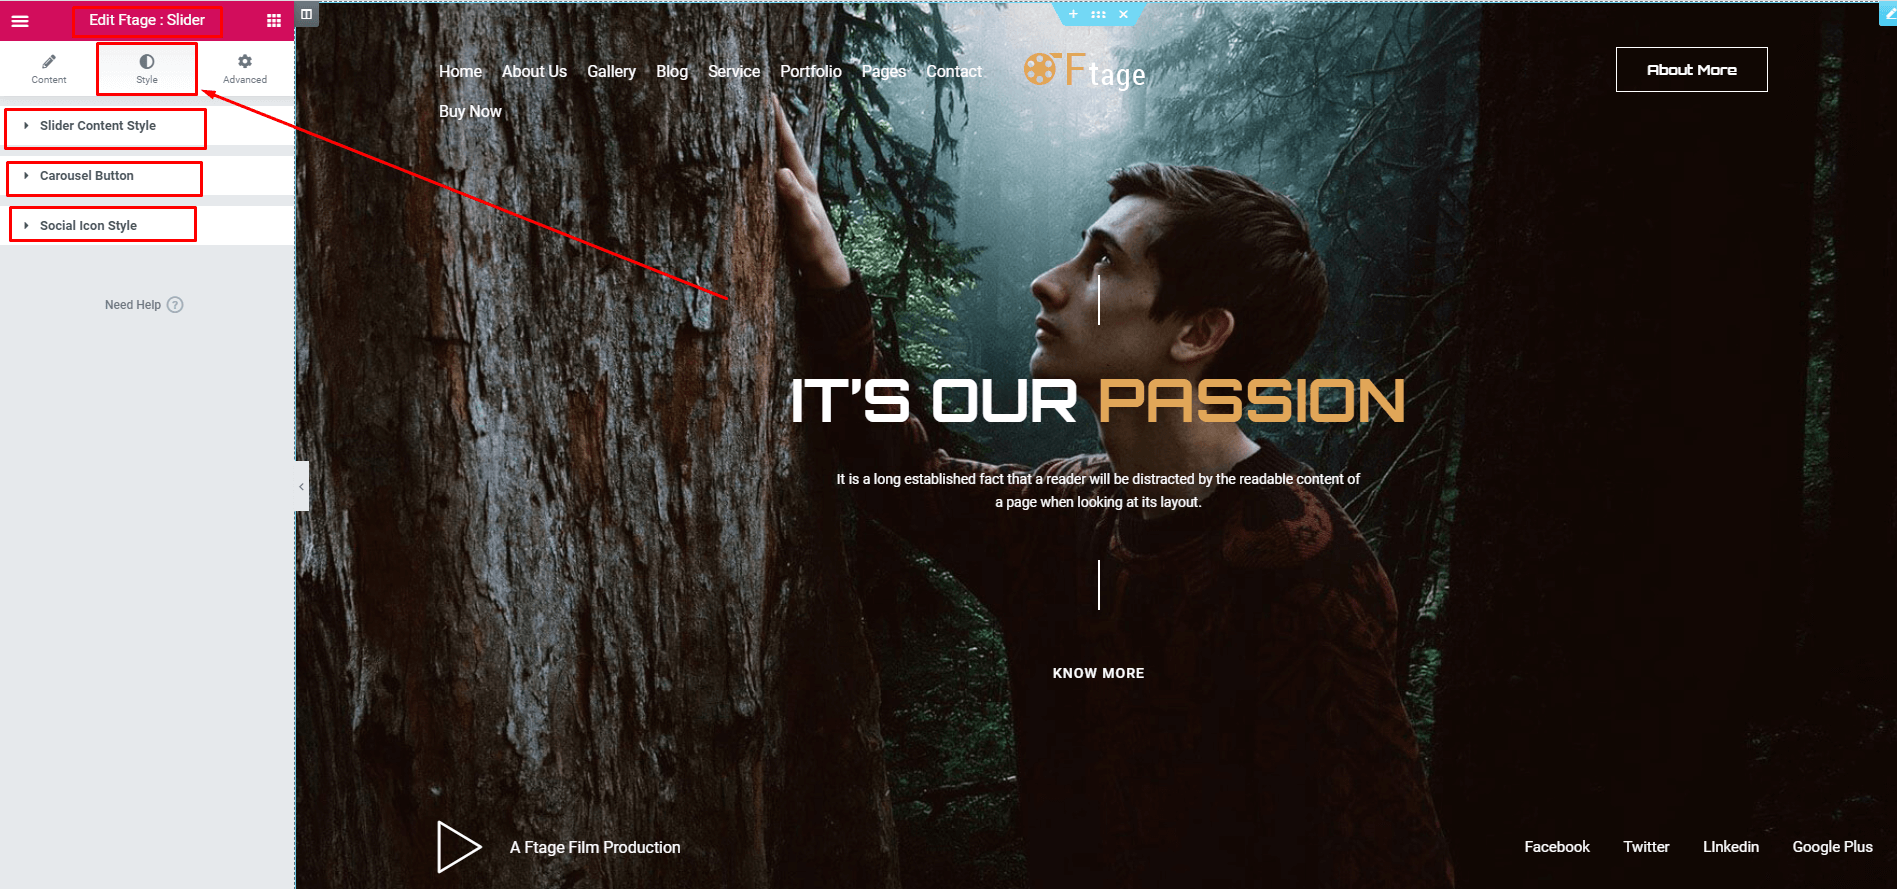
5.Customize your slider style
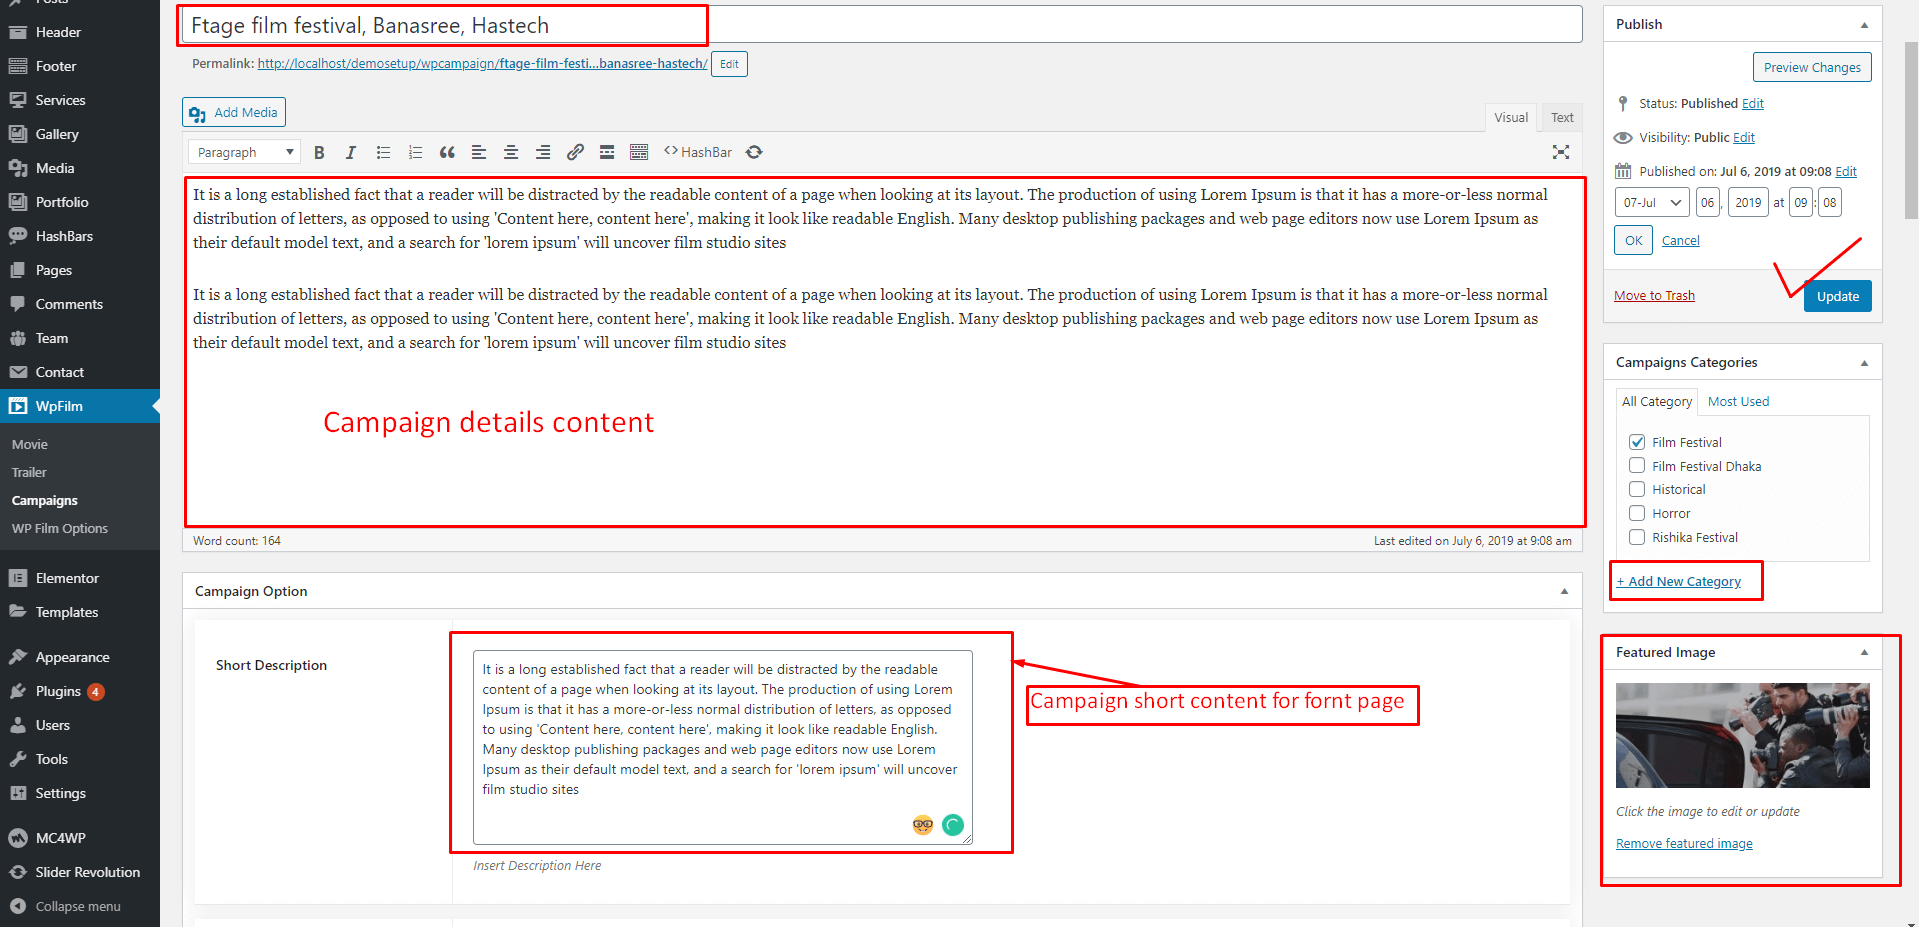
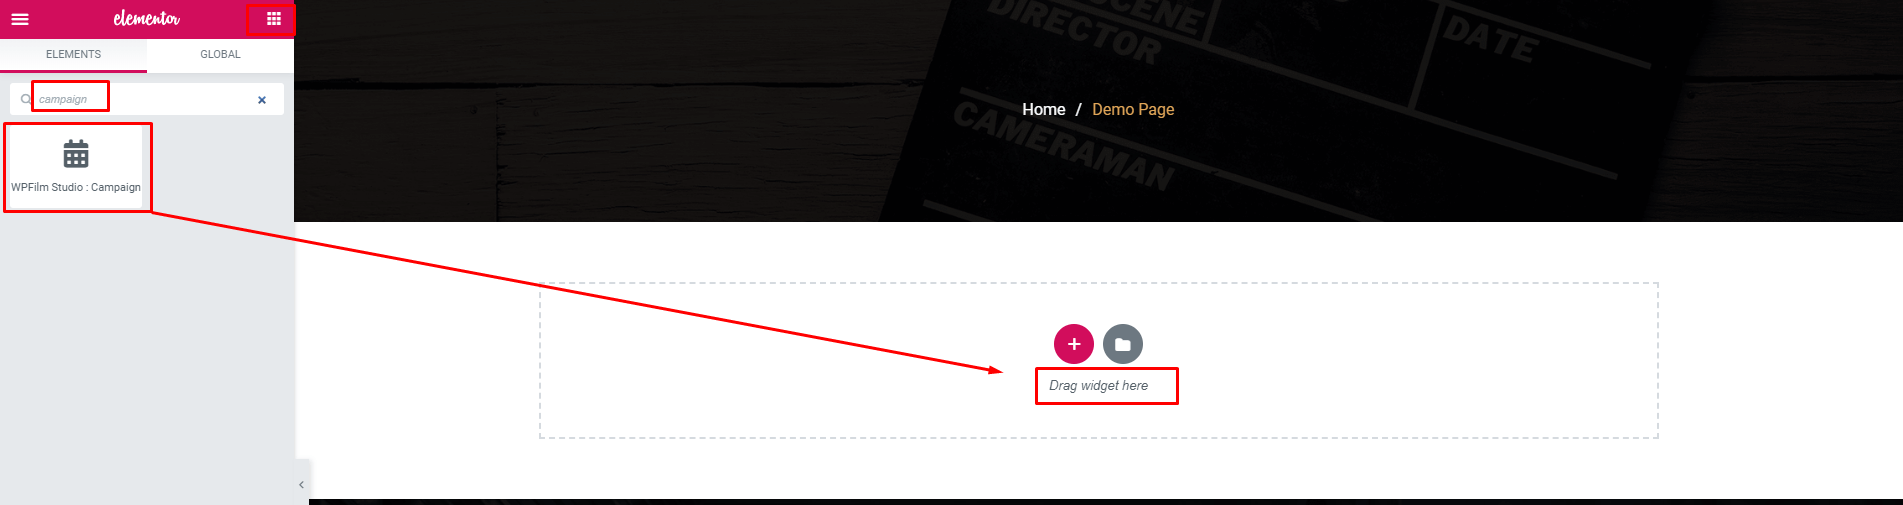
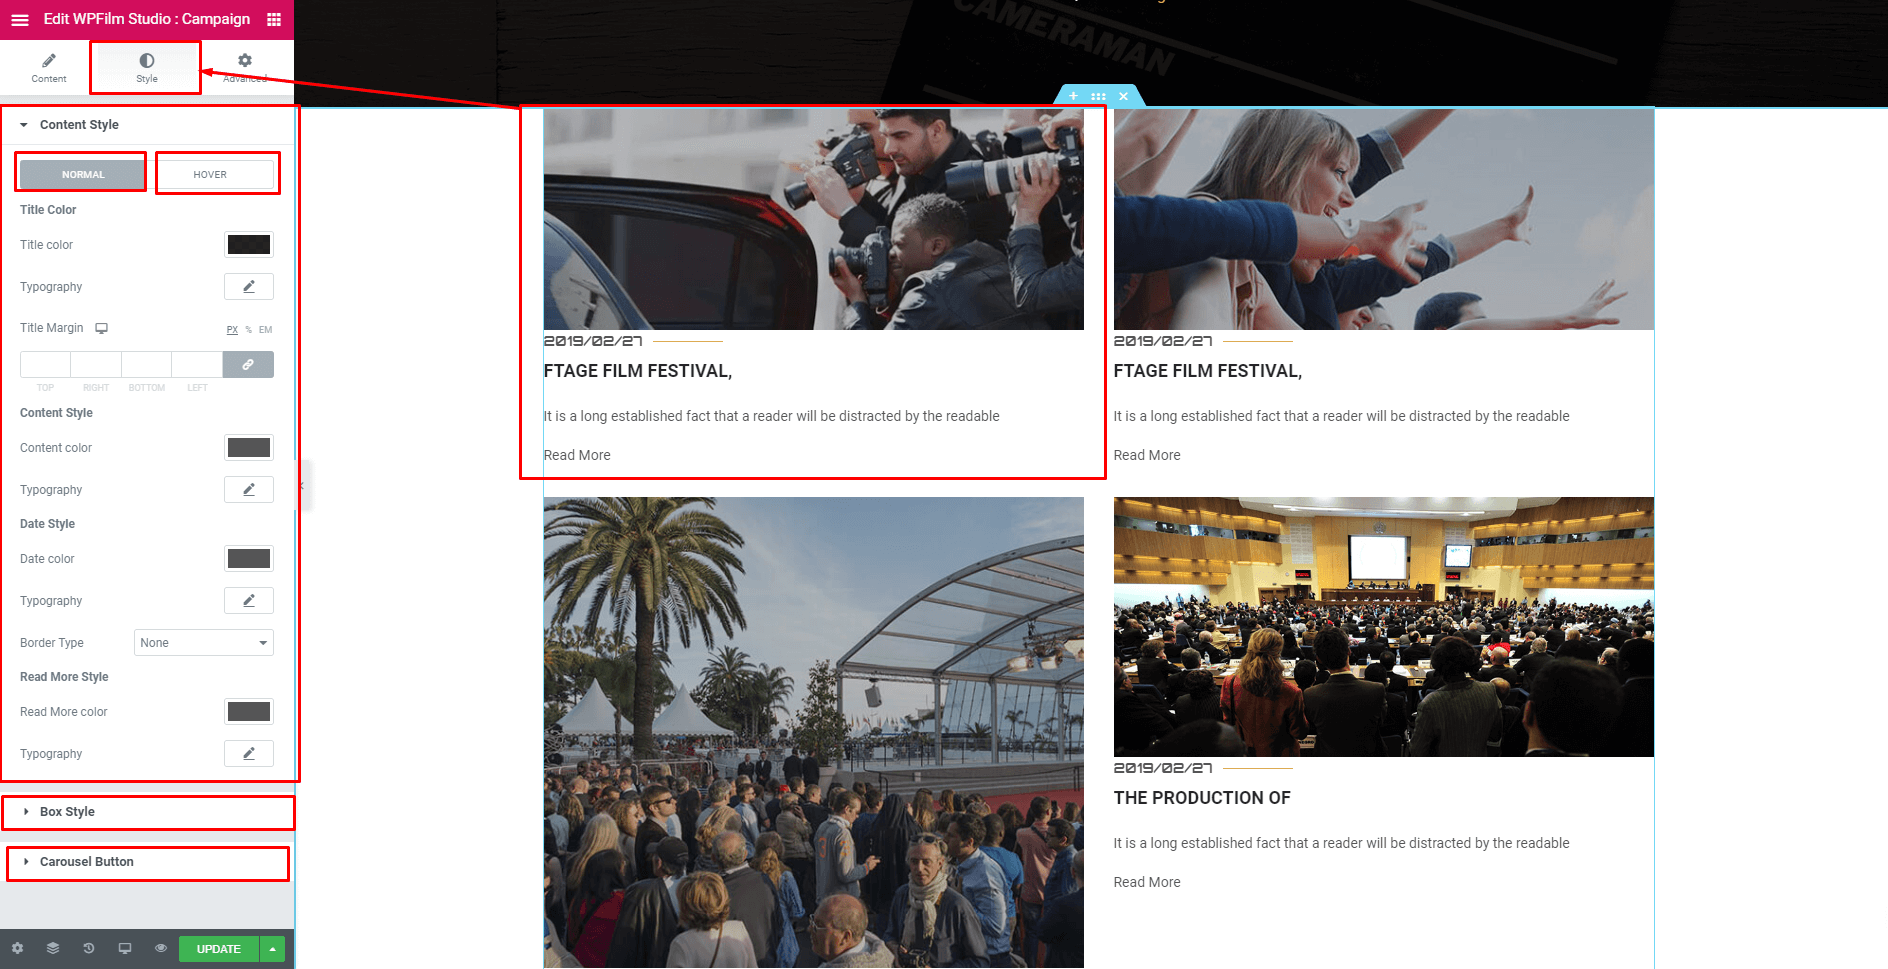
Event/Campaign Adding
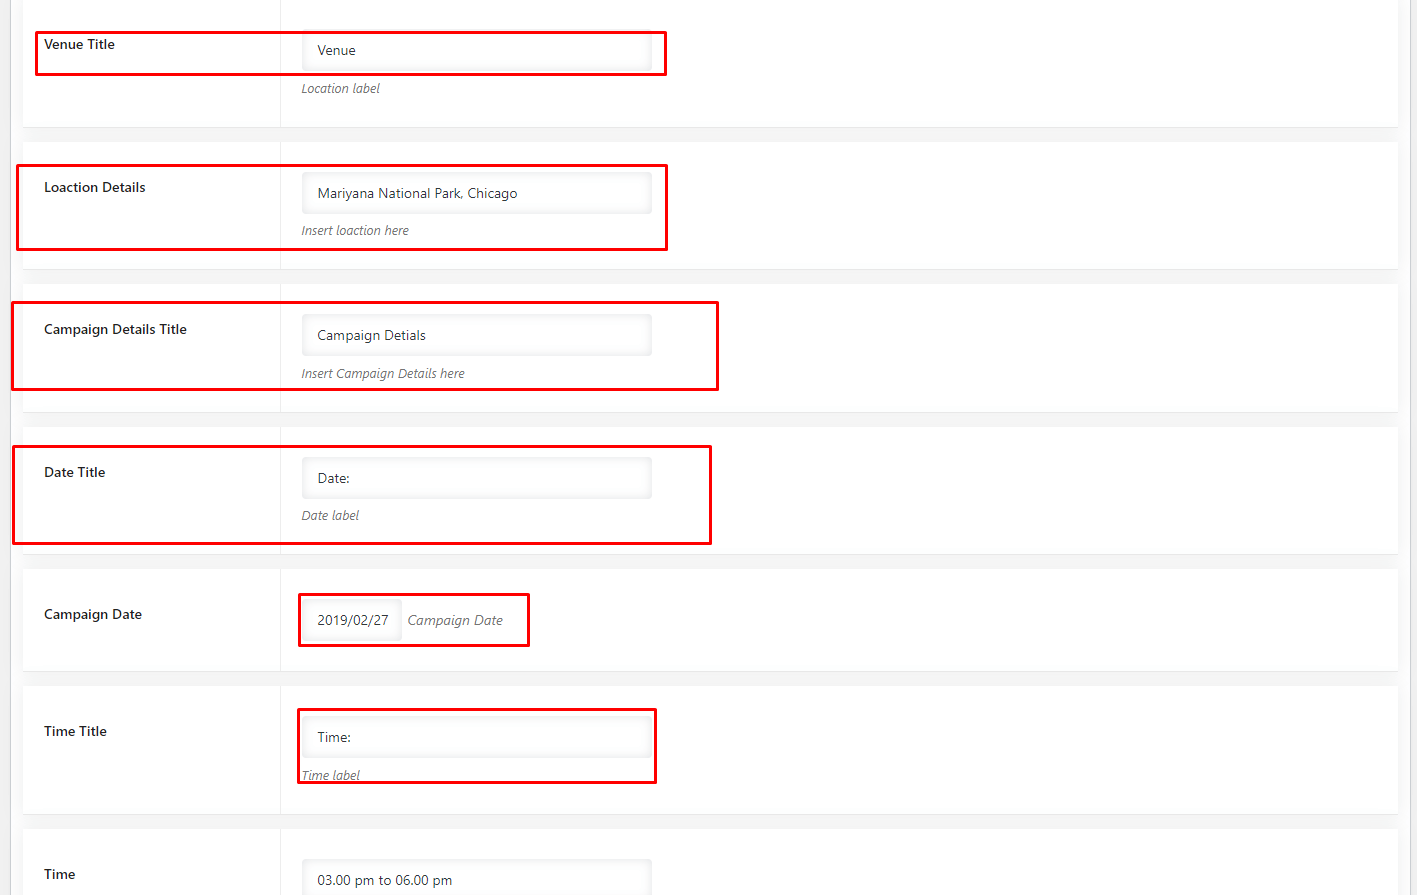
1.Firstly add campaign post then add Campaign/Event addon on a page

2. Add Campaign content

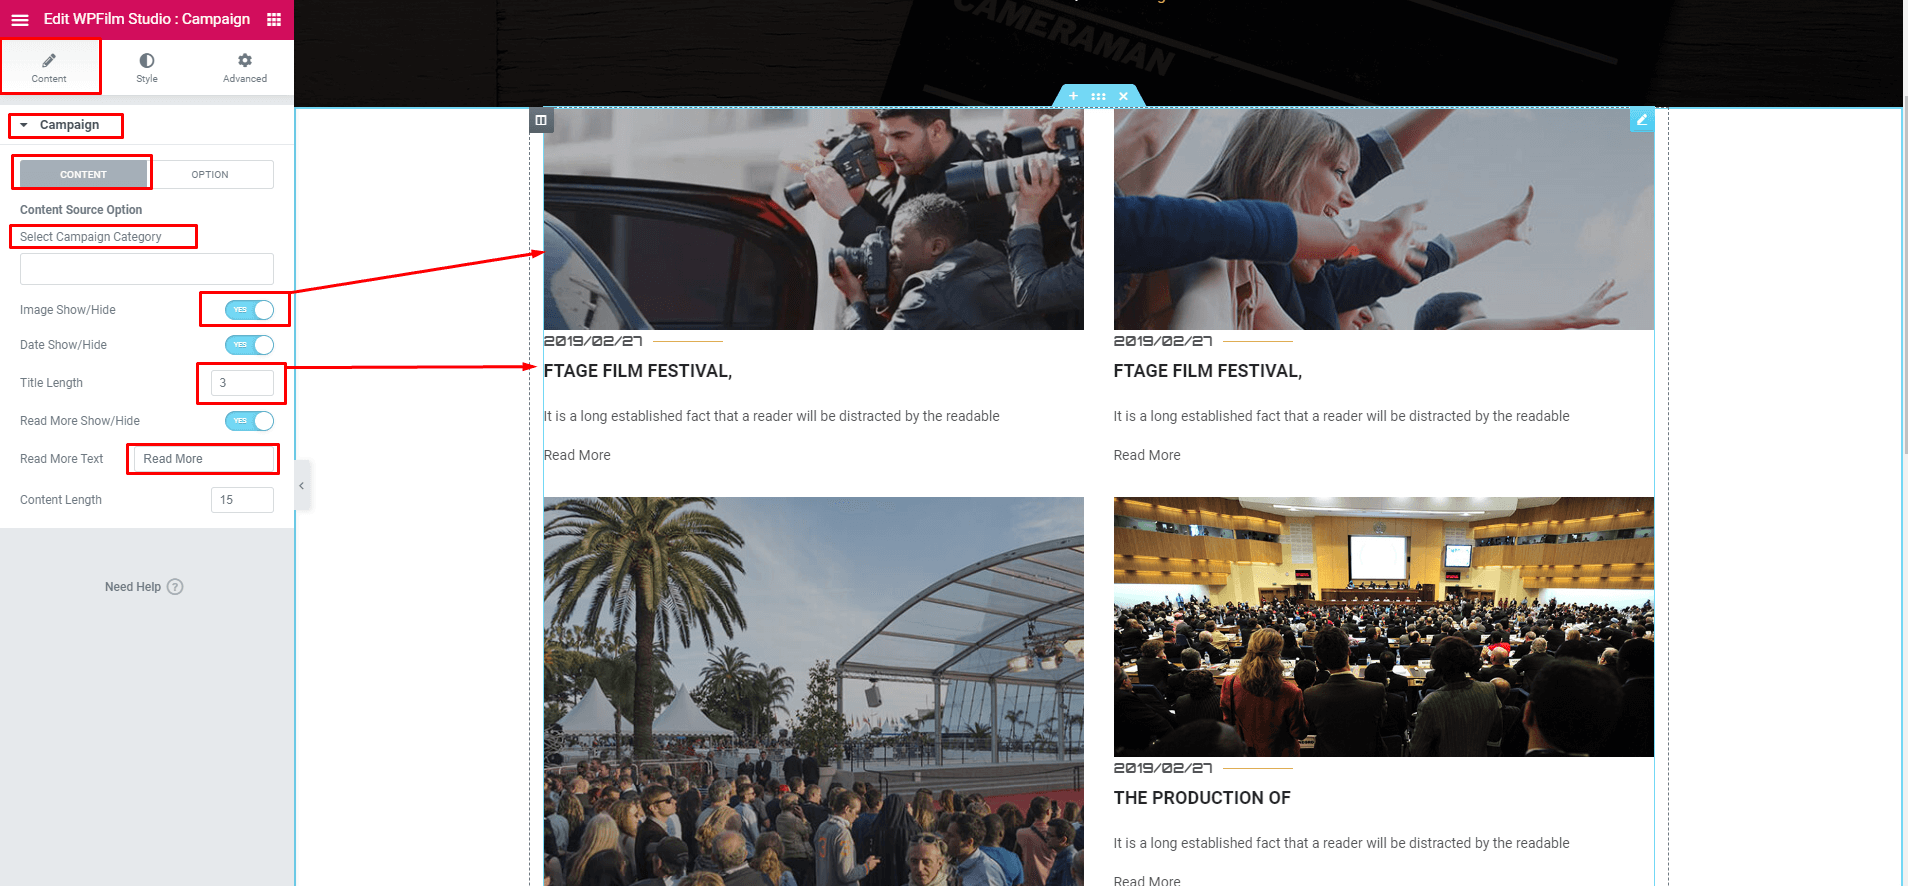
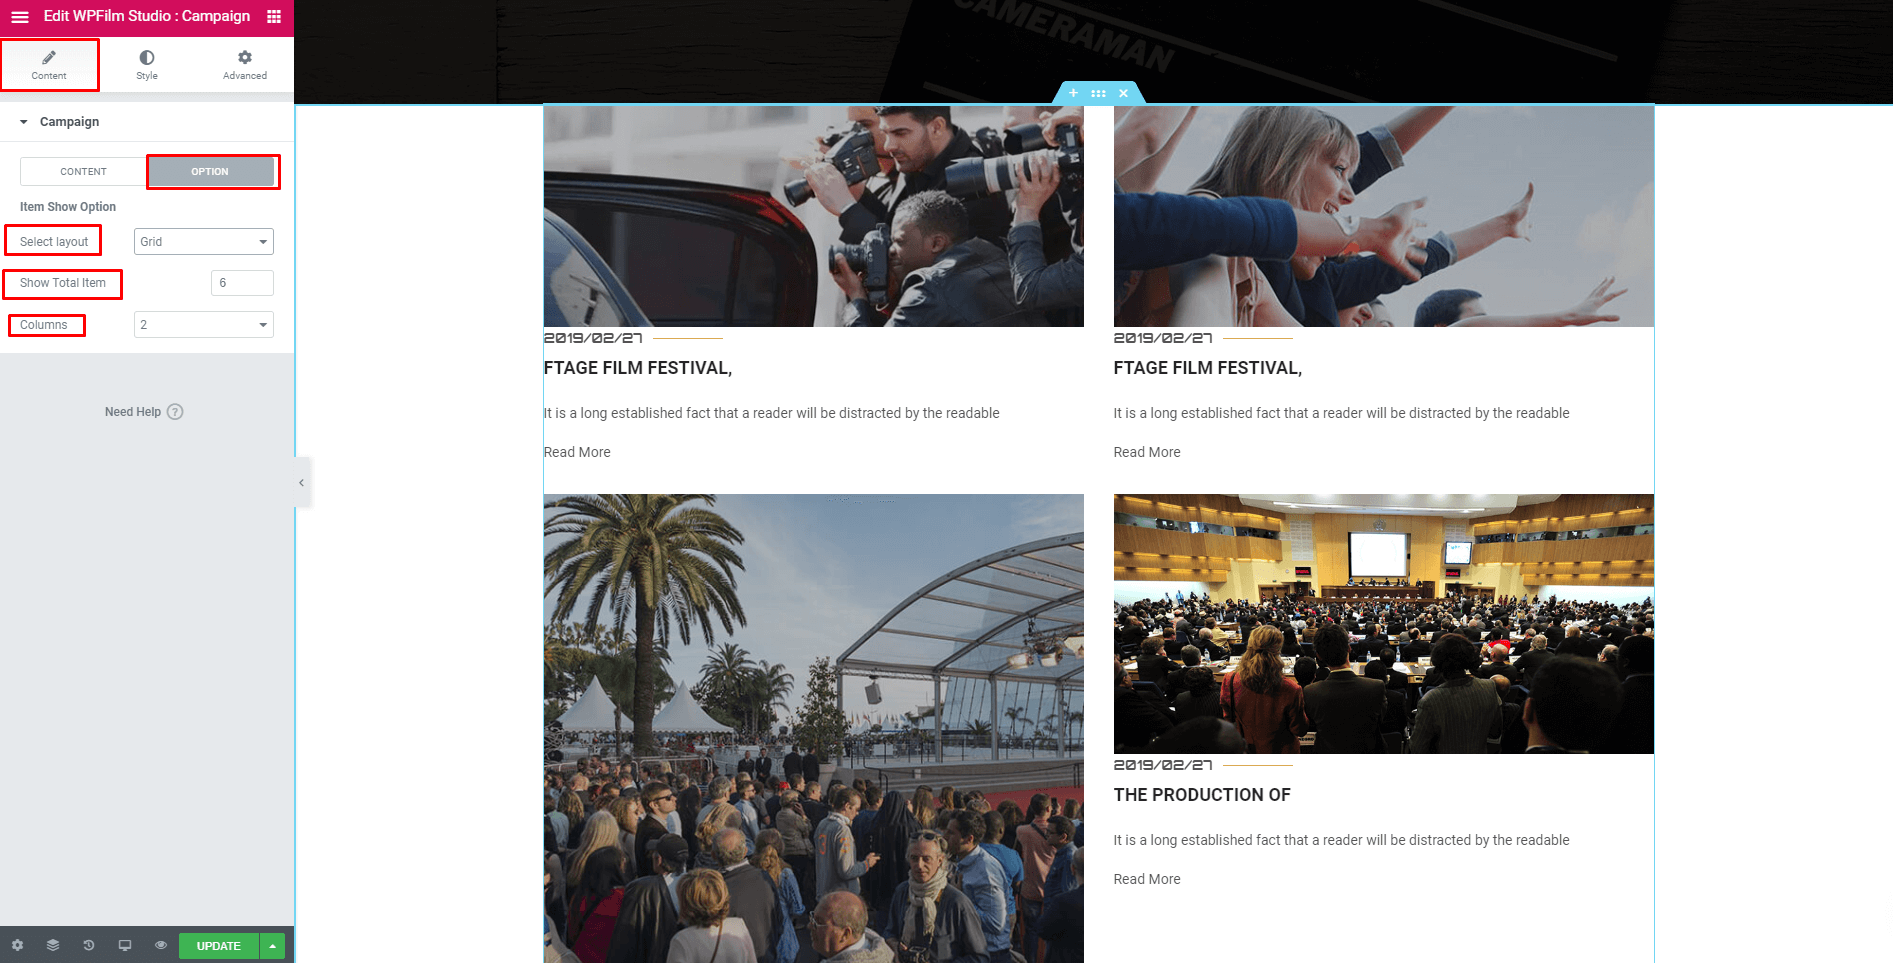
4. Campaign Addons Uses
After adding the campaign post you can show the campaign list in a page by the following steps
Gallery Adding
1.Firstly add gallery post then add Gallery addon on a page
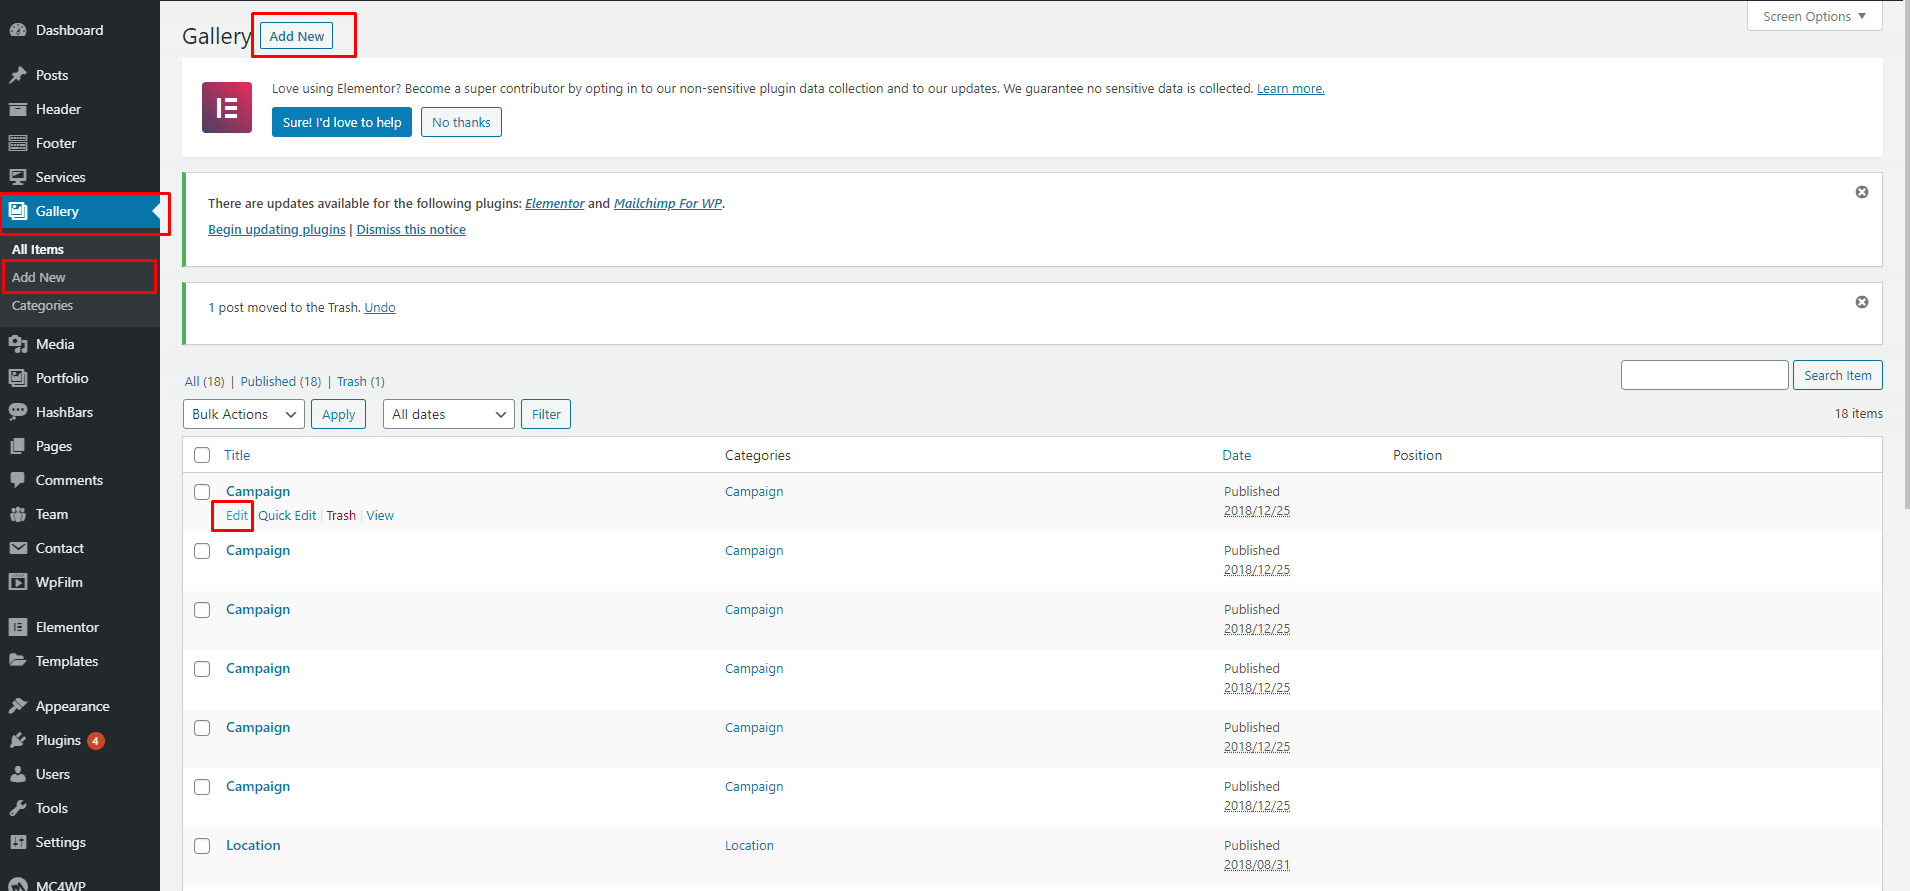
2. Add Gallery Image

3. Gallery Addons Uses
After adding the gallery post you can show the Gallery list in a page by the following steps

Select your Layout
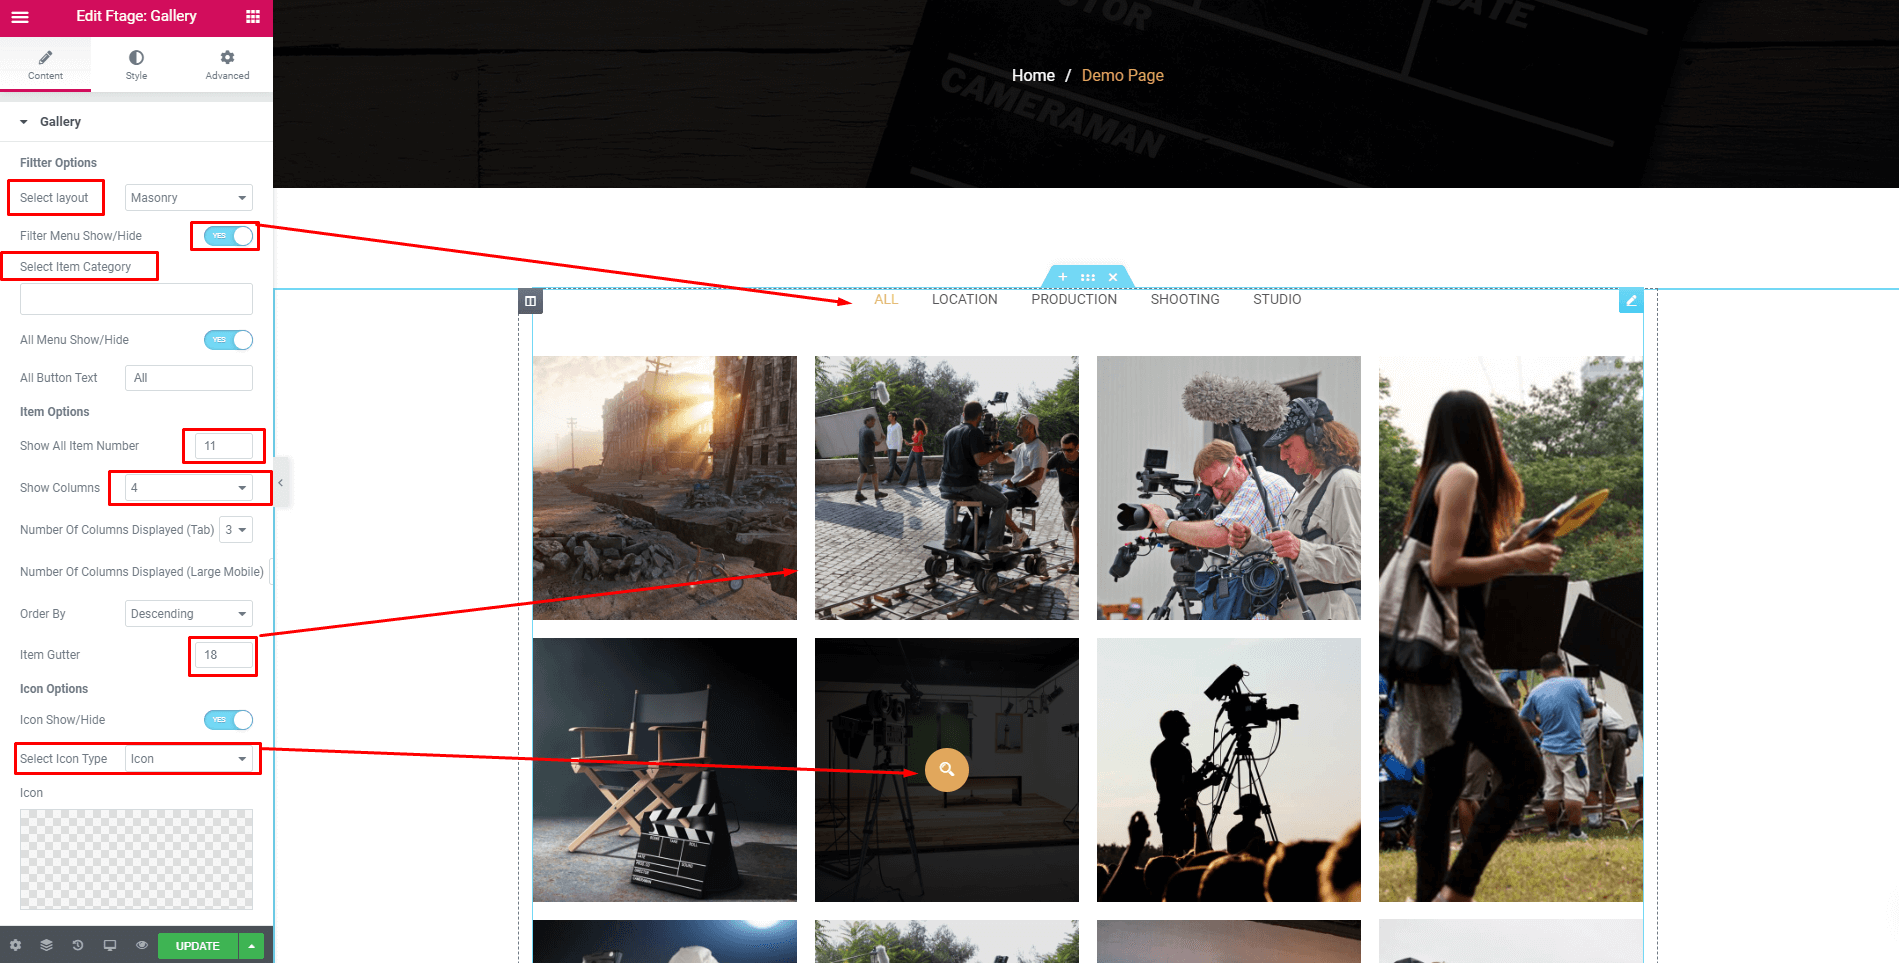
Set the gallery typography

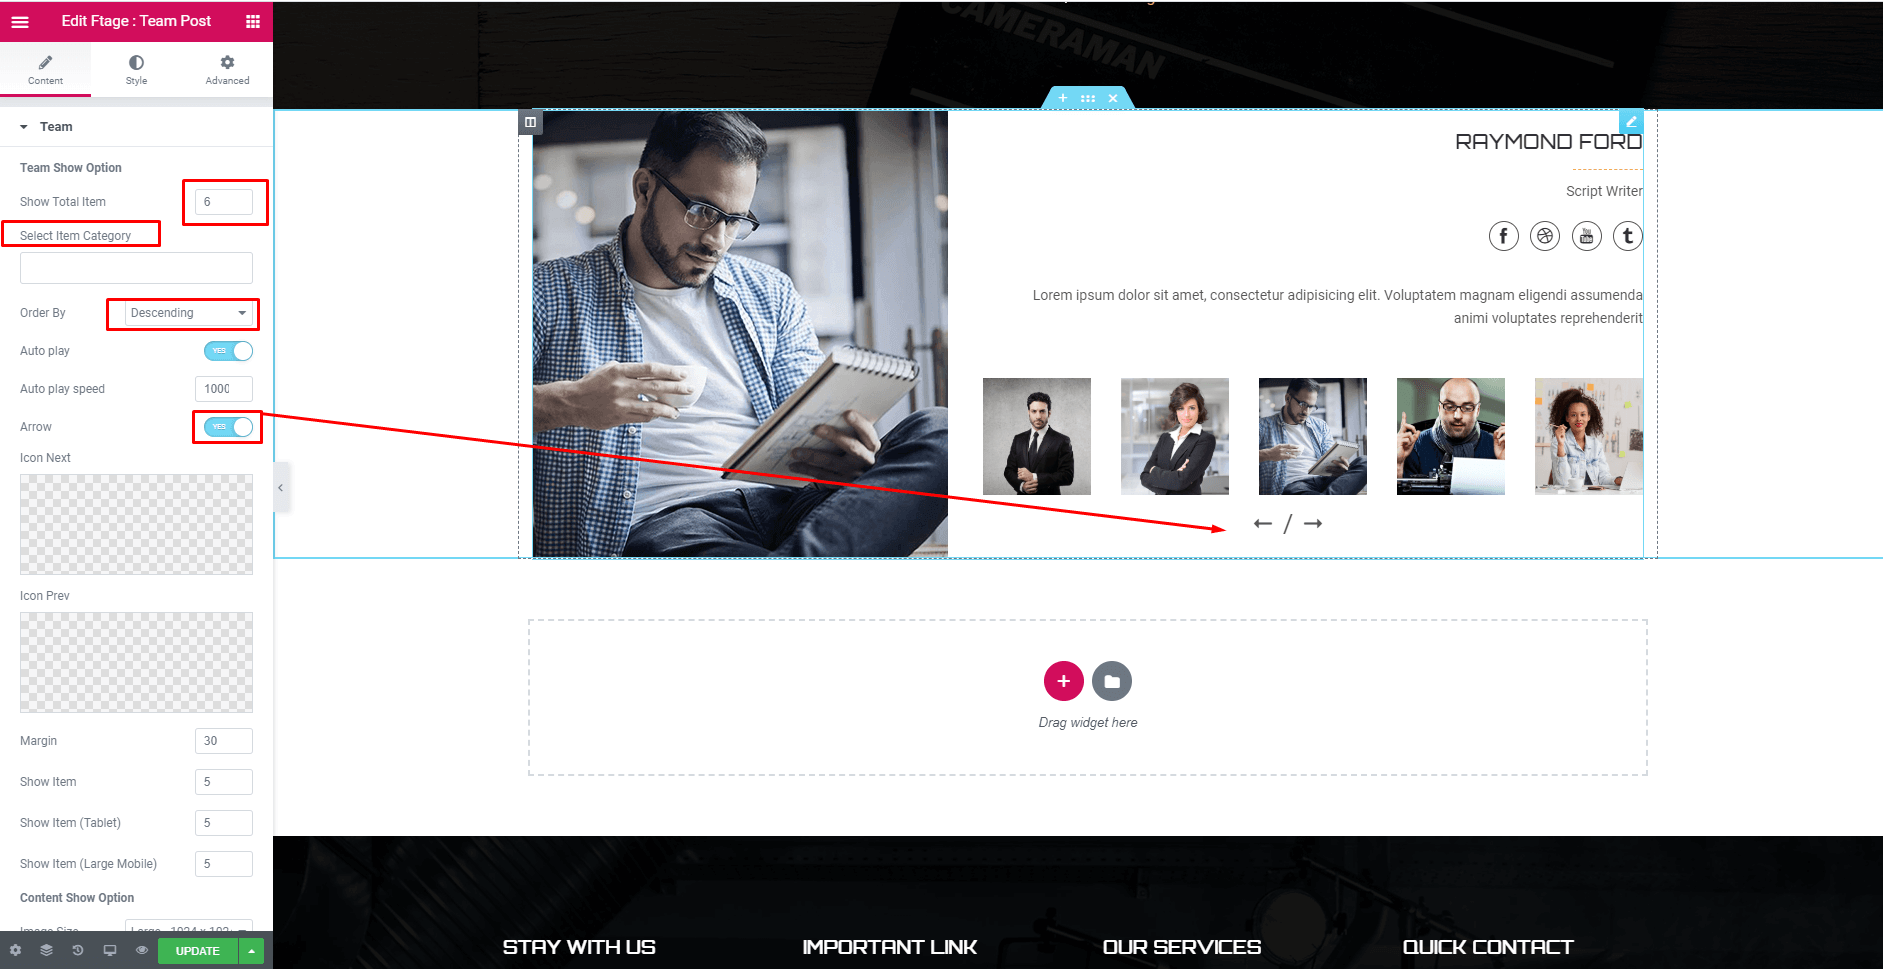
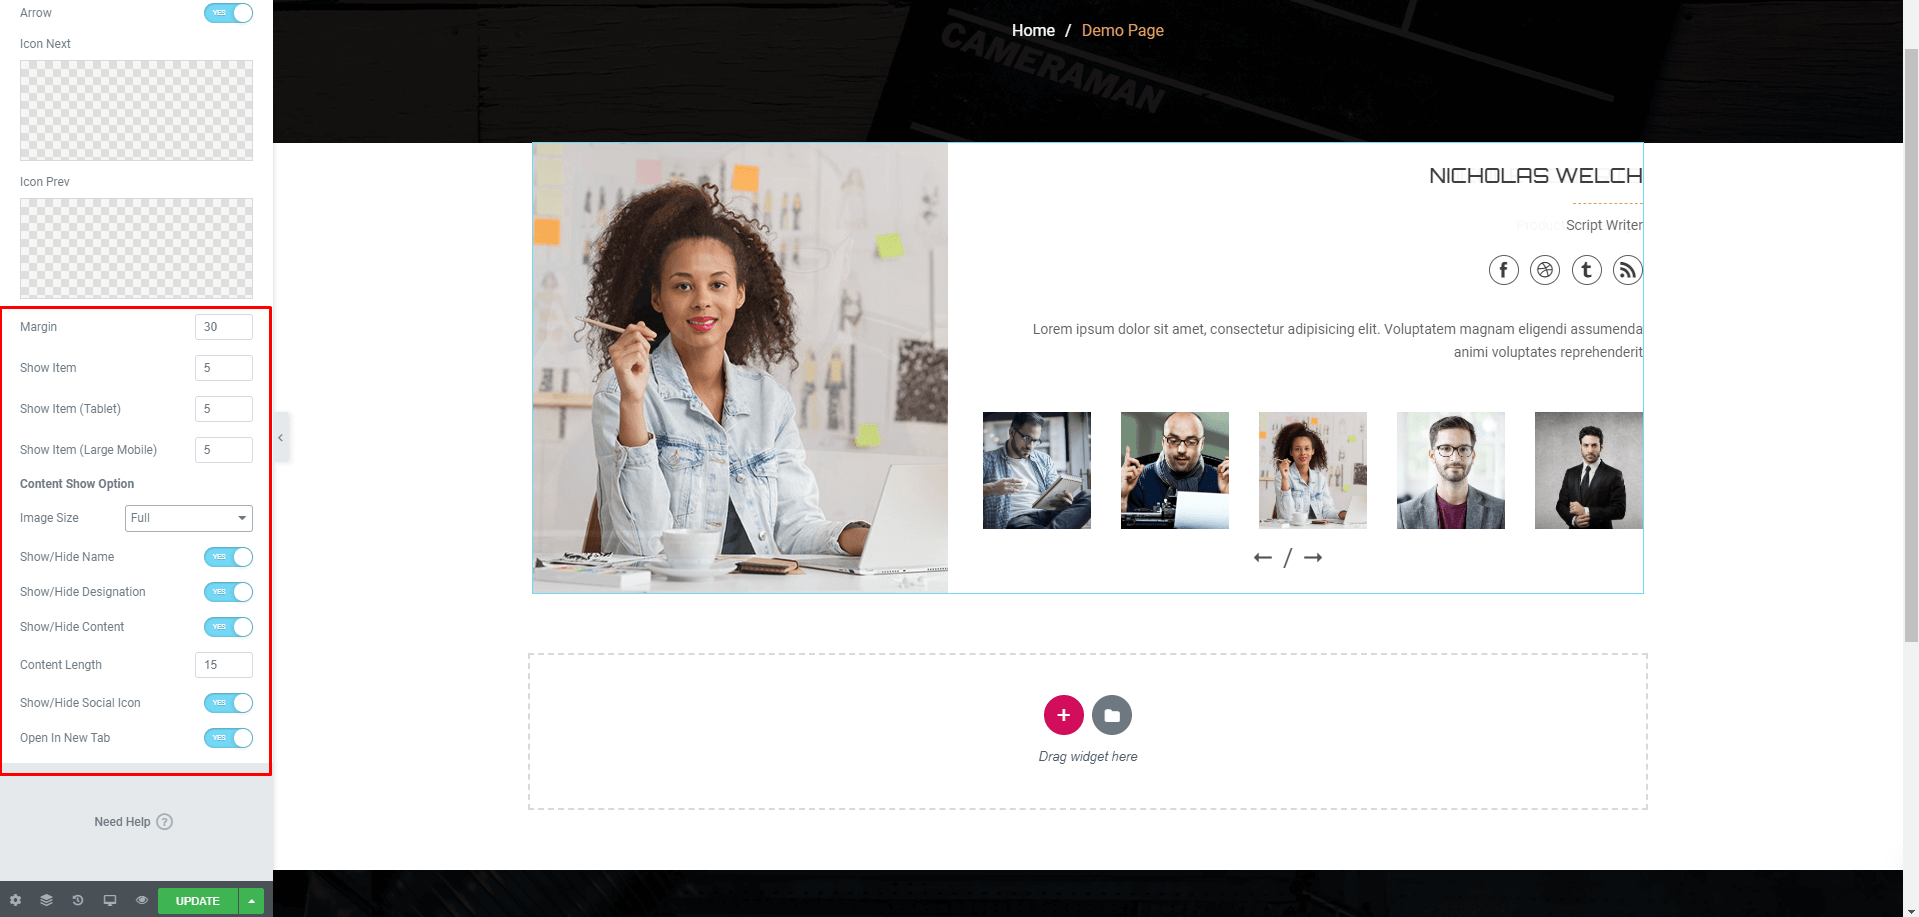
Team Adding
1.Firstly add team post then add Team addon on a page
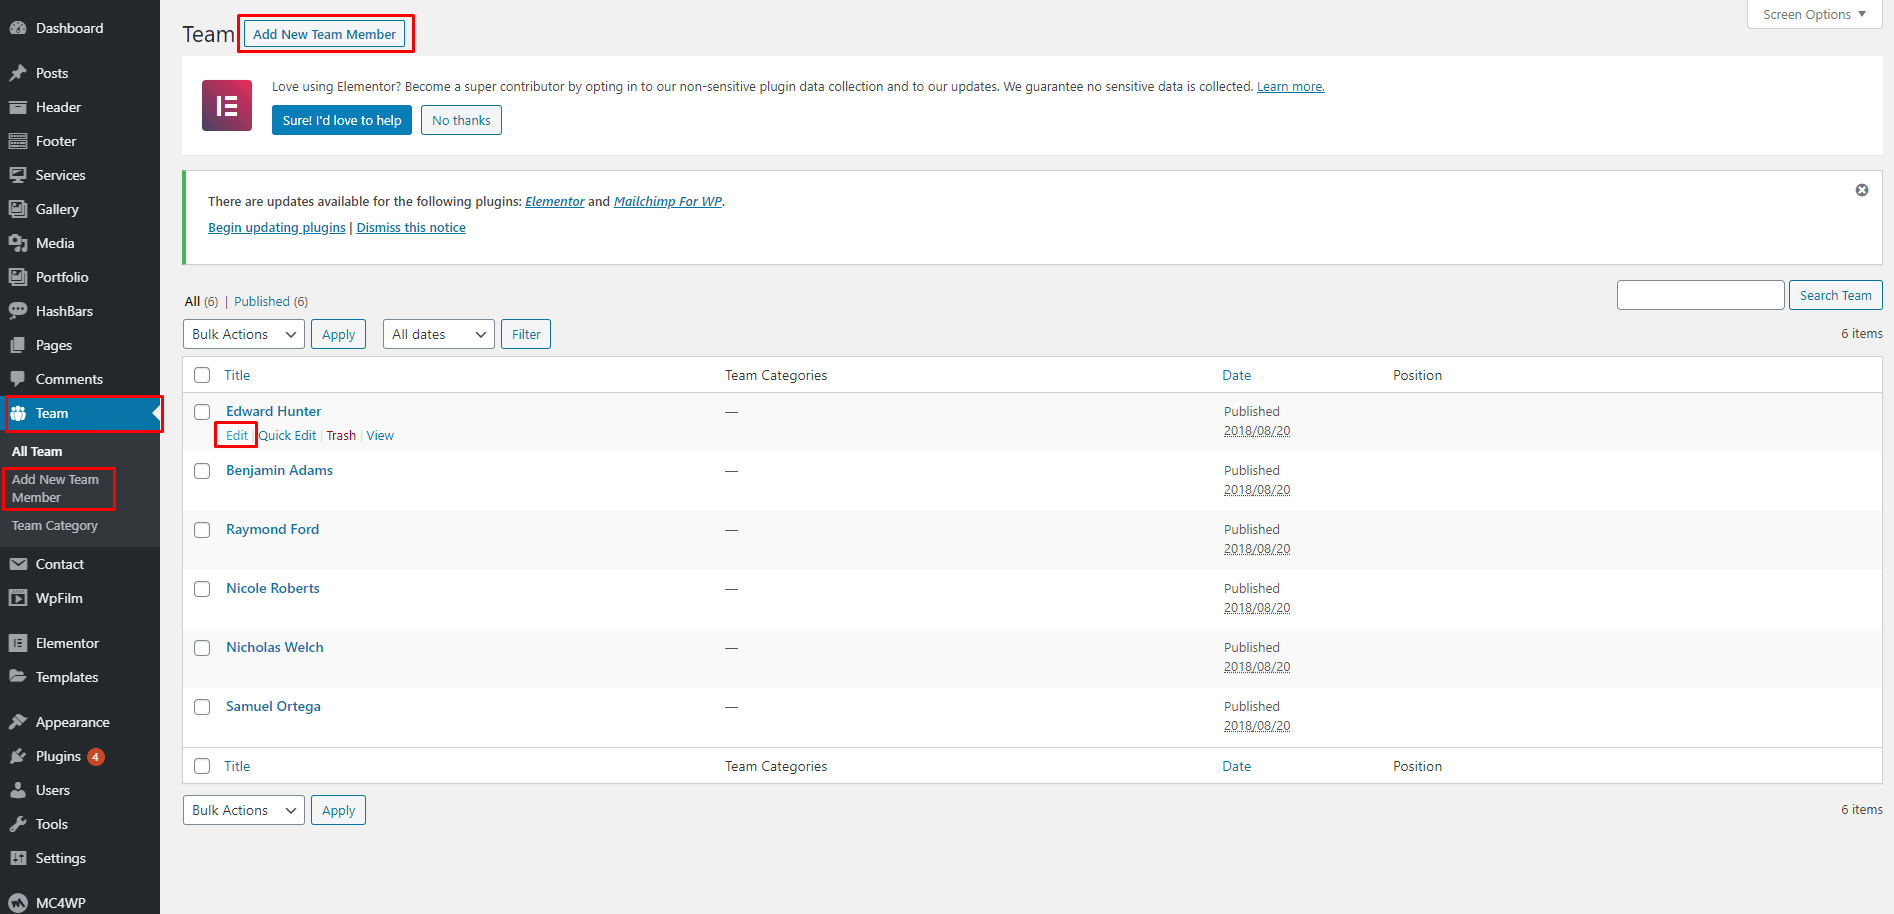
2. Add Team Image and Content
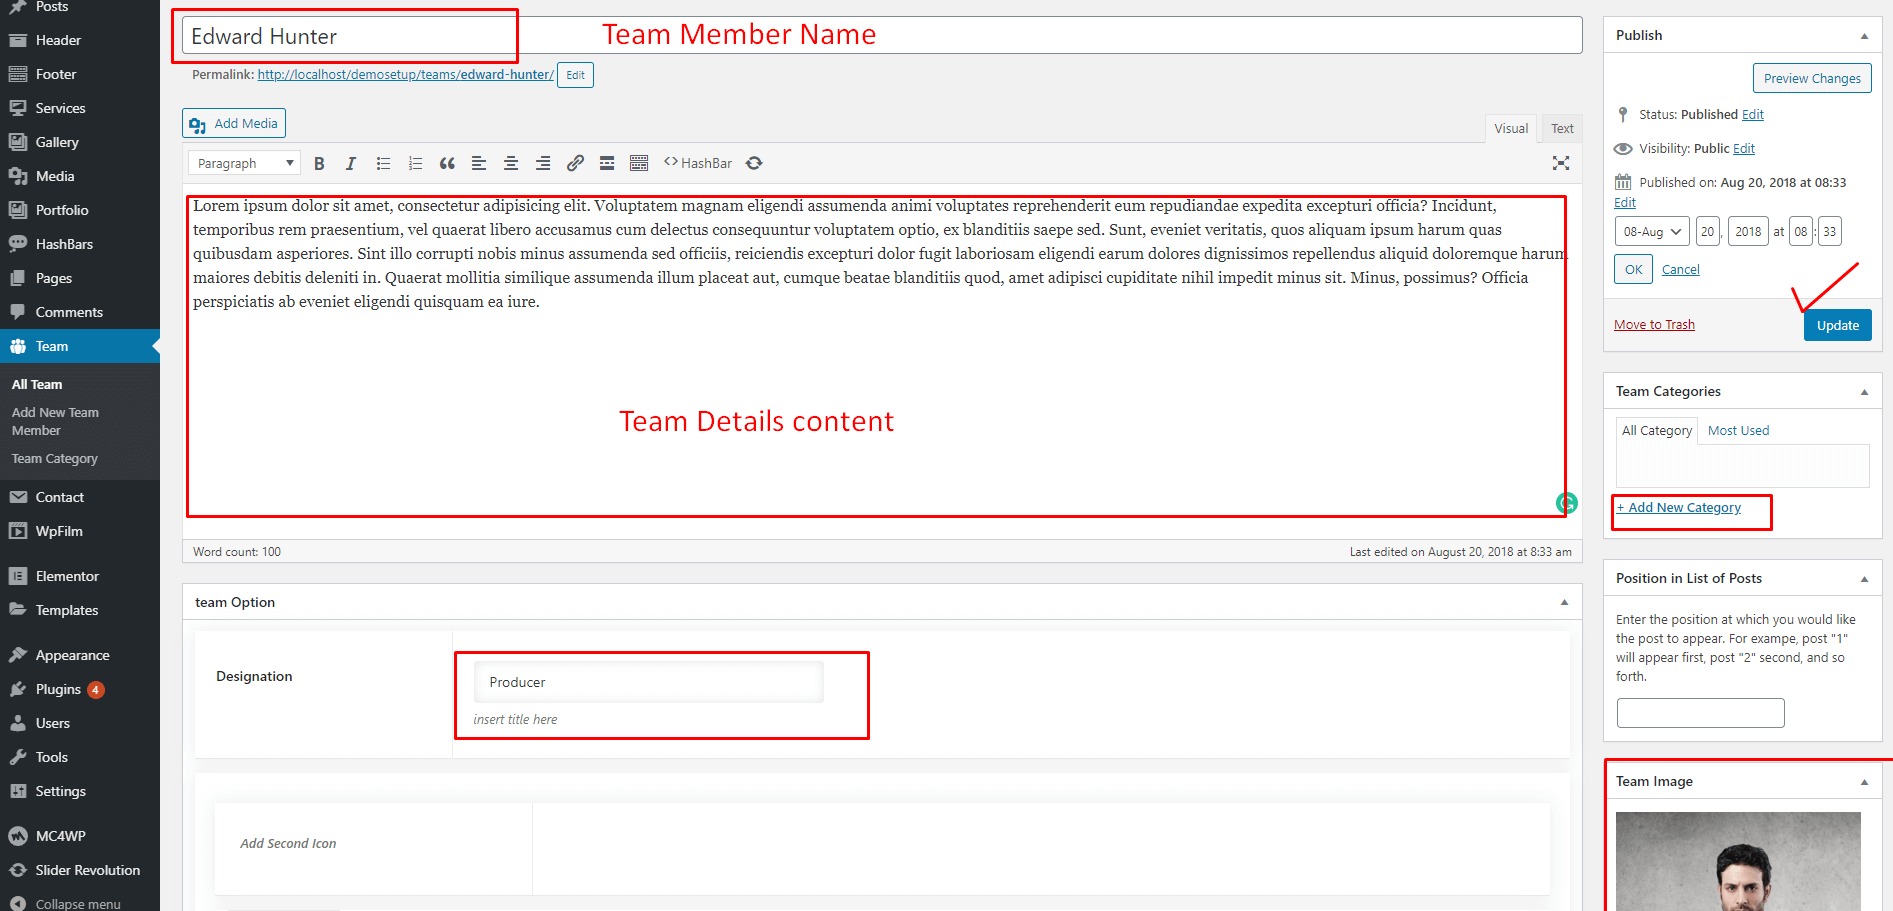
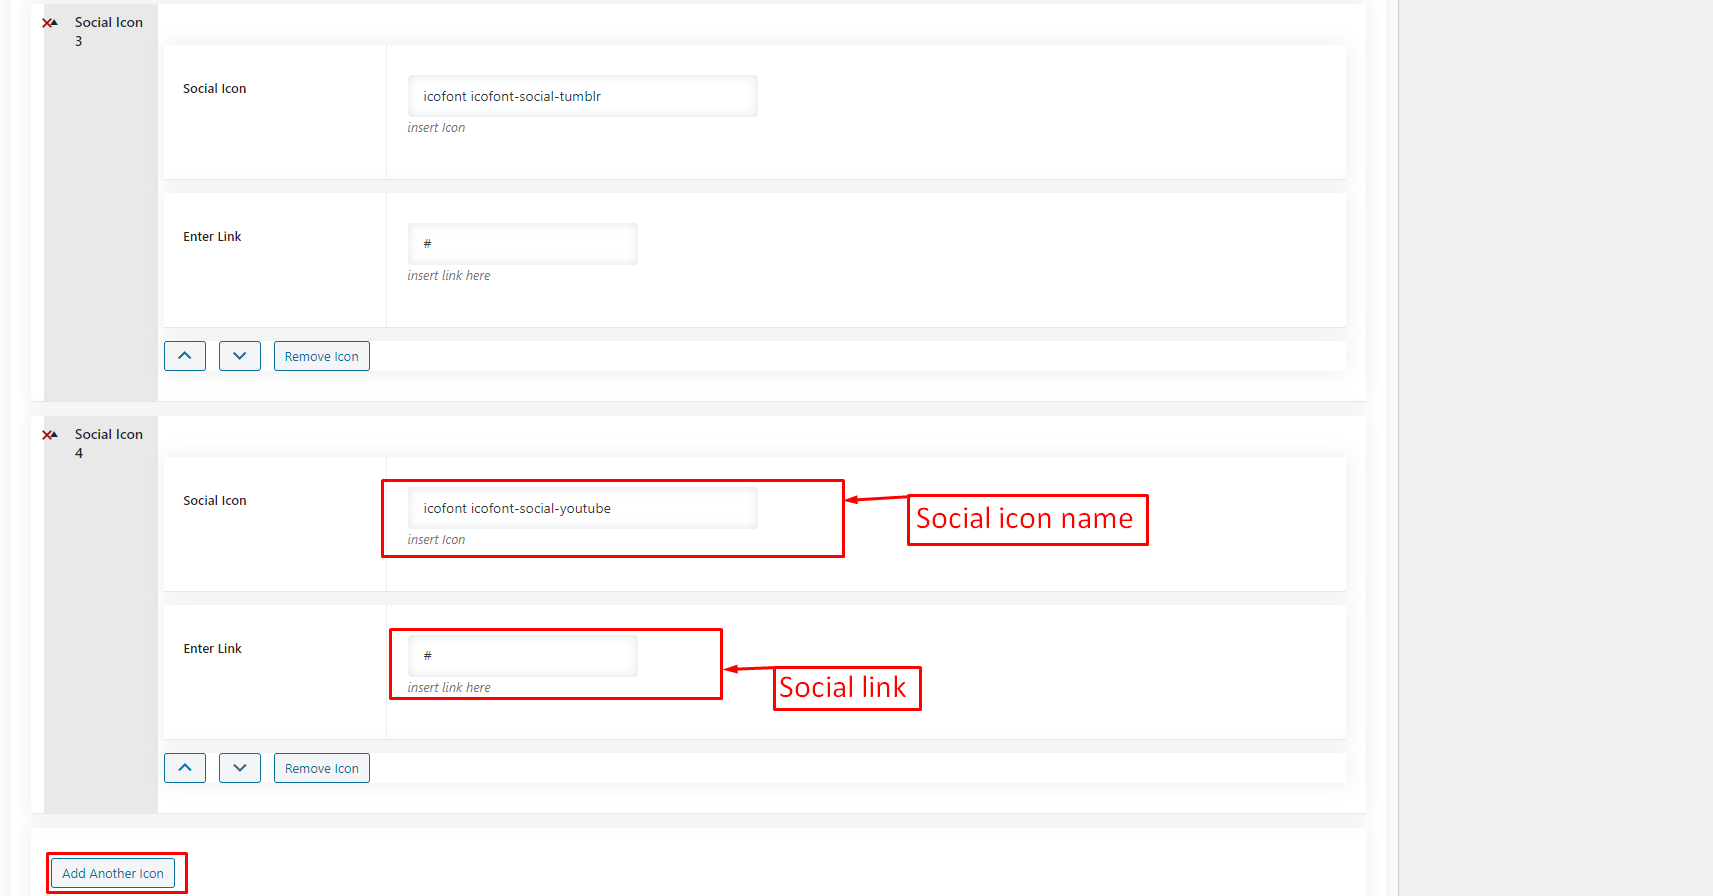
Social Icon Name Icofont
3. Team Addons Uses
After adding the team post you can show the Team list in a page by the following steps

Select your Layout

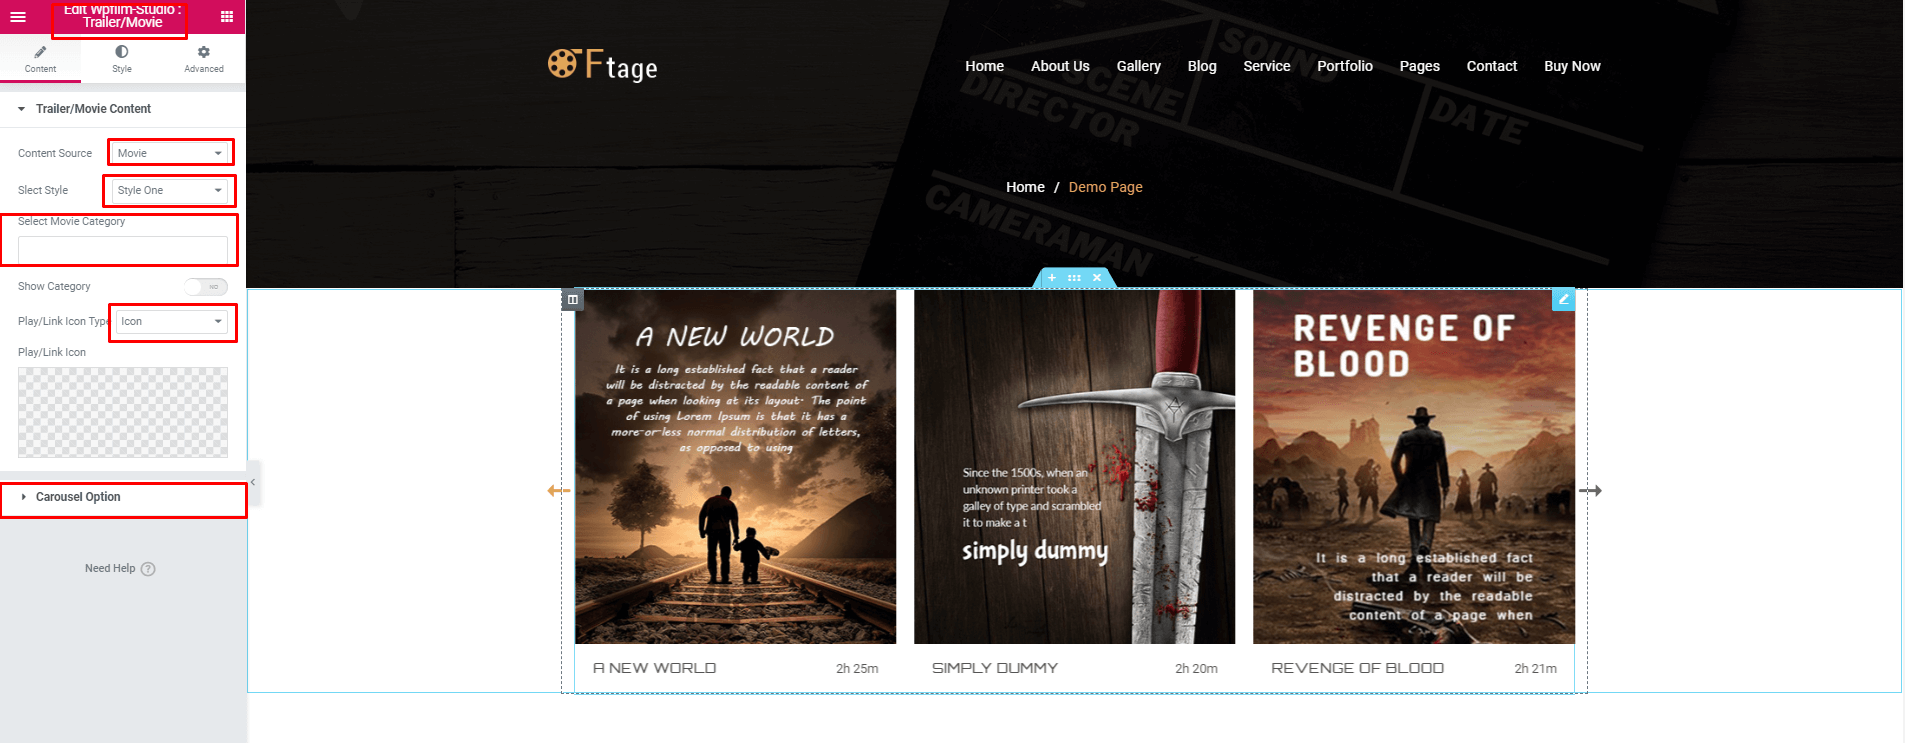
Trailer Adding
1.Firstly add trailer post then add Trailer addon on a page

2. Add Trailer Image and Content
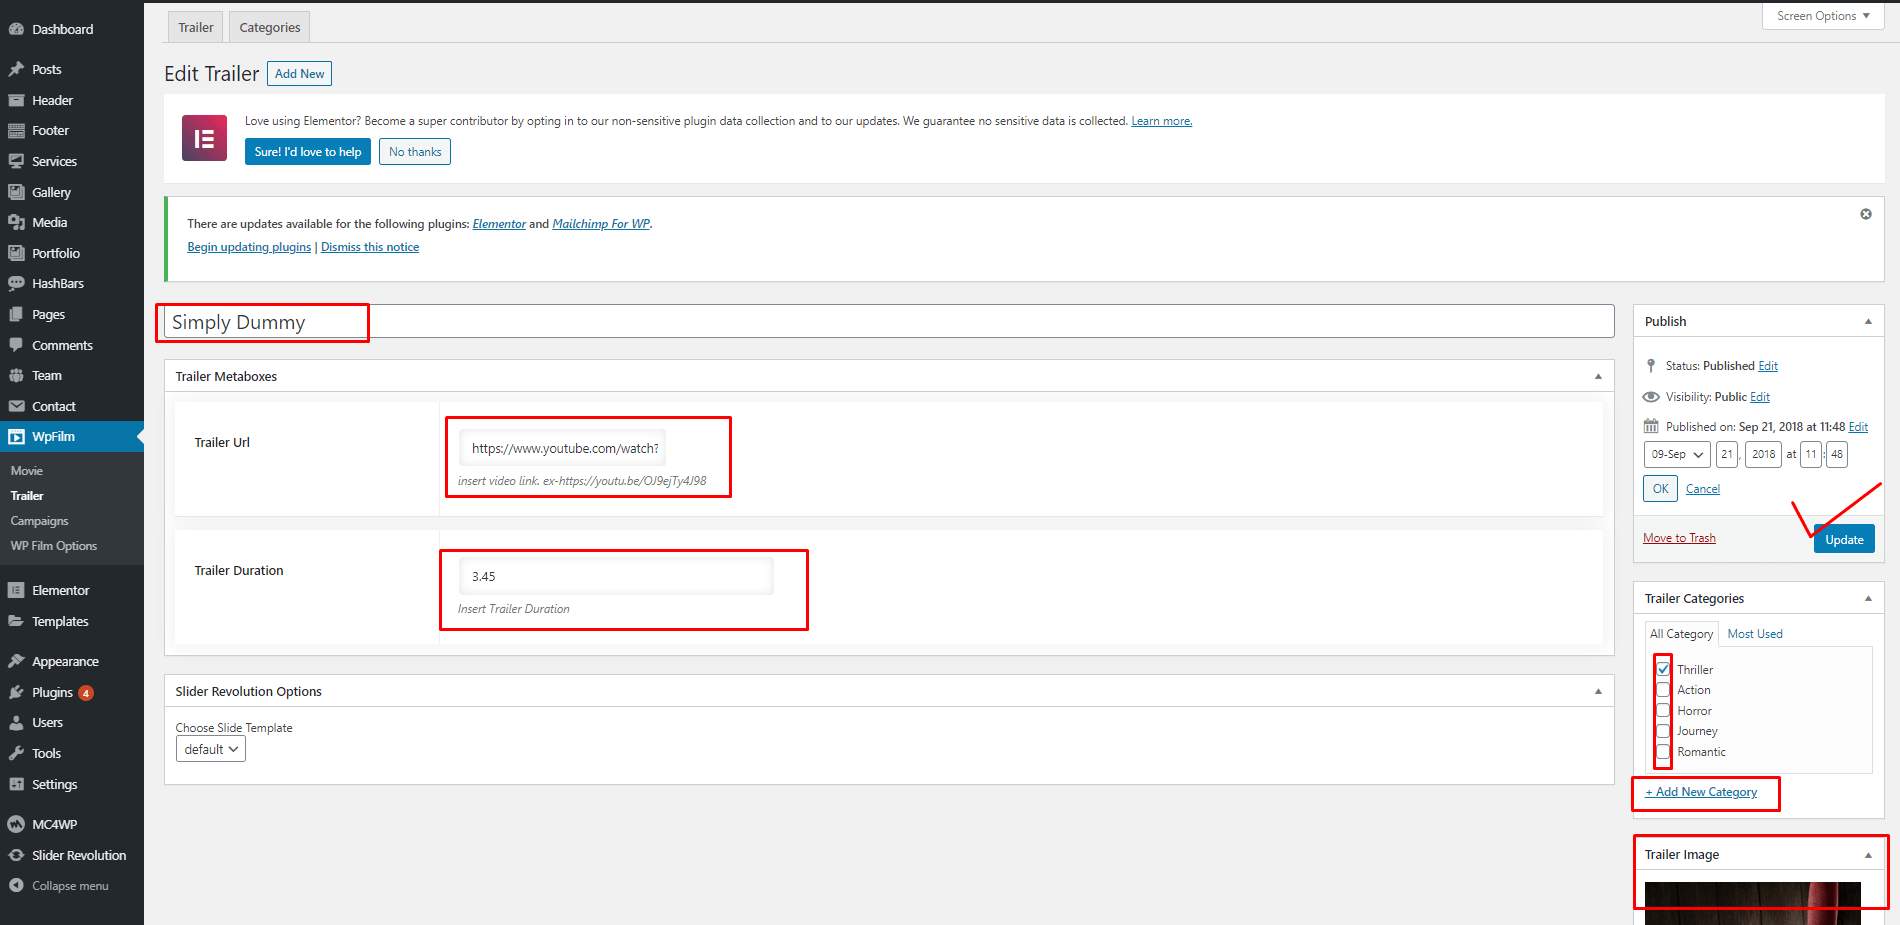
3. Trailer Addons Uses
After adding the trailer post you can show the Trailer list in a page by the following steps
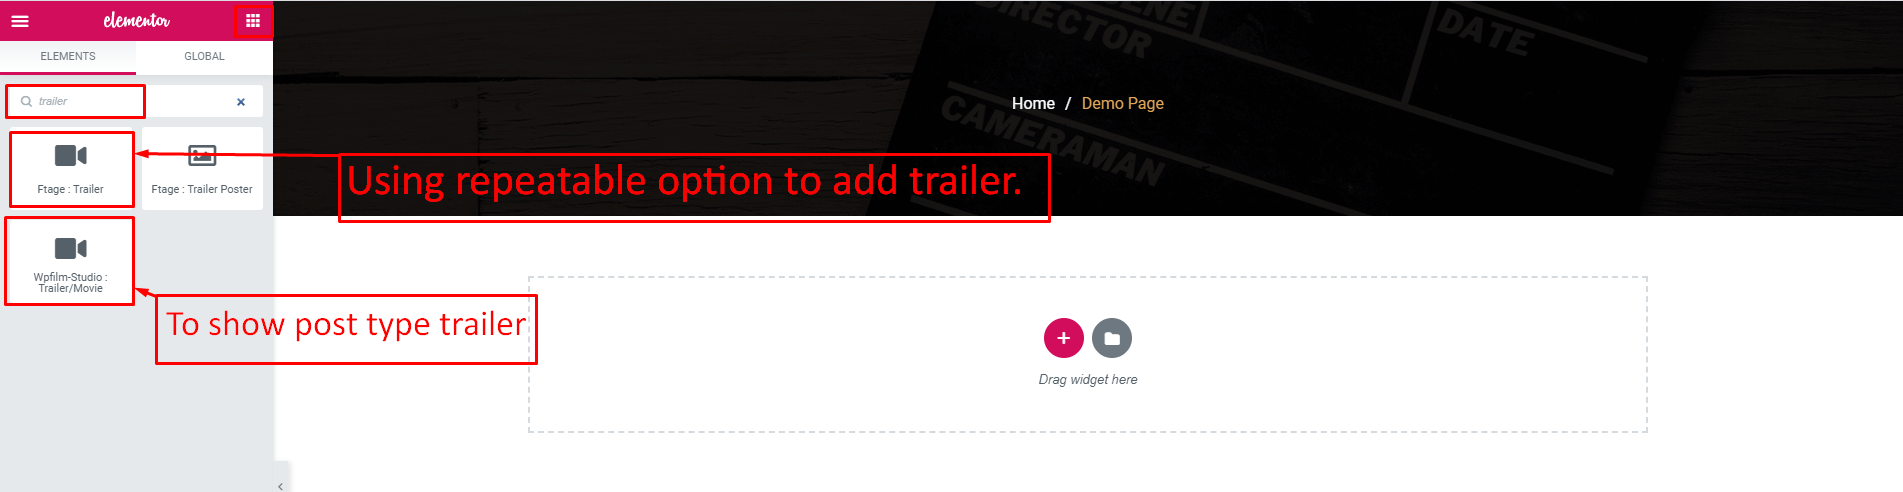
Select your Layout

Set the Trailer Typography

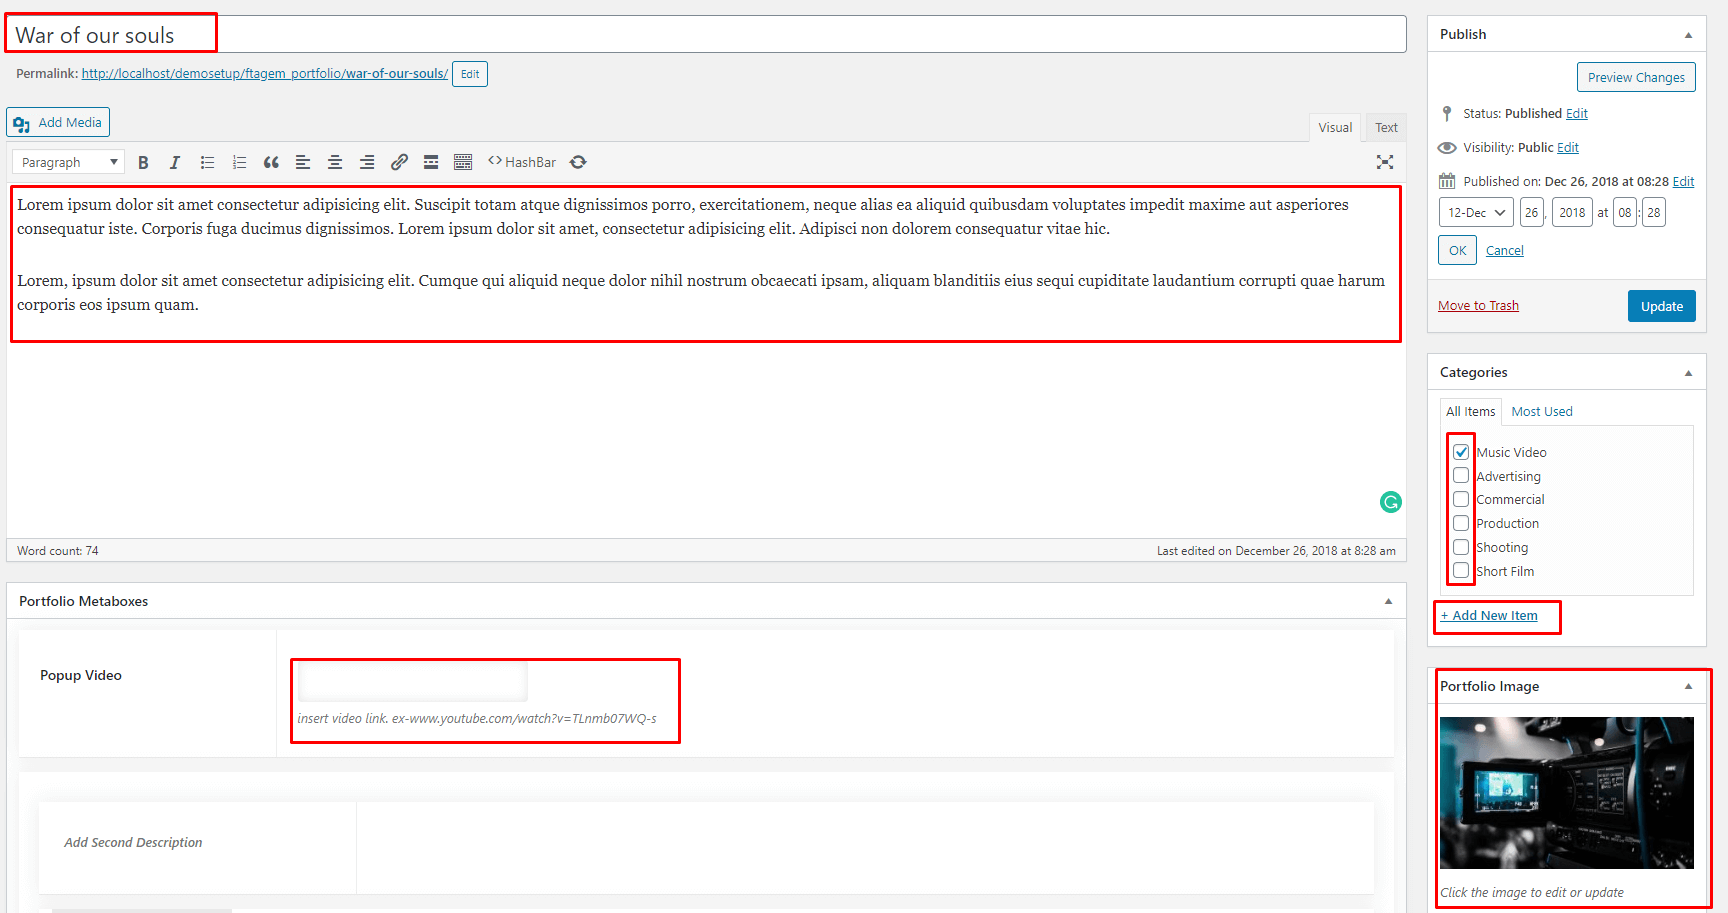
Movie Adding
1.Firstly add movie post then add Movie addon on a page
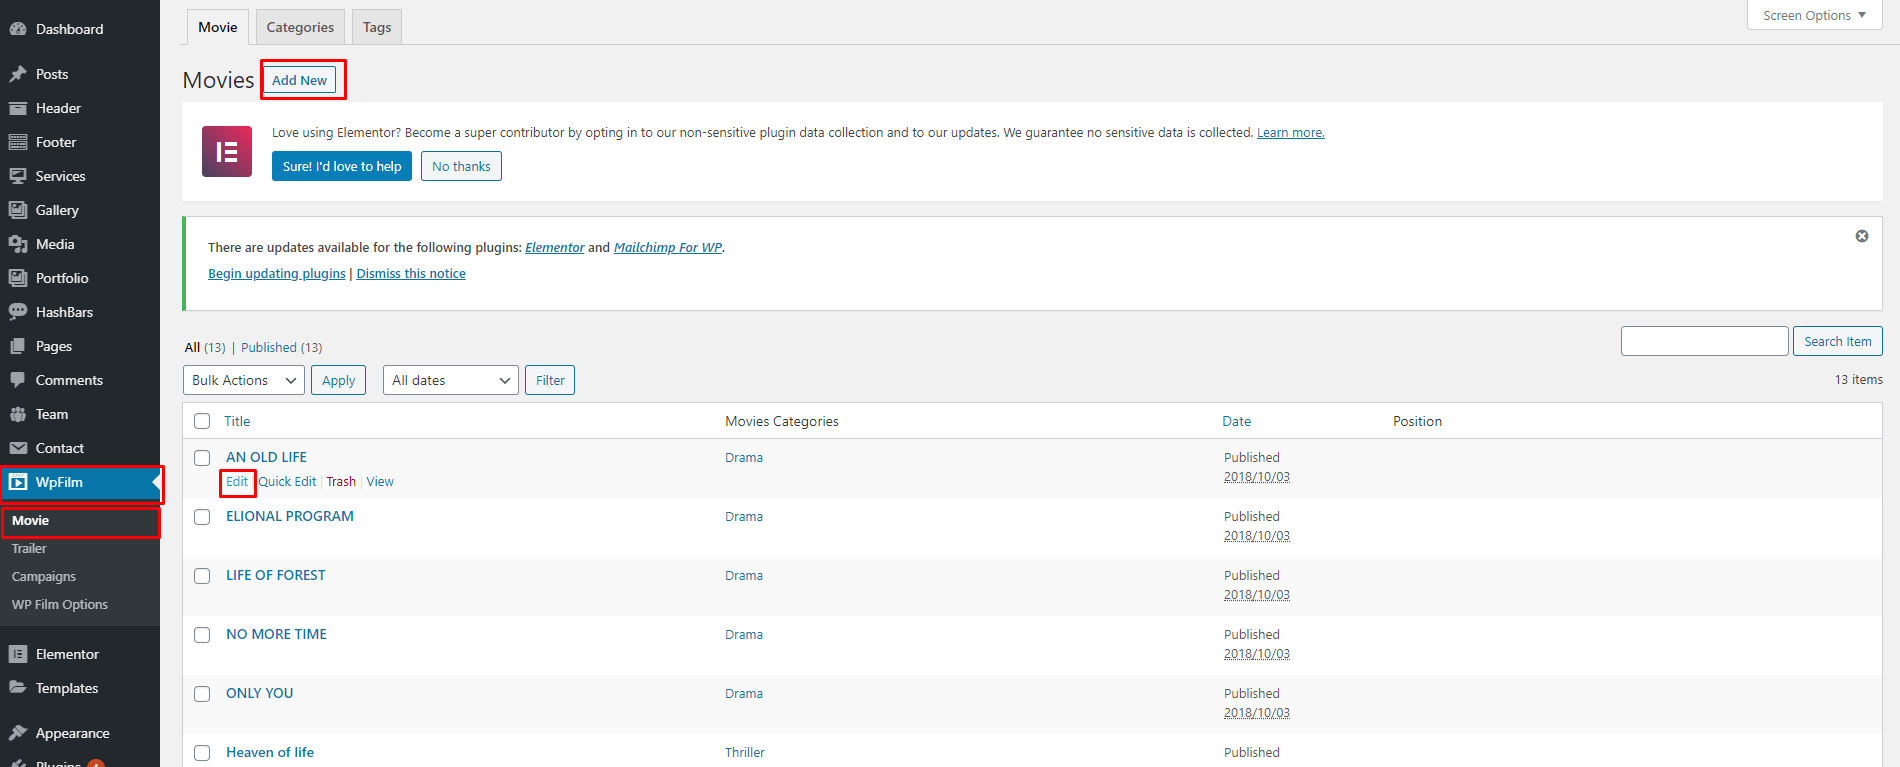
2. Add Movie Image and Content


3. Movie Addons Uses
After adding the movie post you can show the Movie list in a page by the following steps
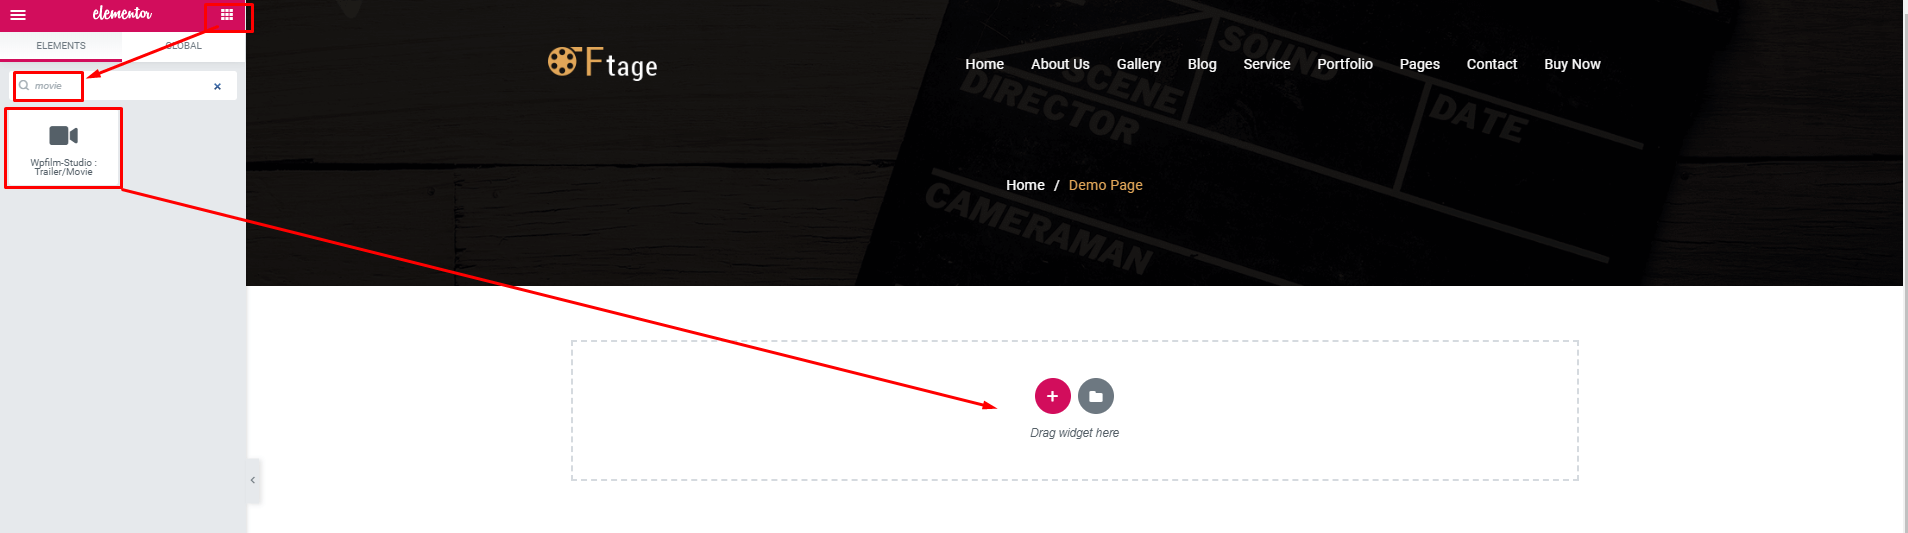
Select your Layout
Set the Movie Typography

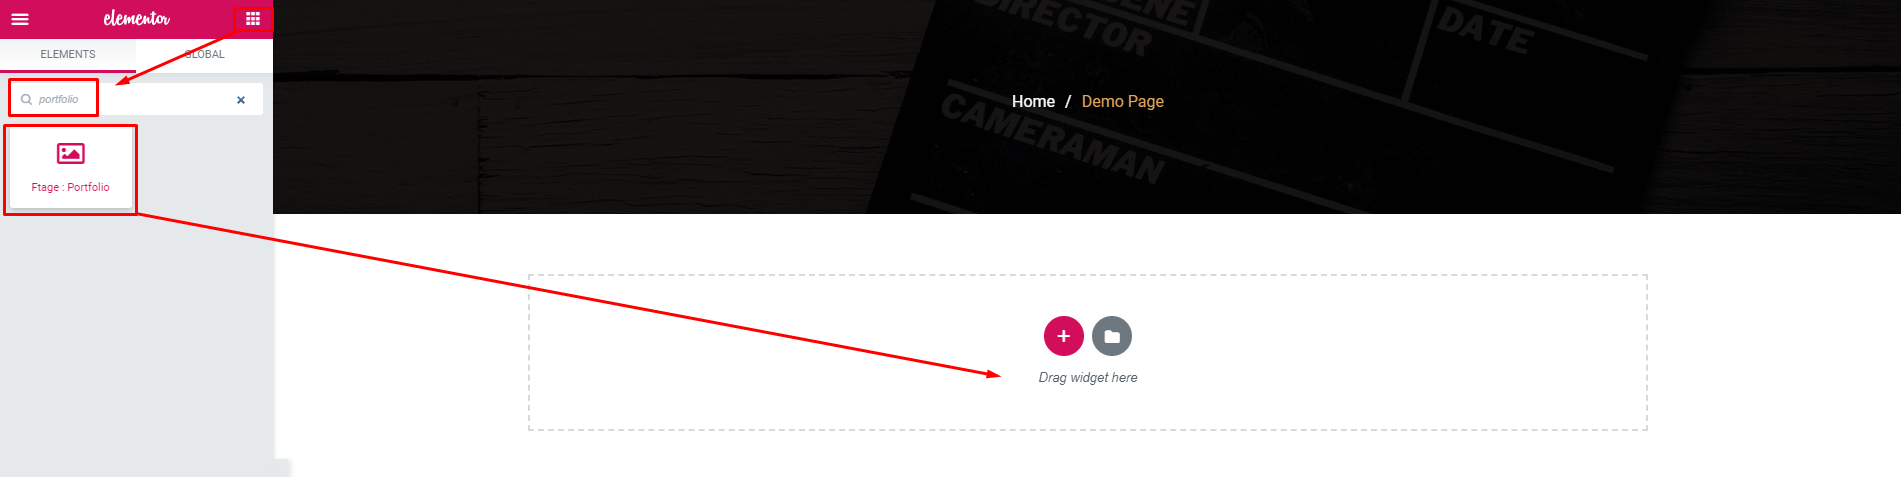
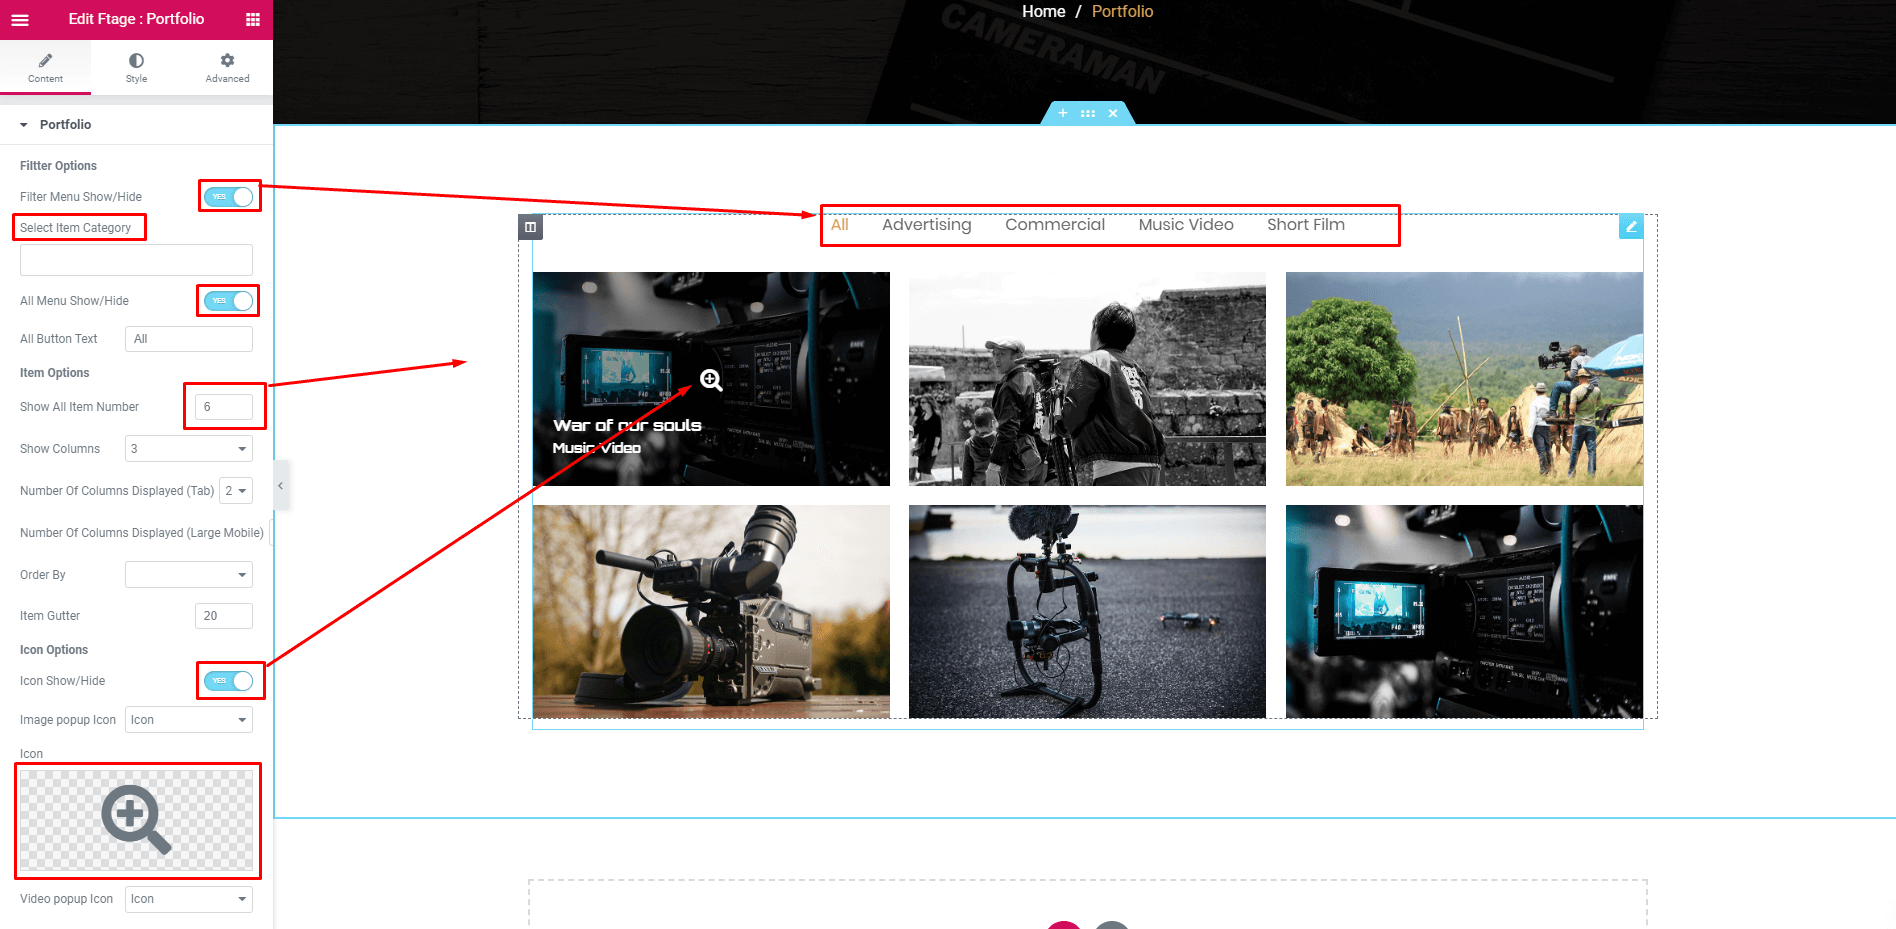
Portfolio Adding
1.Firstly add portfolio post then add Portfolio addon on a page

2. Add Portfolio Image and Content

3. Portfolio Addons Uses
After adding the portfolio post you can show the Portfolio list in a page by the following steps

Services Adding
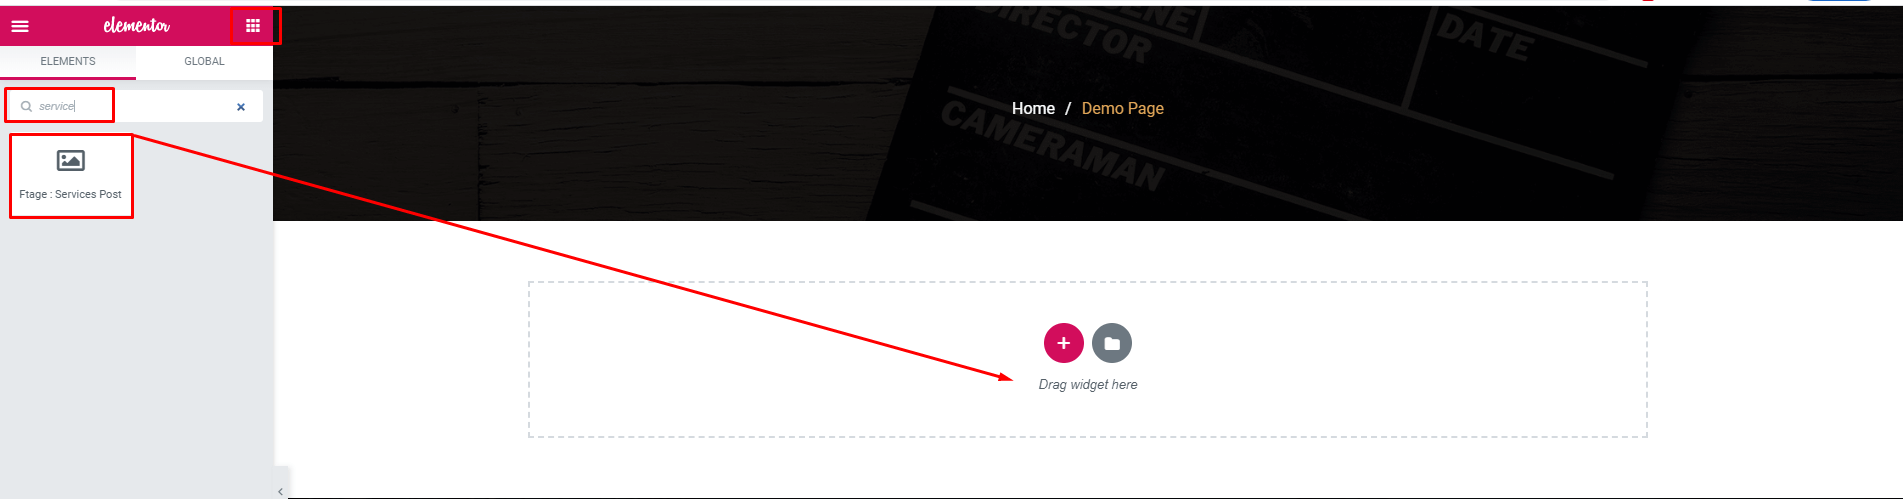
1.Firstly add service post then add Services addon on a page
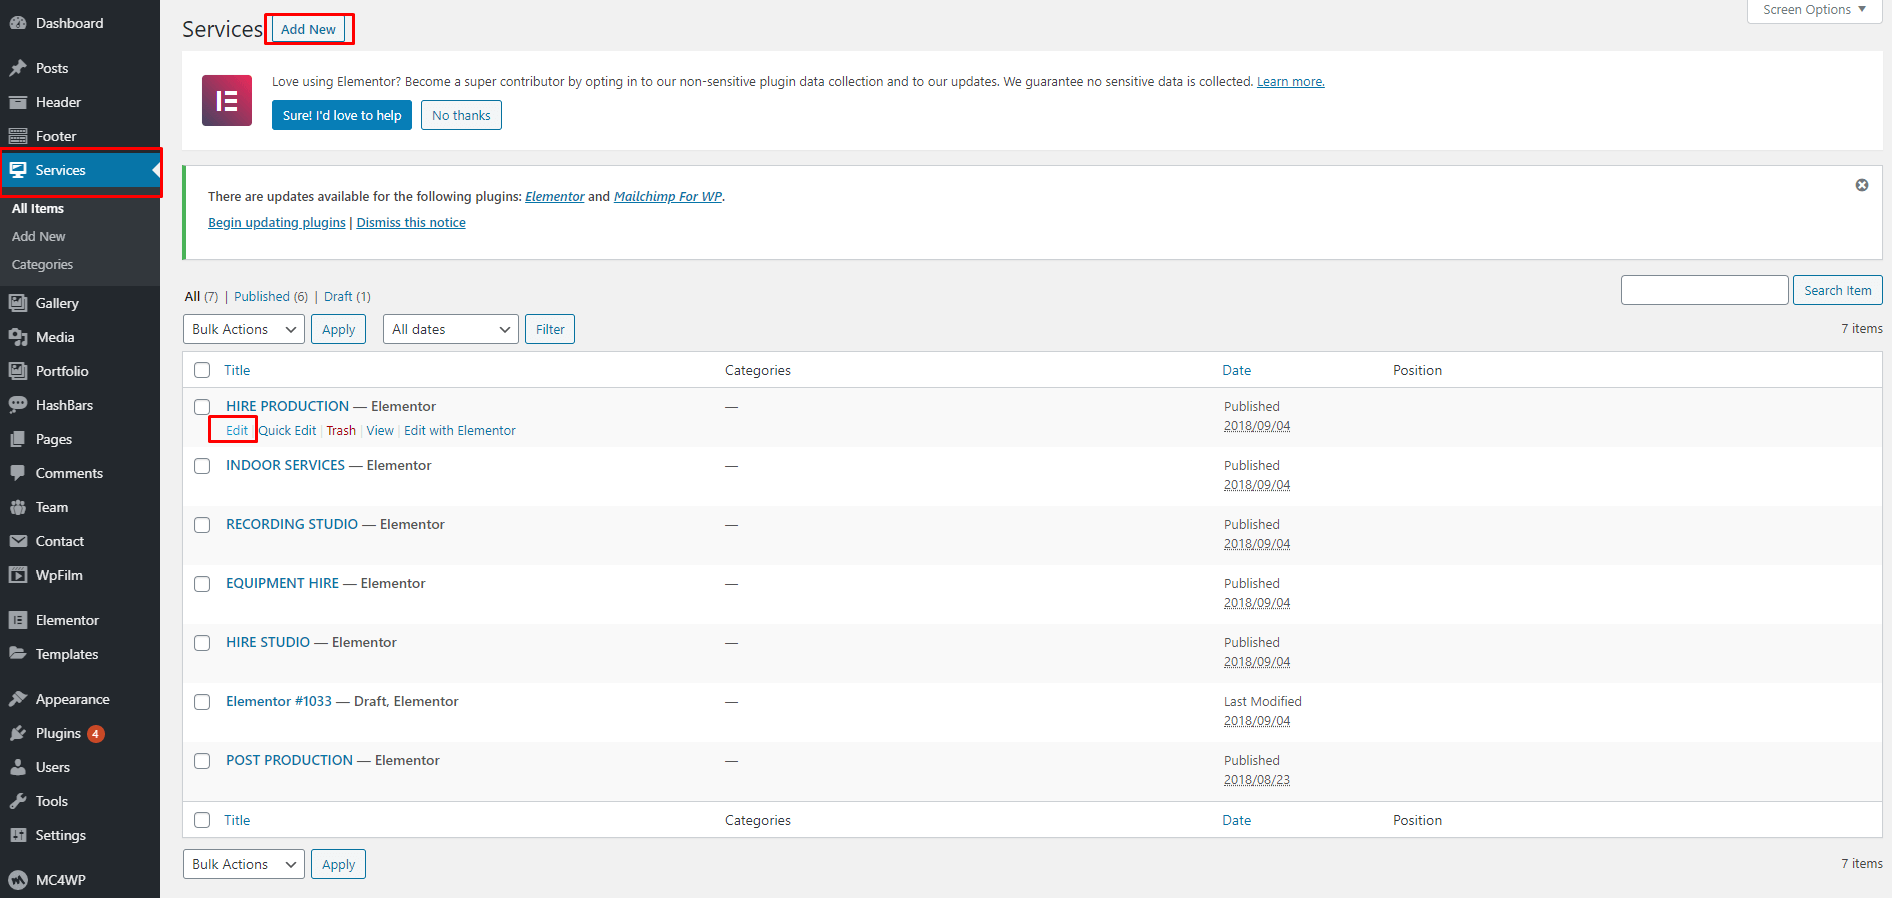
2. Add Services Image and Content
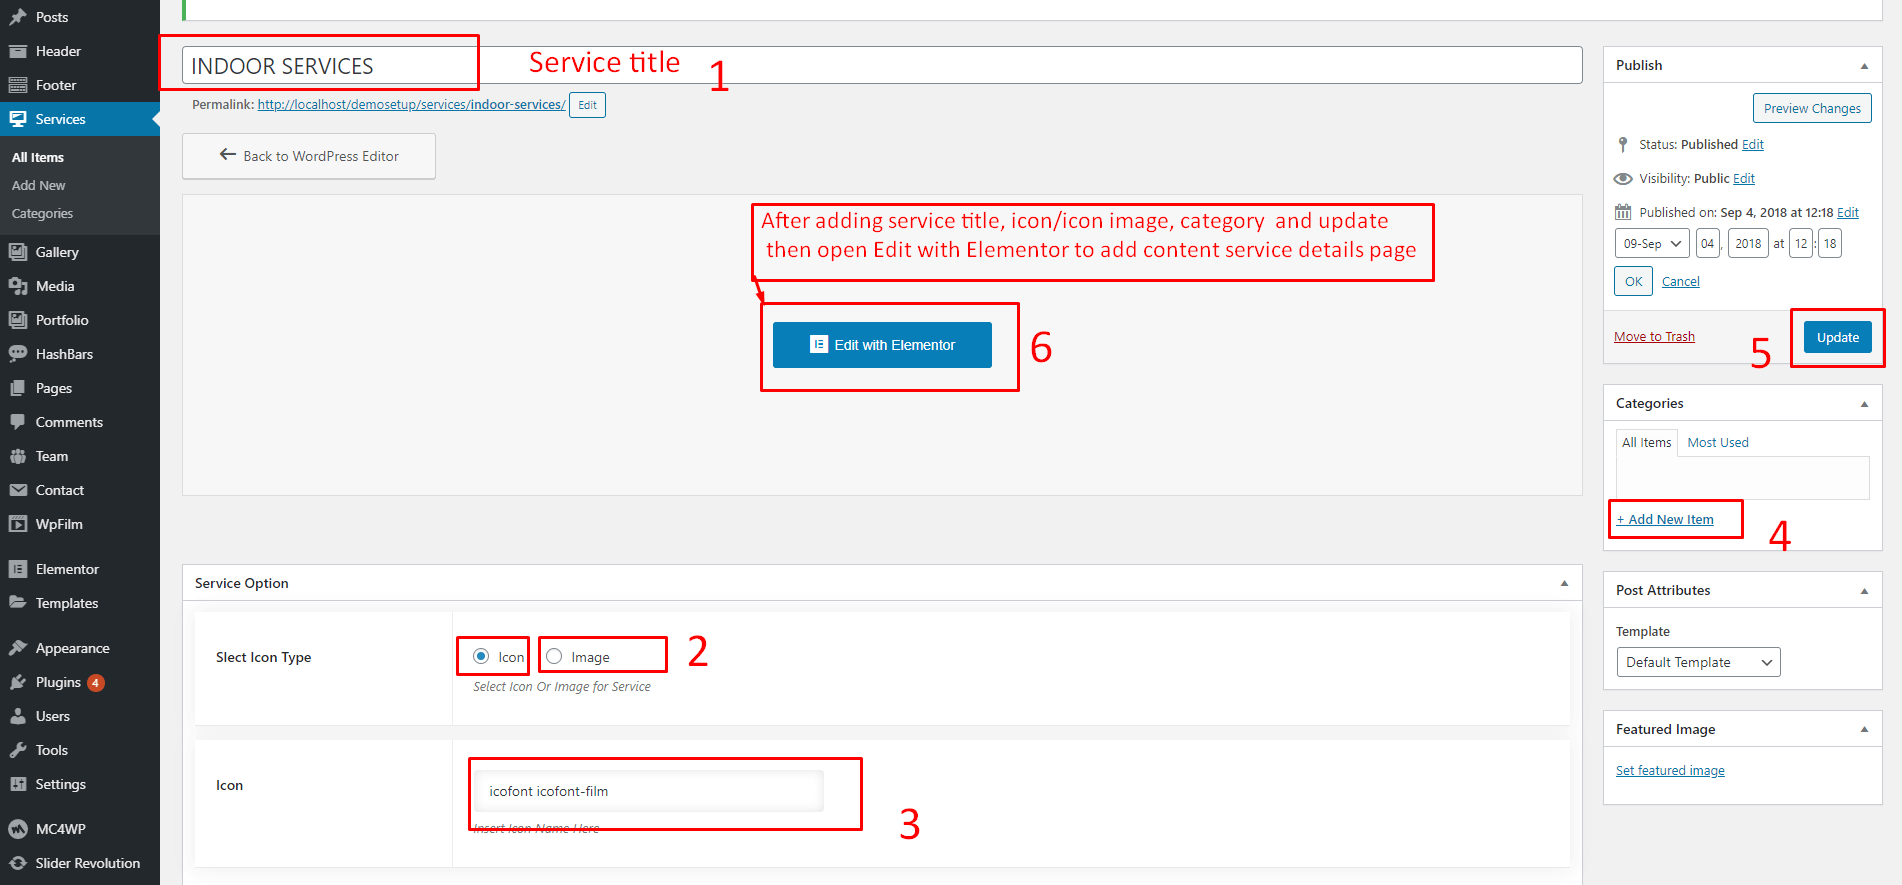

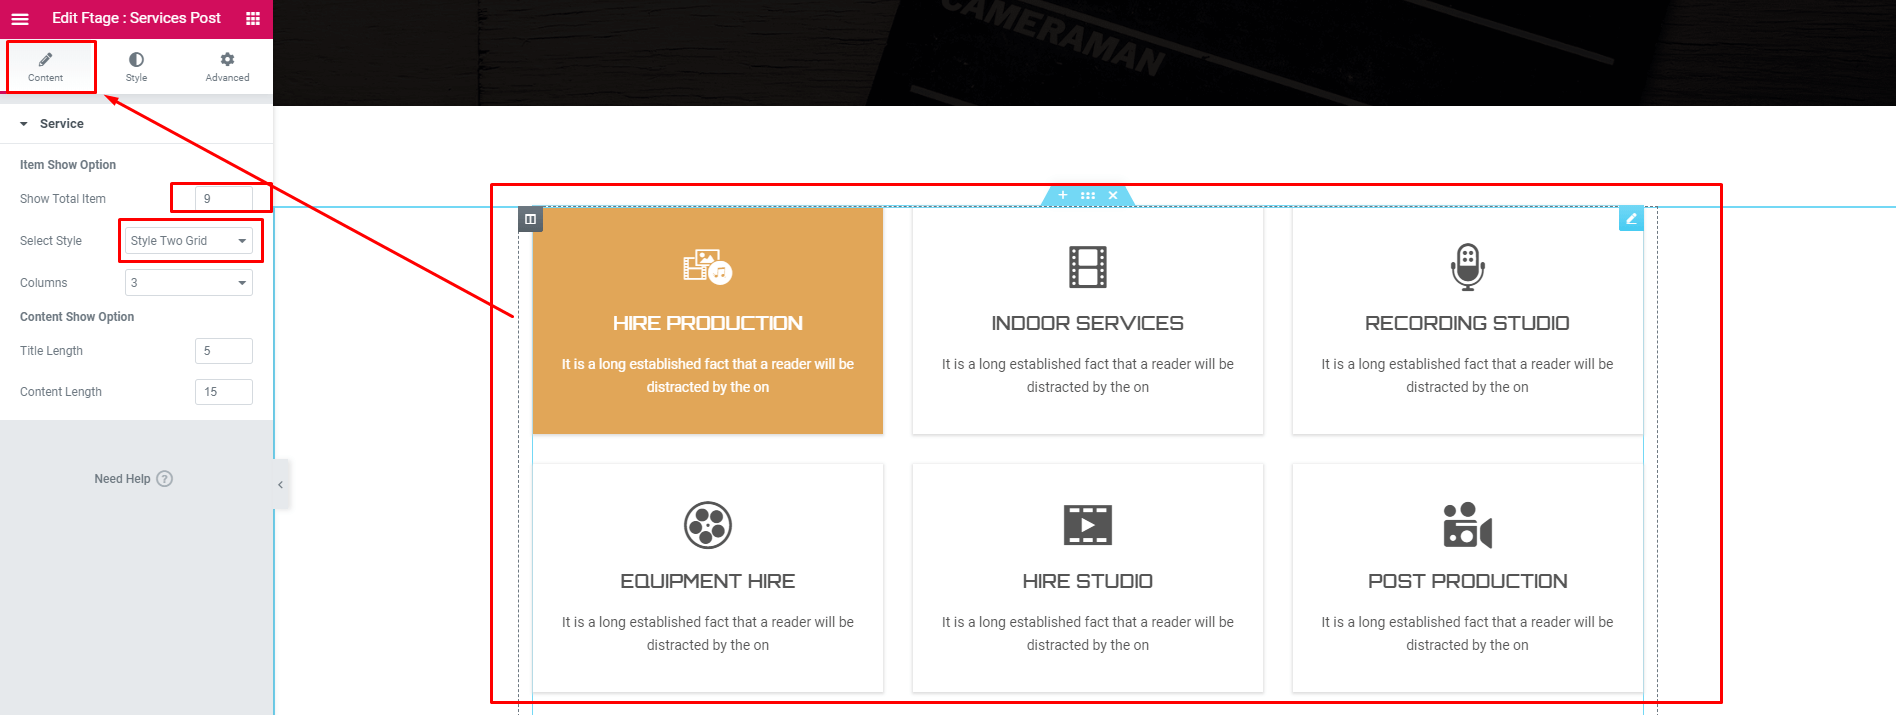
3. Services Addons Uses
After adding the service post you can show the Services list in a page by the following steps

How to update theme
1. First of all keep a backup of your theme, then you need to install Twenty seventeen / fifteen / sixteentheme
2. Delete the main theme

3. Upload new theme and activate.
Everything is okay have fun, if its not there is something wrong happened, please try to do the same process again.
Update Log
1.0 Initial Release
Date:    30-05-2019
Version: 3.0.3
==============================

1. Included :   Team Details Page
2. Updated  :   Elementor Core Plugin
3. Fixed    :   Portfolio Addon(Image loading and hover problem).
4. Fixed    :   Contact us Addon( Social share color problem).
5. Fixed    :   Latest Blog Addons(Meta default color problem).
6. Fixed    :   Header Page Title Problem Solved.
Date:    14-07-2019
Version: 3.1.0

==============================

1. Updated  :  WordPress 5.2.2
2. Included : Film Festival Home Version
3. Included : New Header Style
4. Included : Sticky logo and Mobile Logo Option
5. Included : Custom Page logo
6. Updated  : Core Plugin
7. Updated  : Testimonial Addon(Auto loop option add)
8. Updated  : Service Addon( Auto loop option add )
9. Updated  : Team Addon( Auto loop option add )
10. Updated : Slider Addon( New Style Add )
11. Updated : Section Title Addon( Border Problem )
12. Updated : Revolution Slider
13. Updated : Contact Us Addon(Social Icon Problem solved)
Date:    12-09-2019
Version: 3.1.1

==============================

1. Updated  :  WordPress 5.2.3
2. Updated  :  Slider Revolution
3. Updated  :  Core Plugin
4. Updated  :  Team Addon (Social link New tab Option)
5. Updated  :  Responsive


Date:    25-10-2019
Version: 3.1.2
==============================
1. Updated  :  WordPress 5.2.4
2. Updated  :  Elementor icon Version
3. Updated  :  Core Plugin
4. Updated  :  Team Addon Image size Option
5. Updated  :  Theme Option
Social Settings